Curtain Shield Airbag Assembly Removal
PRECAUTION
ALIGN FRONT WHEELS FACING STRAIGHT AHEAD
DISCONNECT CABLE FROM NEGATIVE BATTERY TERMINAL (for Manual Seat)
REMOVE FRONT SEAT HEADREST ASSEMBLY (for Manual Seat)
REMOVE SEAT TRACK COVER LH (for Manual Seat)
REMOVE INNER SEAT TRACK BRACKET COVER LH (for Manual Seat)
REMOVE FRONT SEAT ASSEMBLY LH (for Manual Seat)
REMOVE FRONT SEAT HEADREST ASSEMBLY (for Power Seat)
REMOVE INNER SEAT TRACK BRACKET COVER RH (for Power Seat)
REMOVE SEAT TRACK COVER LH (for Power Seat)
REMOVE FRONT SEAT ASSEMBLY LH (for Power Seat)
REMOVE FRONT SEAT HEADREST ASSEMBLY (for Manual Seat)
REMOVE SEAT TRACK COVER RH (for Manual Seat)
REMOVE INNER SEAT TRACK BRACKET COVER RH (for Manual Seat)
REMOVE FRONT SEAT ASSEMBLY RH (for Manual Seat)
REMOVE FRONT SEAT HEADREST ASSEMBLY (for Power Seat)
REMOVE SEAT TRACK COVER RH (for Power Seat)
REMOVE INNER SEAT TRACK BRACKET COVER LH (for Power Seat)
REMOVE FRONT SEAT ASSEMBLY RH (for Power Seat)
REMOVE REAR SEAT CUSHION ASSEMBLY
REMOVE REAR SEAT HEADREST ASSEMBLY
REMOVE REAR CENTER SEAT HEADREST ASSEMBLY
REMOVE SEPARATE TYPE REAR SEATBACK ASSEMBLY LH (for Fold Down Seat Type)
REMOVE SEPARATE TYPE REAR SEATBACK ASSEMBLY RH (for Fold Down Seat Type)
REMOVE REAR SIDE SEATBACK ASSEMBLY LH (for Fold Down Seat Type)
REMOVE REAR SIDE SEATBACK ASSEMBLY RH (for Fold Down Seat Type)
REMOVE REAR SEATBACK COVER (for Reclining Seat Type)
REMOVE SEPARATE TYPE REAR SEATBACK ASSEMBLY LH (for Reclining Seat Type)
REMOVE SEPARATE TYPE REAR SEATBACK ASSEMBLY RH (for Reclining Seat Type)
REMOVE CENTER SEATBACK ASSEMBLY (for Reclining Seat Type)
REMOVE REAR DOOR SCUFF PLATE LH
REMOVE REAR DOOR OPENING TRIM WEATHERSTRIP LH
REMOVE REAR DOOR SCUFF PLATE RH
REMOVE REAR DOOR OPENING TRIM WEATHERSTRIP RH
REMOVE RECLINING REMOTE CONTROL LEVER SUB-ASSEMBLY LH (for Reclining Seat Type)
REMOVE RECLINING REMOTE CONTROL LEVER SUB-ASSEMBLY RH (for Reclining Seat Type)
REMOVE REAR DOOR INSIDE HANDLE BEZEL PLUG LH
REMOVE DOOR ASSIST GRIP COVER LH
REMOVE REAR DOOR TRIM BOARD SUB-ASSEMBLY LH
REMOVE REAR DOOR INNER GLASS WEATHERSTRIP LH
REMOVE FRONT DOOR SCUFF PLATE LH
REMOVE COWL SIDE TRIM SUB-ASSEMBLY LH
REMOVE FRONT DOOR OPENING TRIM WEATHERSTRIP LH
REMOVE LAP BELT OUTER ANCHOR COVER (for LH Side)
DISCONNECT FRONT SEAT OUTER BELT ASSEMBLY LH
REMOVE LOWER CENTER PILLAR GARNISH LH
REMOVE UPPER CENTER PILLAR GARNISH LH
REMOVE FRONT DOOR SCUFF PLATE RH
REMOVE COWL SIDE TRIM SUB-ASSEMBLY RH
REMOVE FRONT DOOR OPENING TRIM WEATHERSTRIP RH
REMOVE LAP BELT OUTER ANCHOR COVER (for RH Side)
DISCONNECT FRONT SEAT OUTER BELT ASSEMBLY RH
REMOVE LOWER CENTER PILLAR GARNISH RH
REMOVE UPPER CENTER PILLAR GARNISH RH
REMOVE ROOF SIDE INNER GARNISH LH
REMOVE ROOF SIDE INNER GARNISH RH
REMOVE FRONT PILLAR GARNISH LH
REMOVE FRONT PILLAR GARNISH RH
REMOVE ROOF CONSOLE BOX ASSEMBLY
REMOVE VISOR ASSEMBLY LH
REMOVE VISOR ASSEMBLY RH
REMOVE VISOR HOLDER
REMOVE FRONT ASSIST GRIP SUB-ASSEMBLY
REMOVE REAR ASSIST GRIP SUB-ASSEMBLY
REMOVE NO. 1 ROOM LIGHT ASSEMBLY (w/o Sliding Roof)
REMOVE SPOT LIGHT ASSEMBLY (w/ Sliding Roof)
REMOVE SUN ROOF OPENING TRIM MOULDING (w/ Sliding Roof)
REMOVE SUNSHADE TRIM HOLDER (w/ Rear Sunshade)
REMOVE ROOF HEADLINING ASSEMBLY (w/o Sliding Roof)
REMOVE ROOF HEADLINING ASSEMBLY (w/ Sliding Roof)
REMOVE CURTAIN SHIELD AIRBAG ASSEMBLY
Curtain Shield Airbag Assembly -- Removal |
- HINT:
- Use the same procedures for the RH side and LH side.
- The procedures listed below are for the LH side.
- CAUTION:
- Be sure to read "PRECAUTION" thoroughly before servicing (CAMRY_ACV40 RM000000KT1016X.html).
| 2. ALIGN FRONT WHEELS FACING STRAIGHT AHEAD |
| 3. DISCONNECT CABLE FROM NEGATIVE BATTERY TERMINAL (for Manual Seat) |
- NOTICE:
- Wait for 90 seconds after disconnecting the cable to prevent airbag deployment.
| 4. REMOVE FRONT SEAT HEADREST ASSEMBLY (for Manual Seat) |
| 5. REMOVE SEAT TRACK COVER LH (for Manual Seat) |
Move the front seat assembly fully forward by operating the slide handle.
Using a screwdriver, disengage the 4 claws and remove the seat track cover.
- HINT:
- Tape the screwdriver tip before use.
| 6. REMOVE INNER SEAT TRACK BRACKET COVER LH (for Manual Seat) |
Using a screwdriver, disengage the 4 claws and remove the inner seat track bracket cover.
- HINT:
- Tape the screwdriver tip before use.
| 7. REMOVE FRONT SEAT ASSEMBLY LH (for Manual Seat) |
Move the front seat assembly to the rearmost position by operating the slide handle.
Remove the 2 bolts on the front seat track bracket.
Move the front seat assembly fully forward by operating the slide handle.
Remove the 2 bolts on the rear seat track bracket.
Move the front seat assembly to the center position and adjust the seatback to the vertical position by operating the slide and reclining adjuster release handle.
Disconnect the connectors and clamp.
Remove the front seat assembly.
| 8. REMOVE FRONT SEAT HEADREST ASSEMBLY (for Power Seat) |
| 9. REMOVE INNER SEAT TRACK BRACKET COVER RH (for Power Seat) |
Using a screwdriver, detach the 4 claws and remove the inner seat track bracket cover.
| 10. REMOVE SEAT TRACK COVER LH (for Power Seat) |
Operate the power seat switch knob and move the seat to the position farthest forward.
Using a screwdriver, detach the 4 claws and remove the seat track cover.
- HINT:
- Tape the screwdriver tip before use.
| 11. REMOVE FRONT SEAT ASSEMBLY LH (for Power Seat) |
Operate the power seat switch knob and move the seat to the rearmost position.
Remove the 2 bolts on the front seat track bracket.
Operate the power seat switch knob and move the seat to the position farthest forward.
Remove the 2 bolts on the rear seat track bracket.
Disconnect the cable from the negative (-) battery terminal.
- CAUTION:
- Wait at least 90 seconds after disconnecting the cable from the negative (-) battery terminal to prevent the airbag and seat belt pretensioner from deploying (CAMRY_ACV40 RM000000KT1016X.html).
Disconnect the connectors under the seat. Then remove the front seat assembly.
| 12. REMOVE FRONT SEAT HEADREST ASSEMBLY (for Manual Seat) |
| 13. REMOVE SEAT TRACK COVER RH (for Manual Seat) |
- HINT:
- Use the same procedures for the RH side and the LH side.
| 14. REMOVE INNER SEAT TRACK BRACKET COVER RH (for Manual Seat) |
- HINT:
- Use the same procedures for the RH side and the LH side.
| 15. REMOVE FRONT SEAT ASSEMBLY RH (for Manual Seat) |
- HINT:
- Use the same procedures for the RH side and the LH side.
| 16. REMOVE FRONT SEAT HEADREST ASSEMBLY (for Power Seat) |
| 17. REMOVE SEAT TRACK COVER RH (for Power Seat) |
- HINT:
- Use the same procedures for the RH side and the LH side.
| 18. REMOVE INNER SEAT TRACK BRACKET COVER LH (for Power Seat) |
- HINT:
- Use the same procedures for the RH side and the LH side.
| 19. REMOVE FRONT SEAT ASSEMBLY RH (for Power Seat) |
- HINT:
- Use the same procedures for the RH side and the LH side.
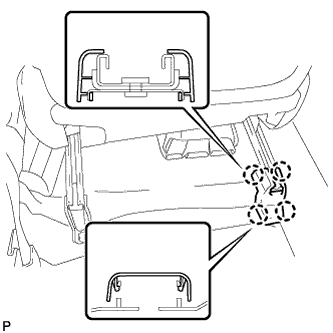
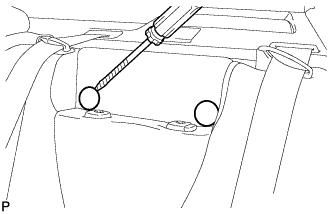
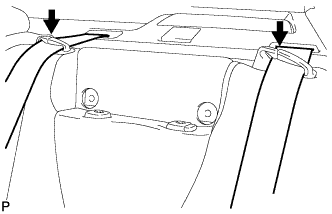
| 20. REMOVE REAR SEAT CUSHION ASSEMBLY |
Detach the 2 front hooks of the seat cushion from the vehicle body.
- NOTICE:
- Follow the instructions below carefully as the cushion frame can be deformed easily.
Choose a hook to detach first. Place your hands near the hook as shown in the illustration. Then lift the seat cushion to detach the hook.
Repeat the step above for the other hook.
Remove the seat cushion.
| 21. REMOVE REAR SEAT HEADREST ASSEMBLY |
| 22. REMOVE REAR CENTER SEAT HEADREST ASSEMBLY |
| 23. REMOVE SEPARATE TYPE REAR SEATBACK ASSEMBLY LH (for Fold Down Seat Type) |
Remove the 2 bolts and separate type rear seatback assembly LH.
| 24. REMOVE SEPARATE TYPE REAR SEATBACK ASSEMBLY RH (for Fold Down Seat Type) |
Remove the 2 bolts and separate type rear seatback assembly RH.
| 25. REMOVE REAR SIDE SEATBACK ASSEMBLY LH (for Fold Down Seat Type) |
Remove the bolt and rear side seatback assembly LH.
| 26. REMOVE REAR SIDE SEATBACK ASSEMBLY RH (for Fold Down Seat Type) |
- HINT:
- Use the same procedures for the RH side and LH side.
| 27. REMOVE REAR SEATBACK COVER (for Reclining Seat Type) |
Using a screwdriver, detach the claws and remove the 2 rear seatback covers.
- NOTICE:
- Tape the screwdriver tip before use.
- Use the same procedures for the RH side and LH side.
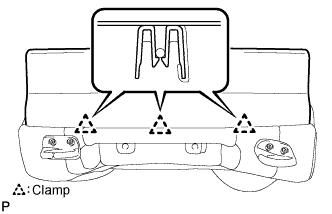
| 28. REMOVE SEPARATE TYPE REAR SEATBACK ASSEMBLY LH (for Reclining Seat Type) |
Separate the 2 rear seat belts.
Disengage the 3 clamps and then separate the cover.
Remove the 2 bolts and 2 nuts and separate type rear seatback assembly LH.
| 29. REMOVE SEPARATE TYPE REAR SEATBACK ASSEMBLY RH (for Reclining Seat Type) |
Separate the rear seat belt.
Disengage the 3 clamps and then separate the cover.
Remove the 2 bolts and 2 nuts and separate type rear seatback assembly RH.
| 30. REMOVE CENTER SEATBACK ASSEMBLY (for Reclining Seat Type) |
Remove the 2 bolts and center seatback assembly.
| 31. REMOVE REAR DOOR SCUFF PLATE LH |
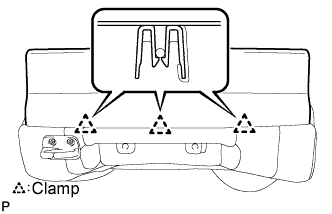
Disengage the 5 claws and 2 clips, and remove the rear door scuff plate LH.
| 32. REMOVE REAR DOOR OPENING TRIM WEATHERSTRIP LH |
| 33. REMOVE REAR DOOR SCUFF PLATE RH |
- HINT:
- Use the same procedures for the RH side and the LH side.
| 34. REMOVE REAR DOOR OPENING TRIM WEATHERSTRIP RH |
| 35. REMOVE RECLINING REMOTE CONTROL LEVER SUB-ASSEMBLY LH (for Reclining Seat Type) |
Remove the bolt.
Disengage the 2 clips and the claw and then separate the reclining remote control lever sub-assembly.
Separate the rear seat reclining control cable and remove the reclining remote control lever sub-assembly.
| 36. REMOVE RECLINING REMOTE CONTROL LEVER SUB-ASSEMBLY RH (for Reclining Seat Type) |
- HINT:
- Use the same procedures for the RH side and the LH side.
| 37. REMOVE REAR DOOR INSIDE HANDLE BEZEL PLUG LH |
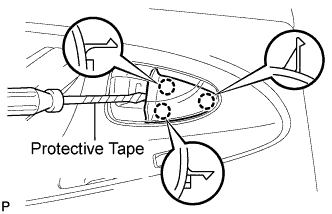
Using a screwdriver with the tip wrapped with protective tape, disengage the 3 claws and remove the rear door inside handle bezel plug.
| 38. REMOVE DOOR ASSIST GRIP COVER LH |
Using a screwdriver with the tip wrapped with protective tape, disengage the 6 claws and remove the door assist grip cover.
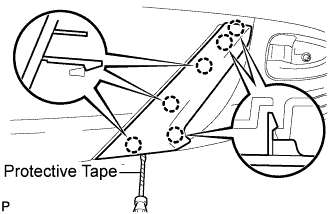
| 39. REMOVE REAR DOOR TRIM BOARD SUB-ASSEMBLY LH |
Remove the 3 screws.
Using a clip remover, disengage the 7 clips.
Raise the rear door trim board to disengage the 4 claws and remove the rear door trim board together with the rear door inner glass weatherstrip.
Disconnect the connector.
Disengage the 2 claws and disconnect the rear door inside handle sub-assembly.
Disengage the clip as shown in the illustration and remove the No. 1 door scuff plate clamp from the rear door trim board.
| 40. REMOVE REAR DOOR INNER GLASS WEATHERSTRIP LH |
Disengage the 3 clips as shown in the illustration and remove the rear door inner glass weatherstrip from the rear door trim board.
| 41. REMOVE FRONT DOOR SCUFF PLATE LH |
Disengage the 7 claws and 3 clips, and remove the front door scuff plate LH.
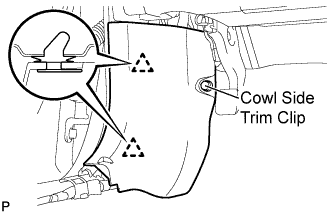
| 42. REMOVE COWL SIDE TRIM SUB-ASSEMBLY LH |
Remove the cowl side trim clip.
Disengage the 2 clips and remove the cowl side trim sub-assembly LH.
| 43. REMOVE FRONT DOOR OPENING TRIM WEATHERSTRIP LH |
| 44. REMOVE LAP BELT OUTER ANCHOR COVER (for LH Side) |
Disengage the 3 claws and remove the lap belt outer anchor cover.
| 45. DISCONNECT FRONT SEAT OUTER BELT ASSEMBLY LH |
Remove the bolt and disconnect the floor end of the front seat outer belt assembly LH.
| 46. REMOVE LOWER CENTER PILLAR GARNISH LH |
Disengage the 2 claws and 2 clips, and remove the lower center pillar garnish LH.
| 47. REMOVE UPPER CENTER PILLAR GARNISH LH |
Remove the bolt.
Disengage the clip and remove the upper center pillar garnish LH.
| 48. REMOVE FRONT DOOR SCUFF PLATE RH |
- HINT:
- Use the same procedures for the RH side and the LH side.
| 49. REMOVE COWL SIDE TRIM SUB-ASSEMBLY RH |
- HINT:
- Use the same procedures for the RH side and the LH side.
| 50. REMOVE FRONT DOOR OPENING TRIM WEATHERSTRIP RH |
| 51. REMOVE LAP BELT OUTER ANCHOR COVER (for RH Side) |
- HINT:
- Use the same procedures for the RH side and the LH side.
| 52. DISCONNECT FRONT SEAT OUTER BELT ASSEMBLY RH |
- HINT:
- Use the same procedures for the RH side and the LH side.
| 53. REMOVE LOWER CENTER PILLAR GARNISH RH |
- HINT:
- Use the same procedures for the RH side and the LH side.
| 54. REMOVE UPPER CENTER PILLAR GARNISH RH |
- HINT:
- Use the same procedures for the RH side and the LH side.
| 55. REMOVE ROOF SIDE INNER GARNISH LH |
Disengage the 5 clips and 2 claws, and remove the roof side inner garnish LH.
| 56. REMOVE ROOF SIDE INNER GARNISH RH |
- HINT:
- Use the same procedures for the RH side and the LH side.
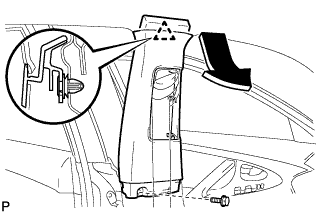
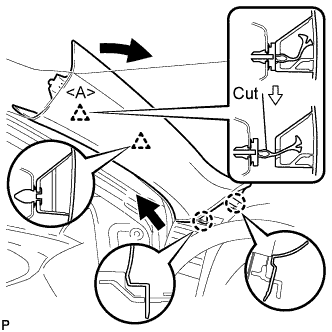
| 57. REMOVE FRONT PILLAR GARNISH LH |
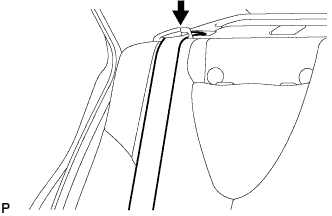
Pull the upper part of the garnish toward the inside of the cabin and disengage the 2 clips.
Cut off the clip <A>.
Disengage the 2 claws and remove the front pillar garnish LH.
Remove the clip <A> from the vehicle body.
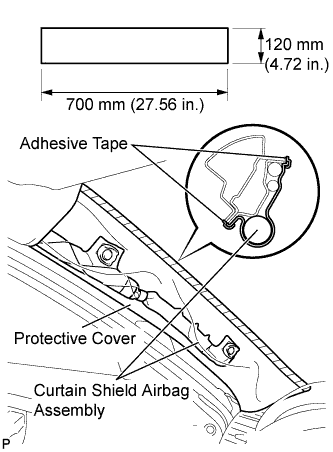
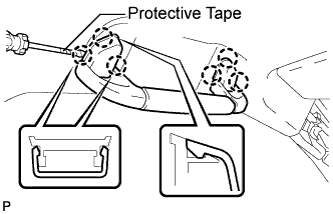
Protect the curtain shield airbag assembly.
Cover the airbag with a 700 mm (27.56 in.) x 120 mm (4.72 in.) cloth or piece of nylon and fix the ends of the cover with tape, as shown in the illustration.
- NOTICE:
- Cover the curtain shield airbag with a protective cover as soon as the front pillar garnish is removed.
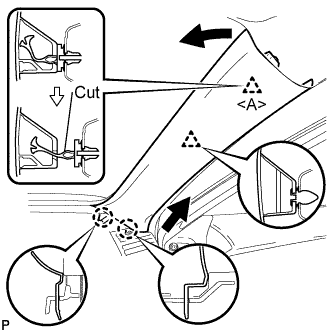
| 58. REMOVE FRONT PILLAR GARNISH RH |
Pull the upper part of the garnish toward the inside of the cabin and disengage the 2 clips.
Cut off the clip <A>.
Disengage the 2 claws and remove the front pillar garnish RH.
Remove the clip <A> from the vehicle body.
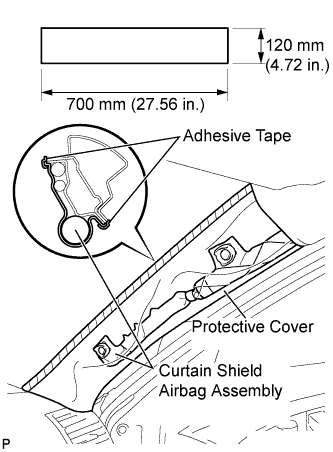
Protect the curtain shield airbag assembly.
Cover the airbag with a 700 mm (27.56 in.) x 120 mm (4.72 in.) cloth or piece of nylon and fix the ends of the cover with tape, as shown in the illustration.
- NOTICE:
- Cover the curtain shield airbag with a protective cover as soon as the front pillar garnish is removed.
| 59. REMOVE ROOF CONSOLE BOX ASSEMBLY |
Using a moulding remover, disengage the 2 clips and 2 claws.
Disconnect the connectors and remove the roof console box assembly.
| 60. REMOVE VISOR ASSEMBLY LH |
Using a moulding remover, disengage the 4 claws and remove the visor bracket cover.
Disengage the 2 clips and remove the visor assembly LH.
| 61. REMOVE VISOR ASSEMBLY RH |
- HINT:
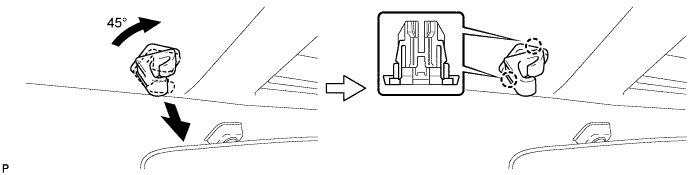
- Use the same procedures for the RH side and the LH side.
Turn the visor holder approximately 45°and pull it out as shown in the illustration.
Disengage the 2 claws and remove the visor holder.
- HINT:
- Use the same procedures for the RH side and the LH side.
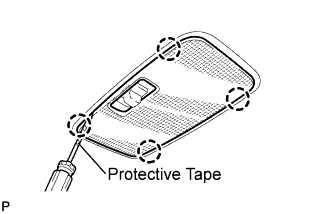
| 63. REMOVE FRONT ASSIST GRIP SUB-ASSEMBLY |
Using a screwdriver, disengage the 6 claws and remove the 2 assist grip covers.
- HINT:
- Tape the screwdriver tip before use.
Disengage the 2 clips and remove the front assist grip sub-assembly.
- HINT:
- Use the same procedures for the RH side and the LH side.
| 64. REMOVE REAR ASSIST GRIP SUB-ASSEMBLY |
- HINT:
- Use the same procedures for the rear side and the front side.
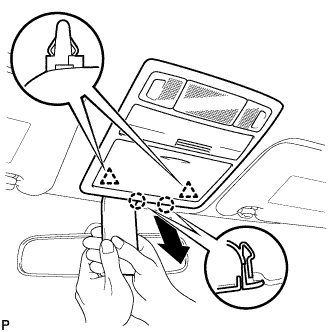
| 65. REMOVE NO. 1 ROOM LIGHT ASSEMBLY (w/o Sliding Roof) |
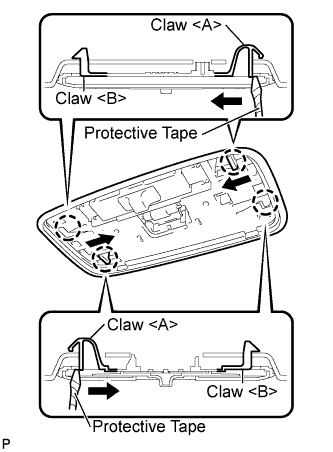
Using a screwdriver, disengage the 4 claws and remove the lens cover.
- HINT:
- Tape the screwdriver tip before use.
Using a screwdriver, disengage the 2 claws <A> as shown in the illustration.
- HINT:
- Tape the screwdriver tip before use.
Disengage the 2 claws <B> and remove the No. 1 room light assembly.
Disconnect the room light connector.
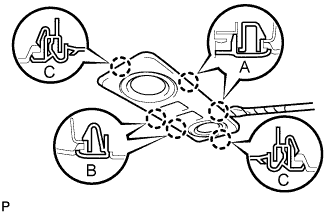
| 66. REMOVE SPOT LIGHT ASSEMBLY (w/ Sliding Roof) |
Using a screwdriver, disengage the 2 claws labeled A and 2 claws labeled B from the vehicle body.
- HINT:
- Tape the screwdriver tip before use.
Using a screwdriver, disengage the 2 claws labeled C and remove the spot light assembly from the headlining.
- HINT:
- Tape the screwdriver tip before use.
Using a screwdriver, disengage the 4 claws.
- HINT:
- Tape the screwdriver tip before use.
Pull the light bulb holder in the direction indicated by the arrow in the illustration to detach the claw. Then remove the spot light assembly from the light bulb holder.
| 67. REMOVE SUN ROOF OPENING TRIM MOULDING (w/ Sliding Roof) |
Remove the sun roof opening trim moulding.
| 68. REMOVE SUNSHADE TRIM HOLDER (w/ Rear Sunshade) |
Using a screwdriver, turn the pin of each sunshade trim holder 90°.
Disengage the 2 claws and remove the sunshade trim holder.
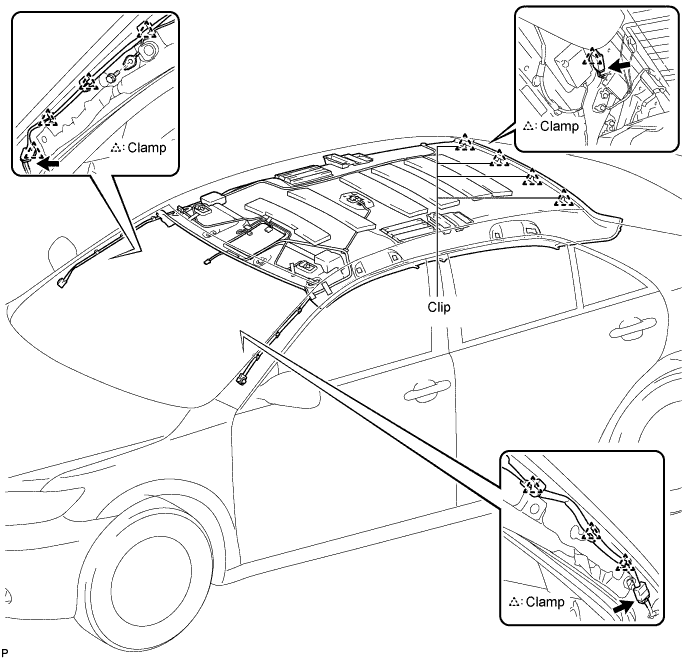
| 69. REMOVE ROOF HEADLINING ASSEMBLY (w/o Sliding Roof) |
Disconnect the No. 1 roof wire connector and disengage each clamp from the front pillar LH.
Remove the bolt and disconnect the radio setting condenser from the front pillar RH.
Disconnect the antenna cord sub-assembly connector and disengage each clamp from the front pillar RH.
Disconnect the antenna cord sub-assembly connector and disengage the clamp from the rear pillar RH.
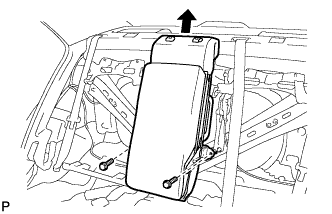
Disengage the 4 clips.
Remove the roof headlining assembly from the vehicle through the rear left door.
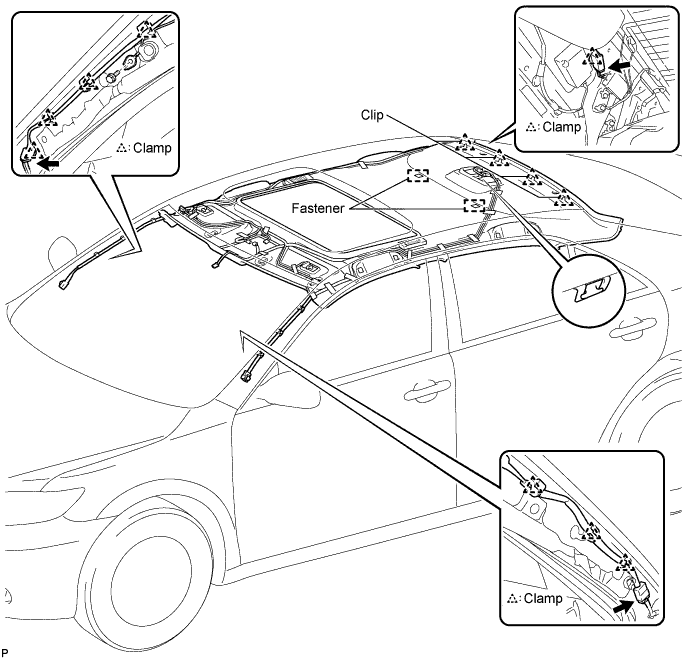
| 70. REMOVE ROOF HEADLINING ASSEMBLY (w/ Sliding Roof) |
Disconnect the No. 1 roof wire connector and disengage each clamp from the front pillar LH.
Remove the bolt and disconnect the radio setting condenser from the front pillar RH.
Disconnect the antenna cord sub-assembly connector and disengage each clamp from the front pillar RH.
Disconnect the antenna cord sub-assembly connector and disengage the clamp from the rear pillar RH.
Disconnect the sliding roof drive gear connector.
Disengage the hook, 4 clips, and 2 fasteners.
Remove the roof headlining assembly from the vehicle through the rear left door.
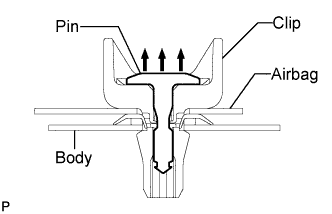
| 71. REMOVE CURTAIN SHIELD AIRBAG ASSEMBLY |
Disconnect the connector.
- NOTICE:
- When handling the airbag connector, take care not to damage the airbag wire harness.
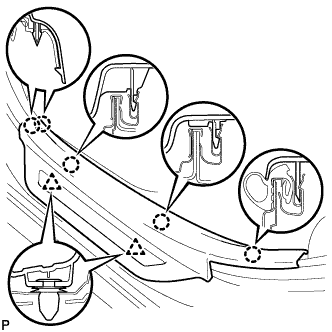
Remove the 4 clips.
Using a clip remover, remove the pin.
Using needle-nose pliers, remove the clip and curtain shield airbag from the body as shown in the illustration.
Remove the 5 bolts and curtain shield airbag assembly.
Remove the 4 clips and 4 spacers from the curtain shield airbag assembly.
- NOTICE:
- If clips and spacers are removed, always replace them with new ones even though they may not appear to be damaged.