Parking Brake Assembly -- Reassembly |
| 1. APPLY HIGH TEMPERATURE GREASE |
Apply high temperature grease to the backing plate which makes contact with the shoe.
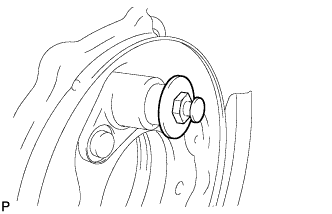
| 2. INSTALL PARKING BRAKE SHOE GUIDE PLATE |
Apply adhesive to the threads of the parking brake shoe guide plate set bolt.
- Adhesive:
- Toyota Genuine Adhesive 1344, Three Bond 1344 or equivalent
Install the parking brake shoe guide plate with the parking brake shoe guide plate set bolt.
- Torque:
- 18 N*m{184 kgf*cm, 13 ft.*lbf}
 |
| 3. INSTALL PARKING BRAKE SHOE LEVER |
Install the parking brake shoe lever and shim to the No. 2 parking brake shoe assembly with a new C-washer.
 |
Using a feeler gauge, measure the clearance between the No. 2 parking brake shoe assembly and parking brake shoe lever.
- Standard clearance:
- Less than 0.35 mm (0.014 in.)
Shim Thickness Shim Thickness 0.3 mm (0.012 in.) 0.9 mm (0.035 in.) 0.6 mm (0.024 in.) -
 |
| 4. INSTALL NO. 2 PARKING BRAKE SHOE ASSEMBLY |
Using needle-nose pliers, connect the No. 3 parking brake cable assembly to the parking brake shoe lever.
 |
Install the No. 2 parking brake shoe assembly with the parking brake shoe hold down spring No. 2 pin, the parking brake shoe hold down spring No. 2 cup, the parking brake shoe hold down spring and the parking brake shoe hold down spring No. 1 cup.
 |
Engage the claw of the parking brake shoe hold down spring No. 1 cup to the No. 2 parking brake shoe assembly.
| 5. INSTALL PARKING BRAKE SHOE ADJUSTING SCREW SET |
Apply high temperature grease to the parking brake adjusting screw as shown in the illustration.
 |
Install the parking brake shoe return tension No. 2 spring to the No. 1 parking brake shoe assembly and the No. 2 parking brake shoe assembly.
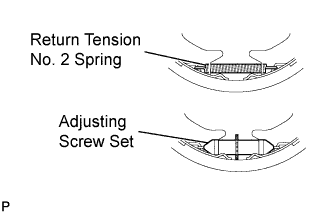 |
Install the parking brake shoe adjusting screw set to the No. 1 parking brake shoe assembly and the No. 2 parking brake shoe assembly.
| 6. INSTALL NO. 1 PARKING BRAKE SHOE ASSEMBLY |
Install the No. 1 parking brake shoe assembly with the parking brake shoe hold down spring No. 1 pin, parking brake shoe hold down spring No. 2 cup, parking brake shoe hold down spring and parking brake shoe hold down spring No. 1 cup.
 |
| 7. INSTALL PARKING BRAKE SHOE STRUT |
Attach the parking brake shoe strut and the parking brake shoe strut compression spring to the No. 1 parking brake shoe assembly and No. 2 parking brake shoe assembly.
| 8. INSTALL PARKING BRAKE SHOE RETURN TENSION NO. 1 SPRING |
Using needle-nose pliers, install the 2 parking brake shoe return tension No. 1 springs.
- HINT:
- First install the front side spring and then the rear side spring.
 |
| 9. CHECK PARKING BRAKE INSTALLATION |
Check that each part is installed properly.
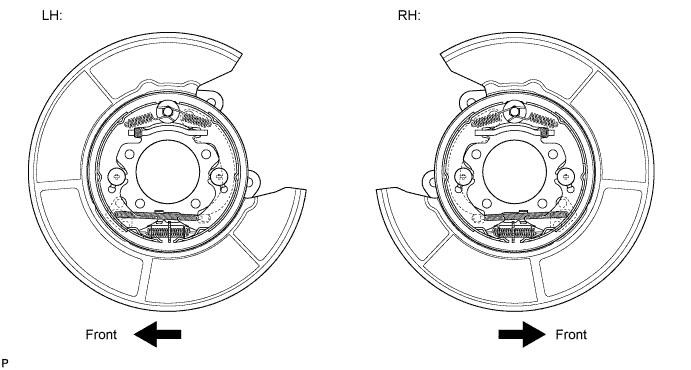
- NOTICE:
- There should be no oil or grease on the friction surface of the shoe lining and disc.
| 10. INSTALL REAR DISC |
Align the matchmarks and install the rear disc.
| 11. ADJUST PARKING BRAKE SHOE CLEARANCE |
Temporarily install the hub nuts.
Remove the shoe adjusting hole plug.
Turn the shoe adjuster and expand the shoe until the disc locks.
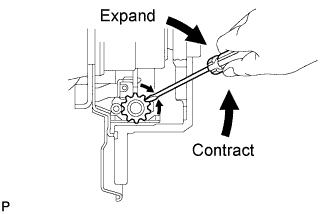 |
Turn and contract the shoe adjuster until the disc can rotate smoothly.
- Standard:
- Return 8 notches.
Check that there is no brake drag against the shoe.
Install the shoe adjusting hole plug.
Remove the hub nuts.
| 12. INSTALL REAR DISC BRAKE CALIPER ASSEMBLY |
Install the rear disc brake caliper assembly with the 2 bolts.
- Torque:
- 62 N*m{632 kgf*cm, 46 ft.*lbf}
 |
| 13. INSTALL REAR WHEEL |
- Torque:
- 103 N*m{1,050 kgf*cm, 76 ft.*lbf}
| 14. INSPECT PARKING BRAKE LEVER TRAVEL (for Manual Transaxle) |
Pull the parking brake lever firmly.
Release the parking brake lock, and return the parking brake lever to its off position.
Slowly pull the parking brake lever all the way up, and count the number of clicks.
- Parking brake lever travel:
- 7 to 9 notches at 200 N (20 kgf, 45 lbf)
 |
| 15. INSPECT PARKING BRAKE PEDAL TRAVEL (for Automatic Transaxle) |
Fully depress the parking brake pedal and release it to engage the parking brake.
Depress the pedal to the floor again, and release it to disengage the parking brake.
Slowly depress the parking brake pedal to the floor, and count the number of clicks.
- Parking brake pedal travel:
- 7 to 10 notches at 300 N (31 kgf, 67 lbf)
 |
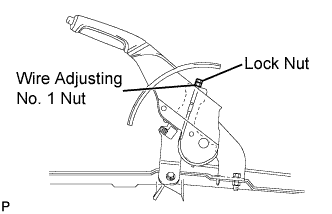
| 16. ADJUST PARKING BRAKE LEVER TRAVEL (for Manual Transaxle) |
Pull up the parking brake lever. Hold the No. 1 wire adjusting nut using a wrench and loosen the lock nut.
 |
Release the parking brake lever.
Turn the No. 1 wire adjusting nut until the parking brake lever travel meets the above specification.
Hold the No. 1 wire adjusting nut using a wrench or an equivalent tool and tighten the lock nut.
- Torque:
- 5.0 N*m{51 kgf*cm, 44 in.*lbf}
Count the number of clicks after depressing and releasing the parking brake lever 3 or 4 times.
Check whether the parking brake drags.
When operating the parking brake lever, check that the parking brake indicator light comes on.
| 17. ADJUST PARKING BRAKE PEDAL TRAVEL (for Automatic Transaxle) |
Depress the parking brake pedal. Hold the No. 1 wire adjusting nut using a wrench and loosen the lock nut.
 |
Release the parking brake pedal.
Turn the No. 1 wire adjusting nut until the parking brake pedal travel meets the above specification.
Hold the No. 1 wire adjusting nut using a wrench or an equivalent tool and tighten the lock nut.
- Torque:
- 5.4 N*m{55 kgf*cm, 48 in.*lbf}
Count the number of clicks after depressing and releasing the parking brake pedal 3 or 4 times.
Check whether the parking brake drags.
When operating the parking brake pedal, check that the parking brake indicator light comes on.