Rear No. 1 Suspension Arm Removal
REMOVE REAR WHEEL
REMOVE CENTER EXHAUST PIPE ASSEMBLY (for 2AZ-FE)
REMOVE TAIL EXHAUST PIPE ASSEMBLY (for 2GR-FE)
REMOVE CENTER EXHAUST PIPE ASSEMBLY (for 2GR-FE)
SEPARATE REAR STABILIZER LINK ASSEMBLY LH
SEPARATE REAR STABILIZER LINK ASSEMBLY RH
REMOVE REAR STABILIZER BAR NO. 2 BRACKET
REMOVE REAR STABILIZER BAR NO. 1 BRACKET
REMOVE REAR STABILIZER BAR
REMOVE REAR STABILIZER BUSHING
SEPARATE REAR STRUT ROD
SEPARATE REAR NO. 2 SUSPENSION ARM LH
SEPARATE REAR NO. 2 SUSPENSION ARM RH
SEPARATE REAR NO. 1 SUSPENSION ARM LH
SEPARATE REAR NO. 1 SUSPENSION ARM RH
REMOVE REAR SUSPENSION MEMBER LOWER STOPPER LH
REMOVE REAR SUSPENSION MEMBER LOWER STOPPER RH
REMOVE REAR SUSPENSION MEMBER SUB-ASSEMBLY
REMOVE REAR NO. 1 SUSPENSION ARM LH
Rear No. 1 Suspension Arm -- Removal |
- NOTICE:
- Check if an old gasket still remains on the pipe. If so, remove it. Also, check if any bolts or nuts are rusted. If so, replace them.
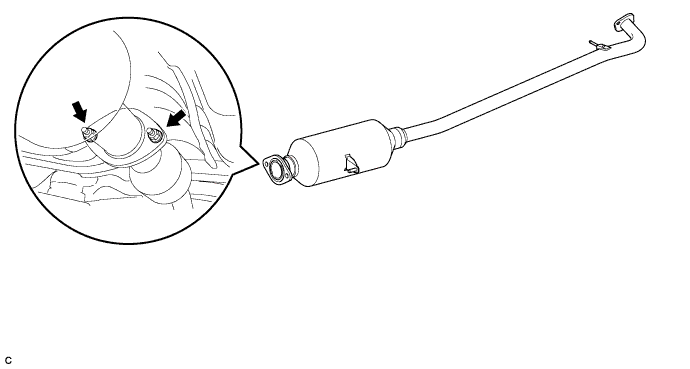
| 2. REMOVE CENTER EXHAUST PIPE ASSEMBLY (for 2AZ-FE) |
Remove the 2 bolts, 2 nuts and center exhaust pipe assembly.
Remove the gasket from the front exhaust pipe.
| 3. REMOVE TAIL EXHAUST PIPE ASSEMBLY (for 2GR-FE) |
Remove the 4 nuts and 2 exhaust tail pipes.
Remove the 2 gaskets from the exhaust tail pipes.
| 4. REMOVE CENTER EXHAUST PIPE ASSEMBLY (for 2GR-FE) |
Remove the 2 bolts, 2 nuts and exhaust center pipe assembly.
Remove the gasket from the exhaust center pipe assembly.
| 5. SEPARATE REAR STABILIZER LINK ASSEMBLY LH |
Remove the nut and separate the rear stabilizer link assembly LH (lower side) from the rear stabilizer bar.
- HINT:
- If the ball joint turns together with the nut, use a hexagon wrench (5 mm) to hold the stud.
| 6. SEPARATE REAR STABILIZER LINK ASSEMBLY RH |
- HINT:
- Separate the RH side using the same procedures as for the LH side.
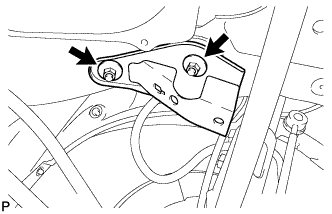
| 7. REMOVE REAR STABILIZER BAR NO. 2 BRACKET |
Remove the 2 bolts and rear stabilizer bar No. 2 bracket.
| 8. REMOVE REAR STABILIZER BAR NO. 1 BRACKET |
Remove the 2 bolts and rear stabilizer bar No. 1 bracket.
| 9. REMOVE REAR STABILIZER BAR |
| 10. REMOVE REAR STABILIZER BUSHING |
Remove the 2 rear stabilizer bushings from the rear stabilizer bar.
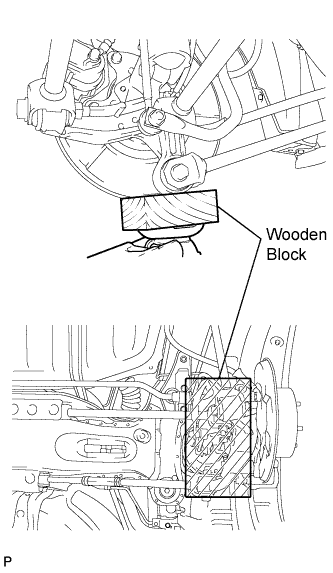
| 11. SEPARATE REAR STRUT ROD |
Support the rear axle carrier with a jack.
Remove the bolt and nut, and disconnect the strut rod (front side).
- NOTICE:
- When removing the bolt, keep the nut from rotating.
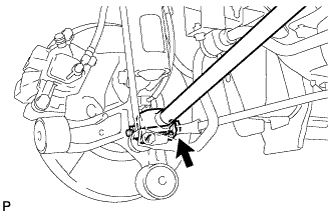
Remove the bolt, nut and strut rod from the rear axle carrier.
- NOTICE:
- When removing the bolt, keep the nut from rotating.
| 12. SEPARATE REAR NO. 2 SUSPENSION ARM LH |
Remove the bolt, nut and separate the rear suspension No. 2 arm (outer side) from the rear axle carrier.
- NOTICE:
- When removing the bolt, keep the nut from rotating.
| 13. SEPARATE REAR NO. 2 SUSPENSION ARM RH |
- HINT:
- Separate the RH side using the same procedures as for the LH side.
| 14. SEPARATE REAR NO. 1 SUSPENSION ARM LH |
Remove the bolt, nut and the rear No. 1 suspension arm (outer side) from the rear axle carrier.
- NOTICE:
- When removing the bolt, keep the nut from rotating.
| 15. SEPARATE REAR NO. 1 SUSPENSION ARM RH |
- HINT:
- Separate the RH side using the same procedures as for the LH side.
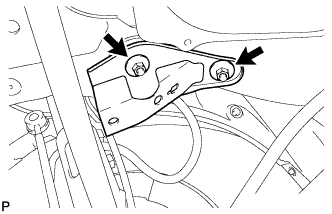
| 16. REMOVE REAR SUSPENSION MEMBER LOWER STOPPER LH |
Remove the 2 nuts and the rear suspension member lower stopper LH.
| 17. REMOVE REAR SUSPENSION MEMBER LOWER STOPPER RH |
Remove the 2 nuts and the rear suspension member lower stopper RH.
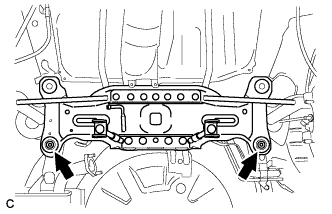
| 18. REMOVE REAR SUSPENSION MEMBER SUB-ASSEMBLY |
Support the rear suspension member with a jack.
Remove the 2 bolts, and the rear suspension member sub-assembly.
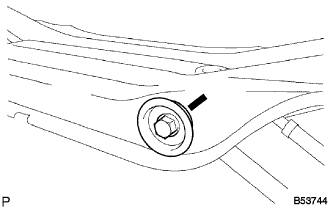
| 19. REMOVE REAR NO. 1 SUSPENSION ARM LH |
Remove the bolt and rear No. 1 suspension arm assembly LH.