Automatic Transaxle Fluid -- Adjustment |
| 1. PRECAUTIONS AND WORK DESCRIPTION |
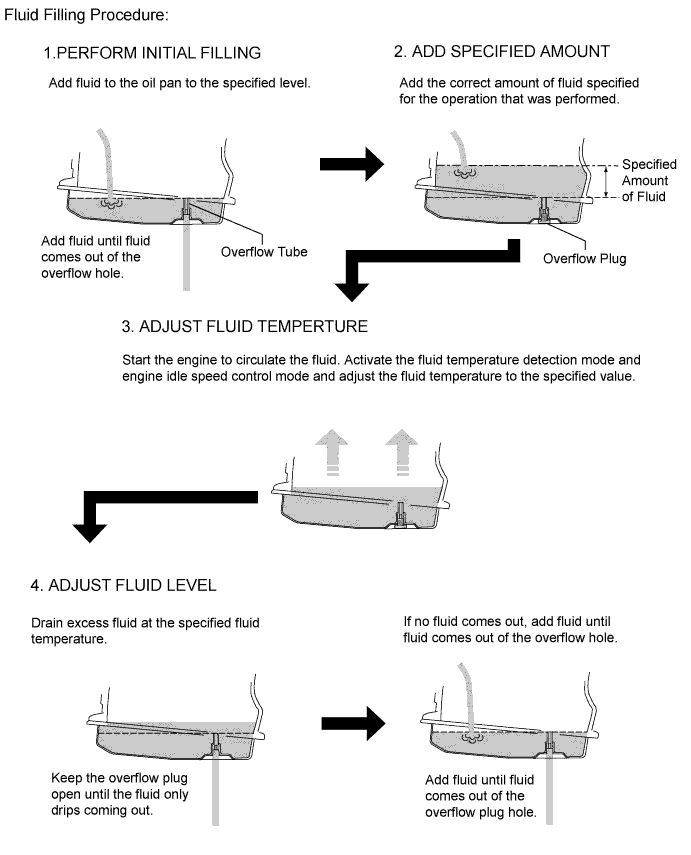
The U660E automatic transaxle does not have an oil filler tube and oil level gauge. When adding fluid, add fluid through the refill hole on the transaxle case. The fluid level can be adjusted by draining excess fluid (allowing excess fluid to overflow) through the overflow tube of the oil pan.
- HINT:
- "Overflow" indicates the condition under which fluid comes out of the overflow plug hole.
Before adjusting the fluid level, add the specified amount of fluid when the engine is cold and warm up the engine to circulate the fluid in the transaxle. Ensure that the fluid temperature is as specified and the engine is idling.
The U660E automatic transaxle requires Toyota Genuine ATF WS.
The adjustment should be performed according to the procedures and notes.
| 2. WORK FLOW |
The adjustment should be performed according to the procedures referring to the work flow below.
| 3. BEFORE FILLING TRANSAXLE WITH FLUID |
Lift the vehicle.
- NOTICE:
- Set the vehicle on a lift so that the vehicle is kept level when it is lifted up.
Remove the engine under covers RH and LH, and fender apron seal LH.
| 4. PERFORM INITIAL FILLING |
- NOTICE:
- If the transaxle is hot (AT fluid temperature is high), wait until the fluid temperature becomes the same as the ambient temperature before starting the following procedure. (Recommended ATF temperature: around 20°C [68°F])
Remove the refill plug and gasket from the automatic transaxle.
- NOTICE:
- After performing any of the following operations, it is not necessary to perform the initial filling procedure. Proceed to the next "ADD SPECIFIED AMOUNT OF FLUID" procedure.
Operation that does not require initial filling - Disconnection the oil cooler tube or oil cooler hose
- Repair of fluid leakage due to a loose case plug, or a faulty plug gasket or O-ring
- Replacement of a new transaxle with torque converter (filled fluid parts)
 |
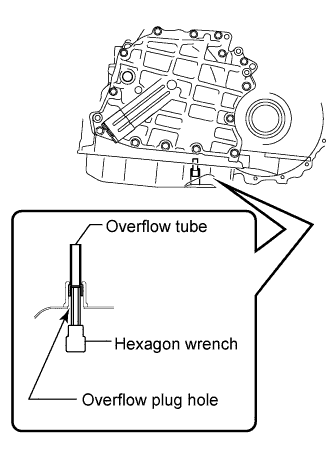
Using a 6 mm socket hexagon wrench, remove the overflow plug and gasket from the automatic transaxle.
- NOTICE:
- If ATF comes out after removing the overflow plug, wait until the fluid flow slows and only drips come out.
- If ATF comes out, it is not necessary to perform the initial filling procedure. After checking the tightening torque of the overflow tube, temporarily tighten the overflow plug.
 |
Using a 6 mm socket hexagon wrench, check that the overflow tube is tightened to the specified torque.
- Torque:
- 1.7 N*m{17 kgf*cm, 15 ft.*lbf}
- NOTICE:
- If the transmission overflow tube is not tightened to the specified torque, the amount of fluid cannot be precisely adjusted.
- HINT:
- To check the torque of the overflow tube, insert the hexagon socket into the overflow hole.
 |
Perform initial filling
Fill the transaxle through the refill hole until fluid begins to trickle out of the overflow plug hole.
- NOTICE:
- Use Toyota Genuine ATF WS.

Wait until the fluid flow slows and only drips come out.
 |
Temporarily install the overflow plug.
- HINT:
- Reuse the old gasket. The plug will be removed again to adjust the fluid level.
|
| 5. ADD SPECIFIED AMOUNT |
Fill the transaxle with the correct amount of fluid as listed in the table below.
- NOTICE:
- Refill amount differs depending on the operation that was performed.
- Standard capacity:
Performed Repair Fill Amount - Disconnection the oil cooler tube or oil cooler hose
- Repair of fluid leakage due to a loose case plug, or a faulty plug gasket or O-ring
- Replacement of a new transaxle with torque converter (filled fluid parts)
0.5 liters (0.5 US qts, 0.4 lmp. qts) - Removal and installation of drive shaft
- Removal and installation of transaxle case oil seal
- Removal and installation of oil pan
2.8 liters (3.0 US qts, 2.5 lmp. qts) Removal and installation of valve body 3.2 liters (3.4 US qts, 2.8 lmp. qts) Removal and installation of transaxle (not remove torque converter) 3.4 liters (3.6 US qts, 3.0 lmp. qts) Removal and installation of torque converter (torque converter reused) 4.8 liters (5.1 US qts, 4.2 lmp. qts) Replacement of a new torque converter 5.3 liters (5.6 US qts, 4.7 lmp. qts) - Disconnection the oil cooler tube or oil cooler hose
Temporarily install the refill plug to avoid fluid splash.
- HINT:
- Reuse the old gasket. The plug will be removed again to adjust the fluid level.
|
Lower the vehicle.
| 6. ADJUST FLUID TEMPERATURE |
When using the intelligent tester:
- HINT:
- The actual ATF temperature can be checked on the data list using the intelligent tester.
Connect the intelligent tester to the DLC3 with the ignition switch off.
Turn the ignition switch ON and turn the intelligent tester main switch ON.
- NOTICE:
- Check that electrical systems such as the air conditioning system, audio system and lighting system are off.
Enter the following menus: Power train / Engine / Active Test / Connect the TC and TE1.
Select the date list menu: A/T Oil Temp from ECT.
Check A/T OIL TEMP.
- NOTICE:
- If the fluid temperature is below 45°C (113°F), proceed to the next step. (Recommended ATF temperature: 40°C [104°F] or less)
- If the fluid temperature is 45°C (113°F) or more, turn the ignition switch off and wait until the fluid temperature drops below 45°C (113°F).
Push the active test menu: Connect the TC and TE1/ ON.
- HINT:
- Indicator lights of the meter do the DTC output blinking when Connect the TC and TE1/ ON
Depress and hold down the brake pedal.
Start the engine.
Slowly move the shift lever from P to D, then back to P.
- HINT:
- Slowly move the shift lever to circulate the fluid through each part of the transaxle.
While observing the D shift indicator on the combination meter, move the shift lever back and forth between N and D at an interval of 1.5 seconds for 6 seconds or more.
- NOTICE:
- Do not pause for more than 1.5 seconds.
- HINT:
- Performing this operation will cause the vehicle to enter the fluid temperature detection mode.
Check that the D shift indicator comes on for 2 seconds.
- HINT:
- When the fluid temperature detection mode is activated, the D shift indicator on the combination meter comes on for 2 seconds.
- If the D shift indicator does not come on for 2 seconds, return to the step where terminal TC is first turned on and perform the procedure again.
Move the shift lever from N to P.
Release the brake pedal.
Push the active test menu: Connect the TC and TE1/ OFF
- NOTICE:
- Be sure to turn terminals TC and TE1 off. If the terminals are on, the fluid level cannot be precisely adjusted due to fluctuations in idle speed.
- HINT:
- Turning terminals TC and TE1 off activates the engine idle speed control mode.
- In the engine idle speed control mode, engine idle speed control starts when the fluid temperature becomes 35°C (95°F) or more and the engine speed is maintained at approximately 800 rpm.
- Even after terminals TC and TE1 are turned off, the fluid temperature detection mode is active until the ignition switch is turned off.
Warm up the engine with the engine idling until the fluid temperature reaches the normal operating temperature (40 to 45°C [104 to 113°F]).
Below Normal Operating Temperature Normal Operating Temperature Above Normal Operating Temperature 40°C or less
(104°F or less)40 to 45°C
(104 to 113°F)45°C or more
(113°F or more)- NOTICE:
- If the fluid temperature is within the normal operating temperature range, immediately proceed to the "ADJUST FLUID LEVEL" procedure.
- If the fluid temperature is 45°C (113°F) or more, stop the engine and wait until the fluid temperature drops to 40°C (104°F) or less. Then perform the "ADJUST FLUID TEMPERATURE" procedure again from the beginning.
- HINT:
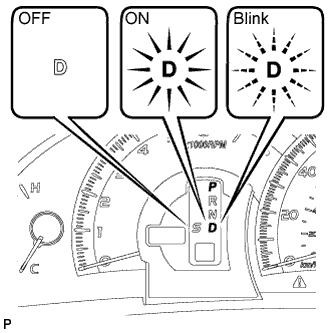
- In the fluid temperature detection mode, the D shift indicator comes on, goes off, or blinks depending on the fluid temperature.
D shift indicator Below Normal Operating Temperature
(40°C or less)
(104°F or less)Normal Operating Temperature
(40 to 45°C)
(104 to 113°F)Above Normal Operating Temperature
(45°C or more)
(113°F or more)OFF ON Blinks

When not using the intelligent tester:
Using SST, connect terminals 13 (TC) and 4 (CG) of the DLC3 with the ignition switch off.
- SST
- 09843-18040
Depress and hold down the brake pedal.
Start the engine.
- NOTICE:
- Check that electrical systems such as the air conditioning system, audio system and lighting system are off.
- HINT:
- Indicator lights of the meter do the DTC output blinking when TC-CG terminal short.
Slowly move the shift lever from P to D, then back to P.
- HINT:
- Slowly move the shift lever to circulate the fluid through each part of the transaxle.
While observing the D shift indicator on the combination meter, move the shift lever back and forth between N and D at an interval of 1.5 seconds for 6 seconds or more.
- NOTICE:
- Do not pause for more than 1.5 seconds.
- HINT:
- Performing this operation will cause the vehicle to enter the fluid temperature detection mode.
Check that the D shift indicator comes on for 2 seconds.
- HINT:
- When the fluid temperature detection mode is activated, the D shift indicator on the combination meter comes on for 2 seconds.
- If the D shift indicator does not come on for 2 seconds, return to the step where terminal TC is first turned on and perform the procedure again.
Move the shift lever from N to P.
Release the brake pedal.
Remove SST from terminals 13 (TC) and 4 (CG).
- SST
- 09843-18040
- NOTICE:
- Be sure to TC-CG terminals open. If the terminals are short, the fluid level cannot be precisely adjusted due to fluctuations in engine speed.
- HINT:
- TC-CG terminals are open activates the engine idle control mode.
- In the engine idle speed control mode, engine idle speed control starts when the fluid temperature becomes 35°C (95°F) or more and the engine speed is maintained at approximately 800 rpm.
- Even after TC-CG terminals are open, the fluid temperature detection mode is active until the ignition switch is turned off.
Allow the engine to idle until the D shift indicator comes on again.
D shift indicator Below Normal Operating Temperature
(40°C or less)
(104°F or less)Normal Operating Temperature
(40 to 45°C)
(104 to 113°F)Above Normal Operating Temperature
(45°C or more)
(113°F or more)OFF ON Blinks - NOTICE:
- If the D shift indicator is on, immediately proceed to the "ADJUST FLUID LEVEL" procedure.
- If the D shift indicator blinks, stop the engine and wait until the fluid temperature drops to 40°C (104°F) or less (the indicator goes off). Then perform the "ADJUST FLUID TEMPERATURE" procedure again from the beginning.
- HINT:
- In the fluid temperature detection mode, the D shift indicator comes on, goes off, or blinks depending on the fluid temperature.
- Fluid filling procedure should be performed when the D shift indicator is on (the fluid temperature is within the normal operating temperature range).

| 7. ADJUST FLUID LEVEL |
- CAUTION:
- To work while engine is idling and the radiator fan is rotating, it takes care enough.
Lift the vehicle.
Adjust fluid level
Using a 6 mm socket hexagon wrench, remove the overflow plug and gasket.
- CAUTION:
- Be careful as the fluid coming out of the overflow hole is hot.
Check the amount of fluid that comes out of the overflow plug hole.
- NOTICE:
- If only a small amount of fluid (approximately 1 cc) comes out of the overflow hole, then only fluid remaining in the overflow tube has come out. This condition is not considered as overflow, so it is necessary to add fluid.
If the amount of fluid that comes out of the overflow hole is large, wait until the fluid flow slows and only drips come out.
If no fluid comes out of the overflow hole, remove the refill plug and gasket. Then add transaxle fluid through the refill hole until fluid comes out of the overflow hole. Wait until the fluid flow slows and only drips come out.
- NOTICE:
- Use Toyota Genuine ATF WS.
Check that the fluid flow has slowed and only drips come out.
- HINT:
- The fluid flow will not completely stop because the fluid expands as its temperature increases.

Install the overflow plug with a new gasket.
- Torque:
- 40 N*m{408 kgf*cm, 30 ft.*lbf}
|
Install the refill plug with a new gasket.
- Torque:
- 49 N*m{500 kgf*cm, 36 ft.*lbf}
|
Lower the vehicle.
Turn the ignition switch OFF.
- HINT:
- Turning the ignition switch off exits the fluid temperature detection mode.
Remove the intelligent tester form DLC3 (when using the intelligent tester).
| 8. AFTER FILLING TRANSMISSION |
Lift the vehicle.
Clean each part.
Check the fluid leak.
Install the fender apron seal LH, engine under cover RH, and LH.
Lower the vehicle.