Shift Lever -- Installation |
| 1. INSTALL SHIFT LOCK CONTROL UNIT |
Connect the shift lock ECU connector and transmission control switch wire connector.
 |
Install the 4 bolts and shift lock control unit.
- Torque:
- 12 N*m{122 kgf*cm, 9 ft.*lbf}
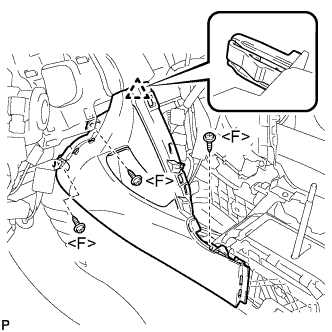
| 2. INSTALL TRANSMISSION CONTROL CABLE ASSEMBLY |
Install the transmission control cable assembly as shown in the illustration.
- HINT:
- Install the floor shift cable with the uneven surface facing up.
- Securely engage the claws of the floor shift cable.
 |
| 3. INSTALL FLOOR CARPET BRACKET LH |
| 4. INSTALL NO. 2 CONSOLE BOX INSERT FRONT |
Engage the clip.
 |
Install the No. 2 console box insert front with the 3 screws <F>.
| 5. INSTALL CONSOLE BOX ASSEMBLY |
Install the 2 screws <F>.
 |
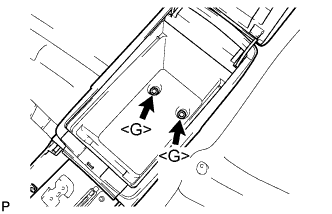
Install the console box assembly with the 2 bolts <G>.
 |
| 6. INSTALL CONSOLE BOX CARPET |
Install the console box carpet.
 |
| 7. INSTALL CONSOLE BOX POCKET |
Install the console box pocket.
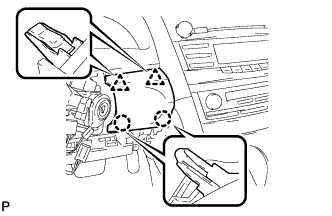
| 8. INSTALL LOWER INSTRUMENT CLUSTER FINISH PANEL CENTER SUB-ASSEMBLY |
Connect each connector.
Engage the 2 claws and 2 clips.
 |
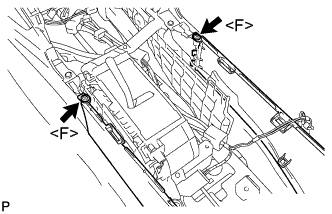
Install the lower instrument cluster finish panel center sub-assembly with the 2 screws <F>.
| 9. INSTALL UPPER CONSOLE REAR PANEL SUB-ASSEMBLY |
Connect the connector and engage the clamp.
 |
Engage the 3 claws and 5 clips to install the upper console rear panel sub-assembly.
| 10. INSTALL FLOOR SHIFT POSITION INDICATOR HOUSING SUB-ASSEMBLY |
with Seat Heater System:
Connect each connector.
Engage the 6 claws and the 3 clips to install the floor shift position indicator housing sub-assembly.
 |
| 11. INSTALL NO. 2 INSTRUMENT CLUSTER FINISH PANEL GARNISH |
Engage the 2 clips and install the No. 2 instrument cluster finish panel garnish.
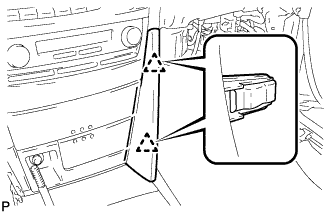 |
| 12. INSTALL NO. 1 INSTRUMENT CLUSTER FINISH PANEL GARNISH |
Engage the 2 clips and install the No. 1 instrument cluster finish panel garnish.
 |
| 13. INSTALL SHIFT LEVER KNOB SUB-ASSEMBLY |
Install the shift lever knob sub-assembly.
 |
| 14. INSTALL LOWER INSTRUMENT PANEL FINISH PANEL |
Engage the 2 claws and 2 clips to install the lower instrument panel finish panel.
 |
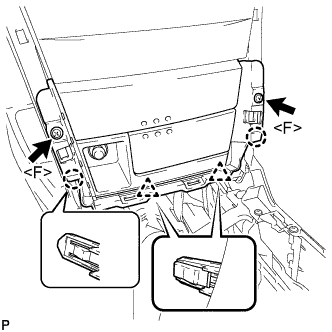
| 15. INSTALL LOWER INSTRUMENT PANEL FINISH PANEL LH |
Install the air hose and connect the connector.
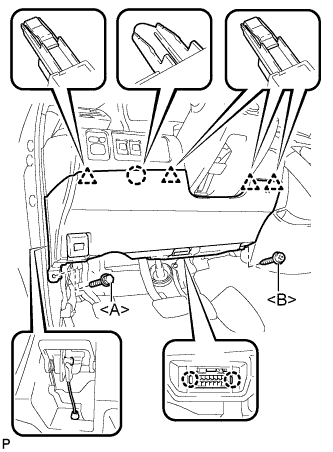 |
Engage the 2 claws and the DLC3.
Engage the claw and the 4 clips.
Instal the lower instrument panel finish panel LH with the screw <B> and bolt <A>.
| 16. INSTALL COWL SIDE TRIM SUB-ASSEMBLY LH |
Engage the 2 clips.
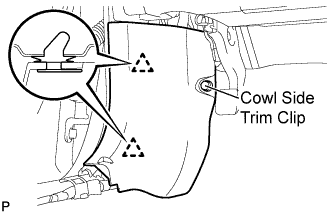 |
Install the cowl side trim sub-assembly LH with the cowl side trim clip.
| 17. INSTALL FRONT DOOR SCUFF PLATE LH |
Engage the 7 claws and 3 clips, then install the front door scuff plate LH.
 |
| 18. CONNECT CABLE TO NEGATIVE BATTERY TERMINAL |
- Torque:
- 6.9 N*m{70 kgf*cm, 61 in.*lbf}
| 19. INSPECT SHIFT LEVER POSITION |
When shifting from the P to the R position with the ignition switch on and brake pedal depressed, make sure that the shift lever moves smoothly and moves correctly into position.
Start the engine and make sure that the vehicle moves forward when shifting from the N to the D position and moves rearward when shifting to the R position.
If operation cannot be done as specified, inspect the park/neutral position switch assembly and check the shift lever assembly installation condition.
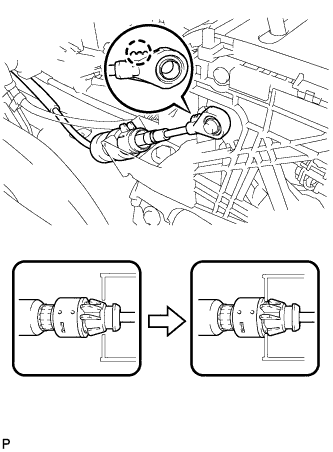
| 20. ADJUST SHIFT LEVER POSITION |
Move the shift lever to the N position.
Remove the nut from the control shaft lever.
 |
Disconnect the transmission control cable assembly from the control shaft lever.
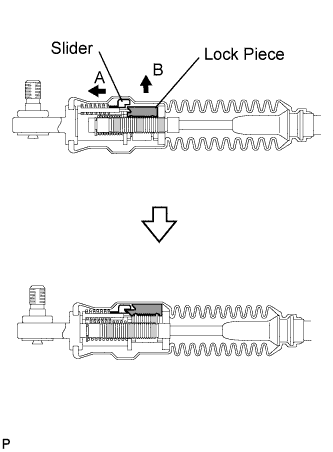
Push the control shaft fully downward.
 |
Return the control shaft lever 2 notches to the N position.
Move the slider in the directions indicated by the arrows and pull up the lock piece.
- NOTICE:
- Do not damage the boot.
 |
Install the transmission control cable to the control shaft lever with the nut.
- Torque:
- 15 N*m{150 kgf*cm, 11 ft.*lbf}
- NOTICE:
- If the control cable end is excessively pushed up, the shift lever cannot be adjusted.
- When tightening the nut, confirm that the control cable is properly stretched.
|
Push in the lock piece.
- NOTICE:
- Firmly push in the lock piece until the slider lock is engaged.
 |
Start the engine and make sure that the vehicle moves forward when moving the lever from the N to the D position and moves rearward when moving it to the R position.
If it becomes hard to move the shift lever, readjust the shift lever position.