Fuel Tank -- Removal |
| 1. DISCHARGE FUEL SYSTEM PRESSURE |
- HINT:
| 2. DISCONNECT CABLE FROM NEGATIVE BATTERY TERMINAL |
| 3. REMOVE REAR SEAT CUSHION ASSEMBLY (for Fold Down Seat Type) |
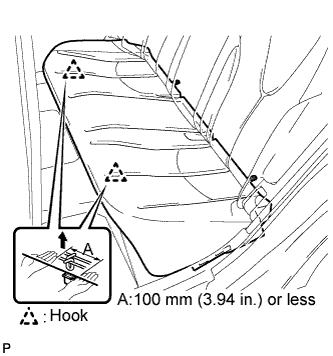
Detach the 2 front hooks of the seat cushion from the vehicle body.
- NOTICE:
- Follow the instructions below carefully as the cushion frame can be deformed easily.
Choose a hook to detach first. Place your hands near the hook as shown in the illustration. Then lift the seat cushion to detach the hook.
Repeat the step above for the other hook.
 |
Remove the seat cushion.
| 4. REMOVE REAR SEAT CUSHION ASSEMBLY (for Reclining Seat Type) |
Detach the 2 front hooks of the seat cushion from the vehicle body.
- NOTICE:
- Follow the instructions below carefully as the cushion frame can be deformed easily.
Choose a hook to detach first. Place your hands near the hook as shown in the illustration. Then lift the seat cushion to detach the hook.
Repeat the step above for the other hook.
 |
Remove the seat cushion.
| 5. REMOVE REAR FLOOR SERVICE HOLE COVER |
Remove the rear floor service hole cover.
 |
Disconnect the fuel pump connector.
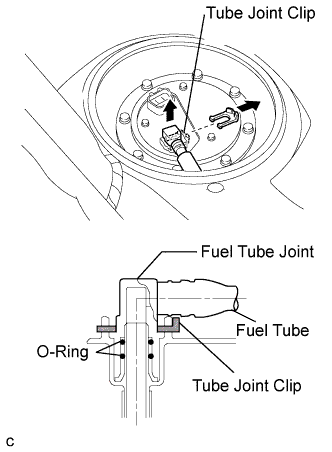
| 6. SEPARATE FUEL PUMP TUBE SUB-ASSEMBLY |
Remove the tube joint clip, and pull out the fuel pump tube.
- NOTICE:
- Check that there is no dirt around the fuel tube joint before this work and clean the dirt away.
- Be careful of dirt like mud because the fuel tube joint has O-rings to seal the fuel tube connector and fuel suction plate.
- Do not use any tools in this work.
- Do not bend or twist the nylon tube by force.
- After disconnecting, cover the fuel tube joint with a plastic bag.
- When the fuel tube joint and fuel suction plate are stuck, pinch the fuel tank tube between fingers, and turn it carefully to release. Disconnect the fuel tank tube.
 |
| 7. REMOVE FUEL TANK VENT TUBE SET PLATE |
Remove the 8 bolts and set plate.
 |
| 8. REMOVE FUEL SUCTION TUBE ASSEMBLY WITH PUMP AND GAUGE |
Pull out the fuel suction tube from the fuel tank.
- NOTICE:
- Do not damage the fuel pump filter.
- Be careful that the arm of the sender gauge does not bend.
 |
Remove the gasket from the fuel suction tube.
| 9. DRAIN FUEL |
| 10. REMOVE CENTER EXHAUST PIPE ASSEMBLY |
Remove the 2 bolts, 2 nuts and exhaust center pipe assembly.

Remove the gasket from the exhaust center pipe assembly.
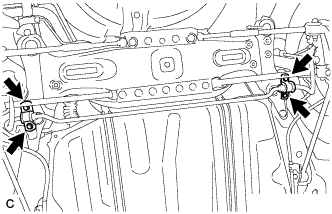
| 11. DISCONNECT NO. 2 PARKING BRAKE CABLE ASSEMBLY |
Remove the set bolt and set nut of the No. 2 parking brake cable assembly.
 |
| 12. DISCONNECT NO. 3 PARKING BRAKE CABLE ASSEMBLY |
Remove the set bolt and set nut of the No. 3 parking brake cable assembly.
 |
| 13. REMOVE REAR STABILIZER BAR NO. 1 BRACKET |
Remove the 4 bolts and 2 rear stabilizer bar No. 1 brackets.
 |
| 14. REMOVE FUEL TANK PROTECTOR LOWER CENTER |
Remove the 4 bolts and fuel tank protector.
 |
| 15. REMOVE FUEL TANK ASSEMBLY |
Disconnect the fuel pump tube.
Pinch the tab of the retainer to disengage the lock claws and pull it down as shown in the illustration.
Pull out the fuel tank main tube.
- NOTICE:
- Check that there is no dirt or other foreign objects around the connector before this operation and clean the connector as necessary.
- It is necessary to prevent mud or dirt from entering the quick connector. If mud enters the connector, the O-rings may not seal properly.
- Remove the quick connector by hand.
- Do not bend or twist the nylon tube. Protect the connector by covering it with a plastic bag.
- If the pipe and connector are stuck, try wiggling or pushing and pulling the connector to release it and pull the connector off of the pipe carefully.
 |
Disconnect the fuel emission hose from the charcoal canister.
 |
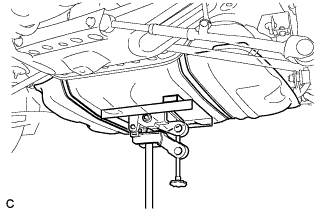
Place a transmission jack under the fuel tank assembly.
 |
Remove the 2 set bolts of the fuel tank bands (*1).
 |
Remove the hose clamp bolt and disconnect the fuel tank to filter pipe hose (*2).
Loosen the hose clamp bolt and disconnect the fuel tank breather hose (*3).
Remove the fuel tank.
Remove the 2 pins and 2 fuel tank bands as shown in the illustration.
 |
Remove the 4 clip nuts.
 |
| 16. REMOVE NO. 2 FUEL TANK PROTECTOR |
Remove the No. 2 fuel tank protector by sliding as shown in the illustration.
 |
| 17. REMOVE NO. 3 FUEL TANK PROTECTOR |
Remove the No. 3 fuel tank protector by sliding as shown in the illustration.
 |
| 18. REMOVE FUEL CUT OFF WITH TUBE VALVE ASSEMBLY |
Using a screwdriver, release the claw and remove the protector by turning it counterclockwise.
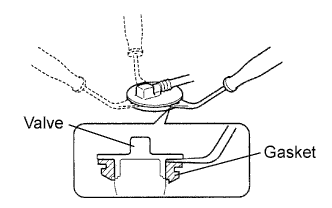 |
Insert a clip remover between the cut off valve and the gasket and remove the cut off valve by gradually pushing it upward.
- NOTICE:
- Work carefully to maintain the sealing integrity of the valve as it is made from resin and easy to be damaged if forcibly removing and installing it.
- Be sure to install a new cut off valve and gasket.
Separate the 2 tube clamps.
Remove the 2 breather tube gaskets.
| 19. REMOVE FUEL PUMP TUBE SUB-ASSEMBLY |
Remove the fuel pump tube from the fuel main tube support and tube clamp.
 |
| 20. REMOVE FUEL MAIN TUBE SUPPORT |
Remove the bolt and tube support.
 |
| 21. REMOVE NO. 4 FUEL TUBE CLAMP |
Remove the 3 clamps.
 |
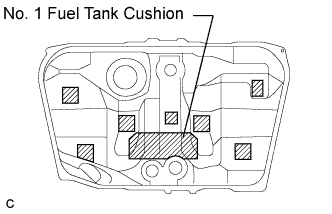
| 22. REMOVE NO. 1 FUEL TANK CUSHION |
Remove the No. 1 fuel tank cushion.
 |
| 23. REMOVE NO. 2 FUEL TANK CUSHION |
Remove the 7 No. 2 fuel tank cushions.