Engine. Camry. Acv40 Gsv40
2Az-Fe Engine Mechanical. Camry. Acv40 Gsv40
SEPARATE AUTOMATIC TRANSAXLE ASSEMBLY (for Automatic Transaxle)
REMOVE DRIVE PLATE & RING GEAR SUB-ASSEMBLY (for Automatic Transaxle)
Engine Rear Oil Seal -- Removal |
| 1. SEPARATE AUTOMATIC TRANSAXLE ASSEMBLY (for Automatic Transaxle) |
- HINT:
| 2. SEPARATE MANUAL TRANSAXLE ASSEMBLY (for Manual Transaxle) |
- HINT:
| 3. REMOVE DRIVE PLATE & RING GEAR SUB-ASSEMBLY (for Automatic Transaxle) |
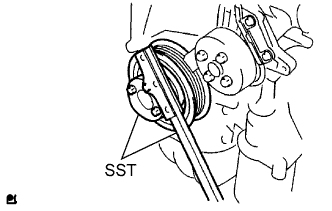
Using SST, hold the crankshaft.
- SST
- 09213-54015(91651-60855)
09330-00021
 |
Remove the 8 bolts, rear spacer, drive plate and front spacer.
 |
| 4. REMOVE CLUTCH COVER ASSEMBLY (for Manual Transaxle) |
Put matchmarks on the clutch cover assembly and flywheel sub-assembly.
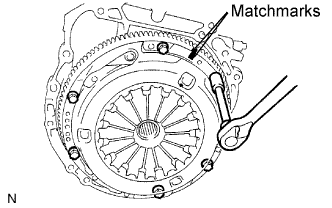 |
Loosen the 6 bolts one turn at a time until spring tension is released.
Remove the 6 bolts and pull off the clutch cover assembly.
- NOTICE:
- Do not drop the clutch disc assembly.
| 5. REMOVE CLUTCH DISC ASSEMBLY (for Manual Transaxle) |
- NOTICE:
- Keep the lining part of the clutch disc assembly, the pressure plate and surface of the flywheel sub-assembly away from oil and foreign matter.
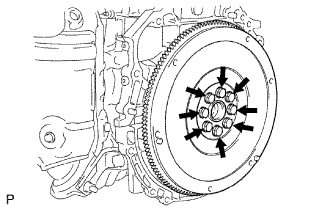
| 6. REMOVE FLYWHEEL SUB-ASSEMBLY (for Manual Transaxle) |
Using SST, hold the crankshaft.
- SST
- 09213-54015(91651-60855)
09330-00021
|
Remove the 8 bolts and flywheel.
 |
| 7. REMOVE ENGINE REAR OIL SEAL |
Using a knife, cut through the oil seal lip.
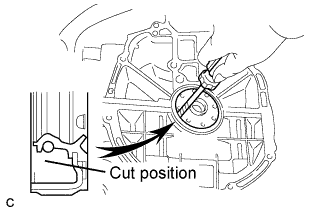 |
Using a screwdriver with its tip taped, pry out the oil seal.
- NOTICE:
- After the removal, check the crankshaft for damage. If it is damaged, smooth the surface with 400-grit sandpaper.