REMOVE BACK DOOR CENTER GARNISH (for Back Door Attached Type)
REMOVE BACK DOOR SIDE GARNISH LH (for Back Door Attached Type)
REMOVE BACK DOOR SIDE GARNISH RH (for Back Door Attached Type)
REMOVE BACK DOOR LOWER OUT SIDE GARNISH SUB-ASSEMBLY (w/ Tire Carrier)
License Plate Light Assembly -- Removal |
| 1. DISCONNECT CABLE FROM NEGATIVE BATTERY TERMINAL |
- CAUTION:
- Wait at least 90 seconds after disconnecting the cable from the negative (-) battery terminal to prevent airbag and seat belt pretensioner activation.
- NOTICE:
- w/ Navigation System for HDD:
- After the ignition switch is turned off, the HDD navigation system requires approximately a minute to record various types of memory and settings. As a result, after turning the ignition switch off, wait a minute or more before disconnecting the cable from the negative (-) battery terminal.
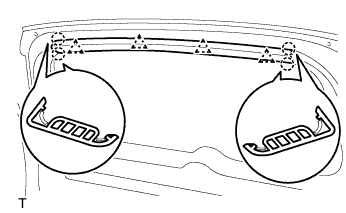
| 2. REMOVE BACK DOOR CENTER GARNISH (for Back Door Attached Type) |
Using a screwdriver, detach the 4 claws and 4 clips and remove the garnish.
- HINT:
- Tape the screwdriver tip before use.
 |
| 3. REMOVE BACK DOOR SIDE GARNISH LH (for Back Door Attached Type) |
Using a screwdriver, detach the 2 claws and 2 clips and remove the garnish.
 |
| 4. REMOVE BACK DOOR SIDE GARNISH RH (for Back Door Attached Type) |
- HINT:
- Use the same procedure described for the LH side.
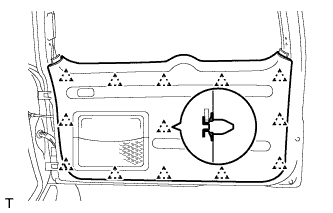
| 5. REMOVE BACK DOOR TRIM BOARD (for Back Door Attached Type) |
Using a screwdriver, detach the 13 clips and remove the trim board.
- HINT:
- Tape the screwdriver tip before use.
- If the screwdriver cannot reach the clips, pull on the lower trim to remove it.
 |
Remove the 5 screws and the back door trim pocket.
| 6. REMOVE BACK DOOR OUT SIDE GARNISH (w/o Tire Carrier) |
 |
Disconnect the connector.
Put protective tape around the back door outside garnish.
 |
Remove the 3 nuts.
Detach the grommet and 5 clips, and remove the back door outside garnish.
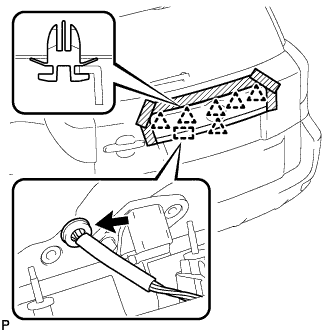 |
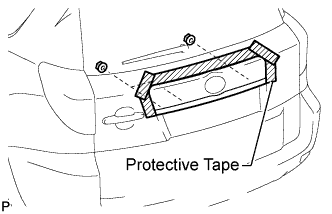
| 7. REMOVE BACK DOOR LOWER OUT SIDE GARNISH SUB-ASSEMBLY (w/ Tire Carrier) |
Put protective tape around the back door outside garnish.
Remove the screw.
Remove the back door outside garnish.
Using a moulding remover, detach the clips and remove the back door outside garnish.

w/ License Plate Light:
Disconnect the license plate light connector.
w/ Rear Fog Light:
Disconnect the rear fog light connector.
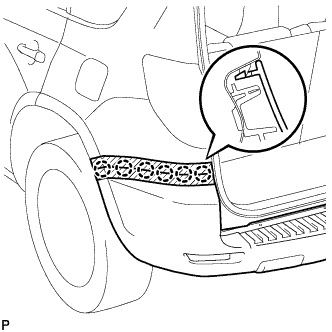
Remove the clips from the back door panel.
Using a clip remover, remove the clip labeled A.
Turn the remaining clips 90° as shown in the part of the illustration labeled B, and remove them.

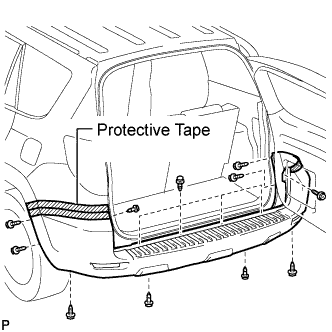
| 8. REMOVE REAR BUMPER COVER (for Bumper Attached Type) |
 |
Put protective tape around the bumper cover.
- NOTICE:
- When removing the rear bumper cover, as the flange of the rear bumper cover forcefully contacts the back door, apply a thick layer of protective tape.
Fully open the back door.
w/ Rear Fender Mudguard:
Remove the 3 screws and 7clips.
 |
w/o Rear Fender Mudguard:
Remove the 7 screws and 7 clips.
 |
Pull the rear bumper cover to detach the 12 claws.
- HINT:
- The illustration only shows the LH side of the vehicle. The remaining claws are on the RH side.
 |
Open the back door one notch and following the order in the illustration, pull down the left side of the cover, then pull down the right side of the cover and remove it by pulling it out from between the back door and body.
 |
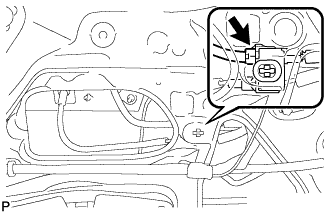
| 9. REMOVE LICENSE PLATE LIGHT ASSEMBLY |
Disconnect the connector.
Using a screwdriver, remove the light as shown in the illustration.
 |
| 10. REMOVE LICENSE PLATE LIGHT ASSEMBLY (w/o Tire Carrier) |
 |
Disconnect the connector.
Remove the screw.
Using a screwdriver, remove the light as shown in the illustration.