Front Seat Outer Belt Assembly Removal
Restraints. Toyota Rav4. Aca30, 33, 38 Gsa33 Zsa30, 35
Seat Belt. Toyota Rav4. Aca30, 33, 38 Gsa33 Zsa30, 35
DISCONNECT CABLE FROM NEGATIVE BATTERY TERMINAL
REMOVE FRONT DOOR SCUFF PLATE LH (for Short Body)
REMOVE FRONT DOOR SCUFF PLATE LH (for Long Body)
REMOVE FRONT DOOR OPENING TRIM WEATHERSTRIP LH
REMOVE REAR DOOR SCUFF PLATE LH (for Short Body)
REMOVE REAR DOOR SCUFF PLATE LH (for Long Body)
REMOVE REAR DOOR OPENING TRIM WEATHERSTRIP LH
REMOVE CENTER PILLAR GARNISH LOWER LH
REMOVE CENTER PILLAR GARNISH LH
REMOVE FRONT SEAT OUTER BELT ASSEMBLY LH
REMOVE FRONT SHOULDER BELT ANCHOR PLATE SUB-ASSEMBLY LH
REMOVE FRONT SHOULDER BELT ANCHOR ADJUSTER ASSEMBLY
Front Seat Outer Belt Assembly -- Removal |
- HINT:
- Use the same procedures for the LH side and RH side.
- The procedures listed below are for the LH side.
| 1. DISCONNECT CABLE FROM NEGATIVE BATTERY TERMINAL |
- CAUTION:
- Wait at least 90 seconds after disconnecting the cable from the negative (-) battery terminal to prevent airbag and seat belt pretensioner activation.
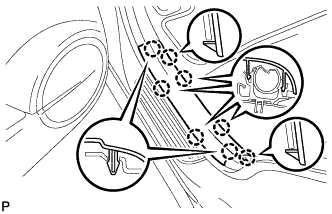
| 2. REMOVE FRONT DOOR SCUFF PLATE LH (for Short Body) |
Using a screwdriver, detach the 10 claws and remove the scuff plate.
- HINT:
- Tape the screwdriver tip before use.
| 3. REMOVE FRONT DOOR SCUFF PLATE LH (for Long Body) |
Using a screwdriver, detach the 10 claws and remove the scuff plate.
- HINT:
- Tape the screwdriver tip before use.
| 4. REMOVE FRONT DOOR OPENING TRIM WEATHERSTRIP LH |
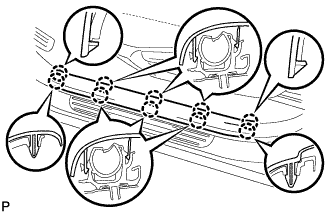
| 5. REMOVE REAR DOOR SCUFF PLATE LH (for Short Body) |
Using a screwdriver, detach the 8 claws and remove the scuff plate.
- HINT:
- Tape the screwdriver tip before use.
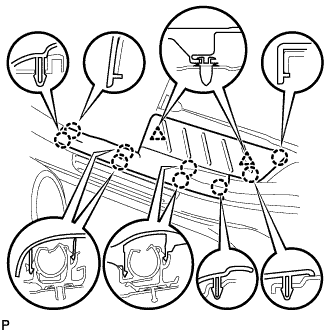
| 6. REMOVE REAR DOOR SCUFF PLATE LH (for Long Body) |
Using a screwdriver, detach the 9 claws.
- HINT:
- Tape the screwdriver tip before use.
Using a clip remover, detach the 2 clips and remove the garnish.
| 7. REMOVE REAR DOOR OPENING TRIM WEATHERSTRIP LH |
| 8. REMOVE CENTER PILLAR GARNISH LOWER LH |
Remove the lap belt outer anchor cover.
Remove the anchor's built-in bolt from the pillar and disconnect the outer belt.
Using a screwdriver, detach the 2 claws.
- HINT:
- Tape the screwdriver tip before use.
Using a clip remover, detach the 2 clips and remove the garnish.
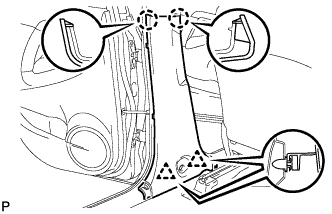
| 9. REMOVE CENTER PILLAR GARNISH LH |
Using a screwdriver, remove the 2 screws.
Using a clip remover, detach the clip, then remove the garnish.
Pull out the outer belt anchor from the center pillar garnish.
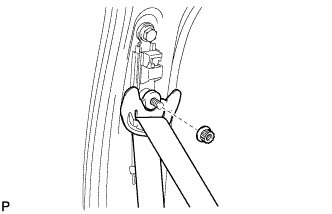
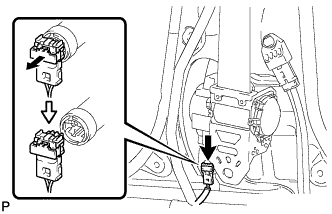
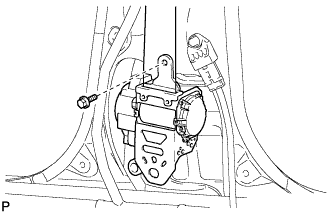
| 10. REMOVE FRONT SEAT OUTER BELT ASSEMBLY LH |
Remove the nut and disconnect the shoulder anchor.
Disconnect the pretensioner connector as shown in the illustration.
Remove the bolt and outer belt.
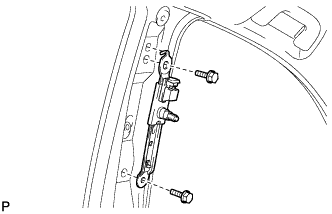
| 11. REMOVE FRONT SHOULDER BELT ANCHOR PLATE SUB-ASSEMBLY LH |
Using a screwdriver, detach the 6 claws.
Remove the anchor plate from the garnish.
- HINT:
- Tape the screwdriver tip before use.
| 12. REMOVE FRONT SHOULDER BELT ANCHOR ADJUSTER ASSEMBLY |
Remove the 2 bolts and anchor.