Crankshaft Position Sensor Removal
Engine. Toyota Rav4. Aca30, 33, 38 Gsa33 Zsa30, 35
REMOVE RADIATOR SUPPORT OPENING COVER
DISCHARGE REFRIGERANT FROM REFRIGERATION SYSTEM
DISCONNECT CABLE FROM NEGATIVE BATTERY TERMINAL
REMOVE V-BANK COVER SUB-ASSEMBLY
DISCONNECT RADIATOR RESERVE TANK ASSEMBLY
REMOVE NO. 1 ENGINE UNDER COVER
REMOVE REAR ENGINE UNDER COVER RH
REMOVE FRONT SUSPENSION MEMBER REINFORCEMENT RH
REMOVE V-RIBBED BELT
REMOVE NO. 1 COOLER REFRIGERANT SUCTION HOSE
REMOVE NO. 1 COOLER REFRIGERANT DISCHARGE HOSE
REMOVE COOLER COMPRESSOR ASSEMBLY
REMOVE CRANKSHAFT POSITION SENSOR
Crankshaft Position Sensor -- Removal |
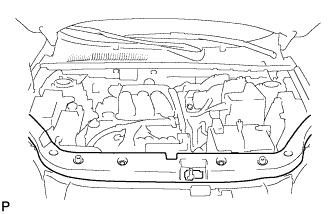
| 1. REMOVE RADIATOR SUPPORT OPENING COVER |
Remove the 9 clips and cover.
| 2. DISCHARGE REFRIGERANT FROM REFRIGERATION SYSTEM |
Start the engine.
Turn the A/C switch on.
Operate the cooler compressor while the engine speed is approximately 1000 rpm for 5 to 6 minutes to circulate the refrigerant and collect the compressor oil remaining in each component into the cooler compressor.
Stop the engine.
Recover the refrigerant from the A/C system using a refrigerant recovery unit.
- SST
- 09985-20010(09985-02130,09985-02150,09985-02090,09985-02110,09985-02010,09985-02050,09985-02060,09985-02070)
| 3. DISCONNECT CABLE FROM NEGATIVE BATTERY TERMINAL |
| 4. REMOVE V-BANK COVER SUB-ASSEMBLY |
Detach the 3 clips and remove the V-bank cover.
| 5. DISCONNECT RADIATOR RESERVE TANK ASSEMBLY |
Remove the 2 bolts and disconnect the reservoir tank.
| 6. REMOVE NO. 1 ENGINE UNDER COVER |
Remove the 2 bolts, 4 screw, 10 clips and under cover.
| 7. REMOVE REAR ENGINE UNDER COVER RH |
Remove the 2 clips and under cover.
| 8. REMOVE FRONT SUSPENSION MEMBER REINFORCEMENT RH |
Remove the 4 bolts and reinforcement.
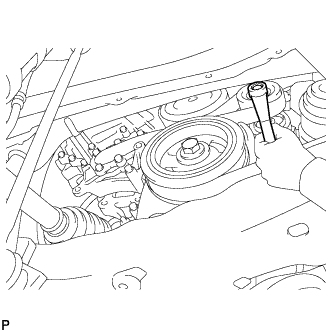
Rotate the tensioner pulley counterclockwise to loosen the belt tension. Then remove the V-ribbed belt.
While turning the belt tensioner counterclockwise, align its holes, and then insert a 5 mm bi-hexagon wrench into the holes to fix the V-ribbed belt tensioner in place.
| 10. REMOVE NO. 1 COOLER REFRIGERANT SUCTION HOSE |
Remove the bolt and disconnect the cooler refrigerant suction hose from the cooler compressor.
Remove the O-ring from the cooler refrigerant suction hose.
- NOTICE:
- Seal the openings of the disconnected parts using vinyl tape to prevent moisture and foreign matter from entering them.
| 11. REMOVE NO. 1 COOLER REFRIGERANT DISCHARGE HOSE |
Remove the bolt and disconnect the cooler refrigerant discharge hose from the cooler compressor.
Remove the O-ring from the cooler refrigerant discharge hose.
- NOTICE:
- Seal the openings of the disconnected parts using vinyl tape to prevent moisture and foreign matter from entering them.
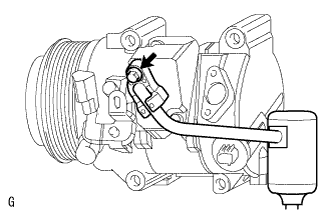
| 12. REMOVE COOLER COMPRESSOR ASSEMBLY |
Disconnect the connector.
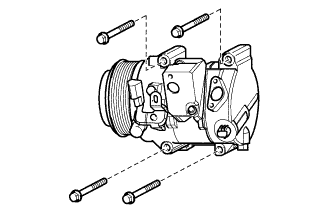
Remove the 4 bolts and cooler compressor.
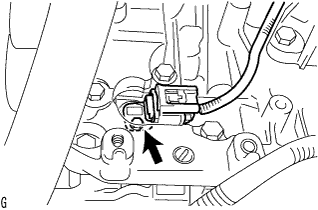
| 13. REMOVE CRANKSHAFT POSITION SENSOR |
Disconnect the sensor connector.
Remove the bolt and sensor.