Side Moulding (For Rear Door) -- Installation |
- HINT:
- Use the same procedure for the RH and LH sides.
- The procedure listed below is for the LH side.
| 1. INSTALL REAR DOOR OUTSIDE MOULDING LH |
Install 5 new clips to the rear door outside moulding.
Attach the 5 clips to install the rear door outside moulding.
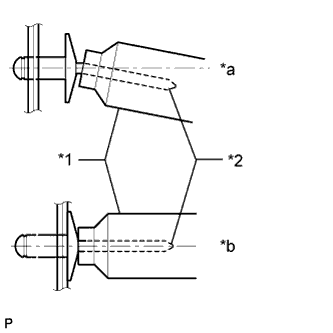
Install a nose piece to an air riveter or hand riveter.
Insert the mandrel part of a new rivet into the nose piece.
Using the riveter, install the 3 rivets as shown in the illustration.
- HINT:
- If the rivet cannot be cut, pull it once and cut it.
- NOTICE:
Do not pry the rivet with the riveter as this will cause damage to the riveter and mandrel.
Text in Illustration *1 Riveter *2 Mandrel *a INCORRECT *b CORRECT
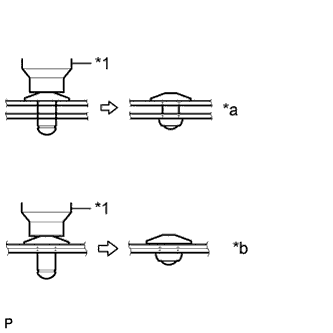
Confirm that the rivets are seated properly against the rear door outside moulding.
- Do not tilt the riveter when installing the rivet to the rear door outside moulding.
- Do not leave any space between the rivet head and rear door outside moulding.
Text in Illustration *1 Riveter *a INCORRECT *b CORRECT
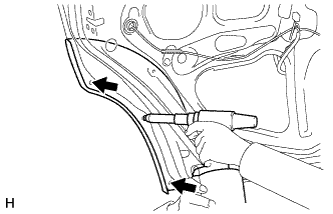
Do not leave any space between the rear door outside moulding and rear door panel. Firmly hold together the 2 items while installing the rivet.
Text in Illustration *1 Riveter *a INCORRECT *b CORRECT
 |
| 2. INSTALL REAR DOOR SERVICE HOLE COVER LH |
Apply new butyl tape to the rear door panel.
Pass the rear door inside locking cable, rear door lock remote control cable and wire harness through a new rear door service hole cover, and then attach the rear door service hole cover using the reference points on the rear door panel.
Text in Illustration *a Reference Point - NOTICE:
- Securely install the rear door service hole cover to prevent wrinkles and air bubbles.
- There should be no wrinkles or folds after installing the rear door service hole cover.
- After installing the rear door service hole cover, check the seal quality.
 |
| 3. INSTALL REAR DOOR NO. 2 TRIM BRACKET |
Install the rear door No. 2 trim bracket with the 2 screws.
| 4. INSTALL REAR DOOR INSIDE HANDLE SUB-ASSEMBLY LH |
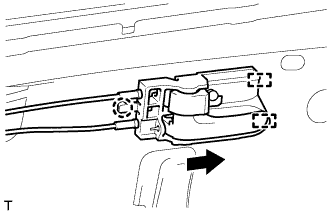
Connect the rear door inside locking cable and rear door lock remote control cable to the rear door inside handle.
 |
Attach the 2 guides as indicated by the arrow in the illustration, and then attach the claw to install the rear door inside handle.
| 5. INSTALL REAR DOOR TRIM BOARD SUB-ASSEMBLY LH |
Attach the 10 clips to install the rear door trim board.
Install the screw.
| 6. INSTALL DOOR PULL HANDLE |
Install the door pull handle with the screw.
| 7. INSTALL REAR POWER WINDOW REGULATOR SWITCH ASSEMBLY WITH REAR DOOR ARMREST BASE PANEL |
Connect the connector.
Attach the 2 claws and 2 clips to install the rear power window regulator switch assembly with rear door armrest base panel.