Lower Instrument Panel -- Installation |
- HINT:
- Use the same procedure for RHD and LHD vehicles.
- The procedure listed below is for LHD vehicles.
- A bolt without a torque specification is shown in the standard bolt chart (Toyota Fortuner RM00000118W017X.html).
| 1. INSTALL LOWER INSTRUMENT PANEL SUB-ASSEMBLY |
for LHD:
Attach the 2 guides to install the lower instrument panel.
Connect the connectors and attach the clamps.
Connect the hood lock control cable, fuel lid lock control cable and DLC3.
Install the 2 bolts <C>, nut <D> and 3 screws <E>.
Install the 2 clips <B>.
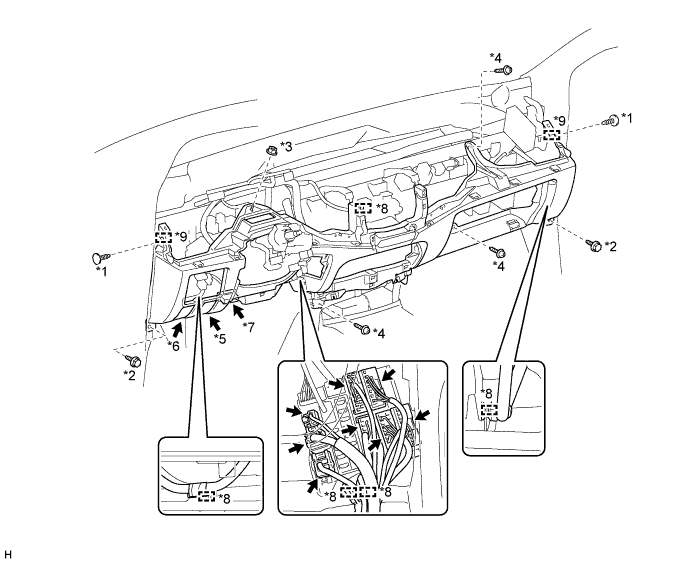
Text in Illustration *1 Clip <B> *2 Bolt <C> *3 Nut <D> *4 Screw <E> *5 Hood Lock Control Cable *6 Fuel Lid Lock Control Cable *7 DLC3 *8 Clamp *9 Guide - -
for RHD:
Attach the 2 guides to install the lower instrument panel.
Connect the connectors and attach the clamps.
Connect the hood lock control cable, fuel lid lock control cable and DLC3.
Install the 2 bolts <C>, nut <D> and 3 screws <E>.
Install the 2 clips <B>.
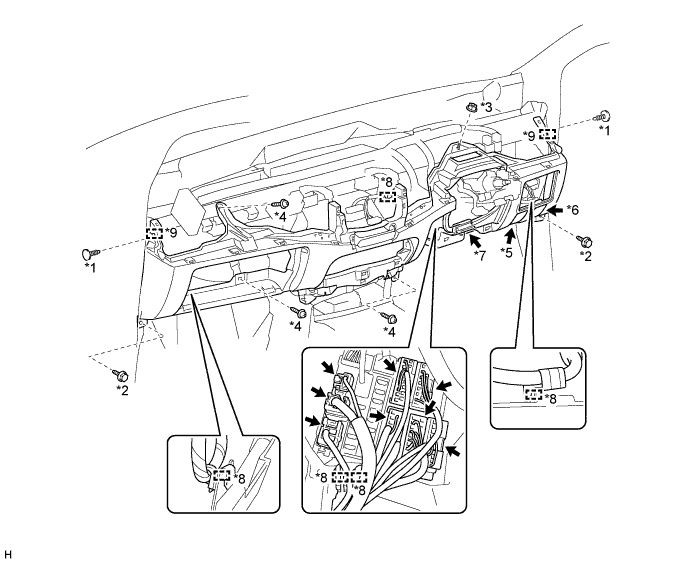
Text in Illustration *1 Clip <B> *2 Bolt <C> *3 Nut <D> *4 Screw <E> *5 Hood Lock Control Cable *6 Fuel Lid Lock Control Cable *7 DLC3 *8 Clamp *9 Guide - -
| 2. INSTALL NO. 1 SWITCH HOLE BASE |
Attach the 5 claws to install the No. 1 switch hole base.
| 3. INSTALL SWITCH BASE |
Connect the connectors.
Attach the 9 claws and guide to install the switch base.
| 4. INSTALL AIR CONDITIONER CONTROL ASSEMBLY (for Manual Air Conditioning System) |
Connect the connector and install the air conditioning control assembly.
| 5. INSTALL NO. 1 INSTRUMENT PANEL BOX |
Connect the connectors and attach the clamp.
Install the No. 1 instrument panel box with the 6 screws <A>.
| 6. INSTALL LOWER INSTRUMENT PANEL FINISH PANEL SUB-ASSEMBLY |
Attach the 3 guides, 2 claws and 3 clips to install the lower instrument panel finish panel.
| 7. INSTALL NO. 3 HEATER TO REGISTER DUCT |
Attach the 4 claws to install the No. 3 heater to register duct.
Install the clip.
| 8. INSTALL NO. 1 HEATER TO REGISTER DUCT |
Attach the 3 claws to install the No. 1 heater to register duct.
Install the clip.
| 9. INSTALL NO. 2 HEATER TO REGISTER DUCT |
Install the No. 2 heater to register duct with the 3 clips.
| 10. INSTALL COWL SIDE TRIM BOARD LH |
Attach the 2 clips to install the cowl side trim board.
Install the clip.
Install the front door opening trim.
| 11. INSTALL COWL SIDE TRIM BOARD RH |
- HINT:
- Use the same procedure described for the LH side.
| 12. INSTALL FRONT DOOR SCUFF PLATE LH |
Attach the 3 clips and 7 claws to install the front door scuff plate.
| 13. INSTALL FRONT DOOR SCUFF PLATE RH |
- HINT:
- Use the same procedure described for the LH side.
| 14. INSTALL CONSOLE BOX ASSEMBLY |
| 15. INSTALL HEADLIGHT DIMMER SWITCH ASSEMBLY |
| 16. INSTALL UPPER INSTRUMENT PANEL SUB-ASSEMBLY |
| 17. CONNECT CABLE TO NEGATIVE BATTERY TERMINAL |
- NOTICE:
- When disconnecting the cable, some systems need to be initialized after the cable is reconnected (Toyota Fortuner RM000004W63000X.html).
| 18. CHECK SRS WARNING LIGHT |