Quarter Window Glass Removal
REMOVE REAR SEAT FRONT BRACKET COVER RH
REMOVE REAR SEAT REAR BRACKET COVER RH
REMOVE REAR NO. 2 SEAT ASSEMBLY RH
REMOVE BACK DOOR SCUFF PLATE
REMOVE REAR DOOR SCUFF PLATE RH
REMOVE REAR DOOR OPENING TRIM WEATHERSTRIP RH
DISCONNECT REAR NO. 1 OUTER SEAT BELT ASSEMBLY OUTER RH
DISCONNECT REAR NO. 2 OUTER SEAT BELT ASSEMBLY OUTER RH
REMOVE QUARTER INSIDE TRIM BOARD RH
REMOVE QUARTER PILLAR GARNISH RH
REMOVE INNER UPPER ROOF SIDE GARNISH RH
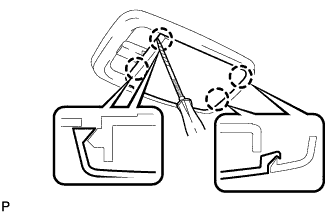
REMOVE ASSIST GRIP
REMOVE NO. 1 ROOM LIGHT ASSEMBLY
REMOVE ROOF HEADLINING ASSEMBLY
REMOVE QUARTER WINDOW ASSEMBLY RH
REMOVE QUARTER WINDOW GLASS SPACER
CLEAN QUARTER WINDOW ASSEMBLY
CLEAN VEHICLE BODY
Quarter Window Glass -- Removal |
- HINT:
- Use the same procedures for the LH side and RH side.
- The procedures listed below are for the RH side.
| 1. REMOVE REAR SEAT FRONT BRACKET COVER RH |
Fully tilt the seatback forward.
Remove the screw.
Pull the bracket cover in the direction indicated by the arrow in the illustration to detach the claw and remove the bracket cover.
| 2. REMOVE REAR SEAT REAR BRACKET COVER RH |
- HINT:
- Use the same procedures described for the rear seat front bracket cover RH.
| 3. REMOVE REAR NO. 2 SEAT ASSEMBLY RH |
Remove the 2 bolts.
Unlock the seat legs by horizontally pulling the release band. Then remove the seat.
- NOTICE:
- Be careful not to damage the vehicle body,
| 4. REMOVE BACK DOOR SCUFF PLATE |
Detach the 4 claws, 2 guides and 6 clips and remove the back door scuff plate.
| 5. REMOVE REAR DOOR SCUFF PLATE RH |
- HINT:
- Use the same procedure described for the LH side.
| 6. REMOVE REAR DOOR OPENING TRIM WEATHERSTRIP RH |
| 7. DISCONNECT REAR NO. 1 OUTER SEAT BELT ASSEMBLY OUTER RH |
Partially remove the rear No. 1 seat belt outer RH.
- HINT:
- Only remove the 2 bolts, floor anchor (Toyota Fortuner RM000001G5E03BX_02_0008.html) and shoulder anchor (Toyota Fortuner RM000001G5E03BX_02_0008.html).
| 8. DISCONNECT REAR NO. 2 OUTER SEAT BELT ASSEMBLY OUTER RH |
Partially remove the rear No. 2 seat belt outer RH.
- HINT:
- Only remove the 2 bolts, floor anchor (Toyota Fortuner RM000001G5E03BX_02_0009.html) and shoulder anchor (Toyota Fortuner RM000001G5E03BX_02_0009.html).
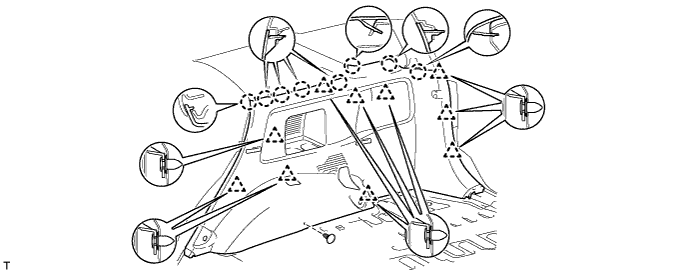
| 9. REMOVE QUARTER INSIDE TRIM BOARD RH |
Detach the 2 claws and remove the outer lap belt anchor cover.
- HINT:
- Use the same procedure for both outer lap belt anchor covers.
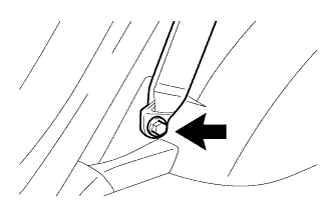
Remove the bolt and disconnect the rear No. 1 seat outer belt floor anchor.
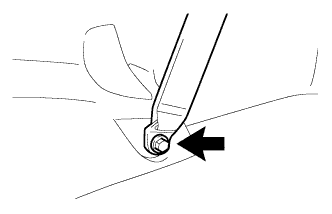
Remove the bolt and disconnect the rear No. 2 seat outer belt floor anchor.
Using a clip remover, remove the clip.
Detach the 8 claws and 10 clips and remove the quarter inside trim board.
| 10. REMOVE QUARTER PILLAR GARNISH RH |
- HINT:
- Use the same procedure described for the LH side.
| 11. REMOVE INNER UPPER ROOF SIDE GARNISH RH |
- HINT:
- Use the same procedure described for the LH side.
- HINT:
- Use the same procedure for all assist grips.
Using a screwdriver, detach the 4 claws and open the 2 covers.
- HINT:
- Tape the screwdriver tip before use.
Text in Illustration*1
| Protective Tape
|
Remove the 2 screws and assist grip.
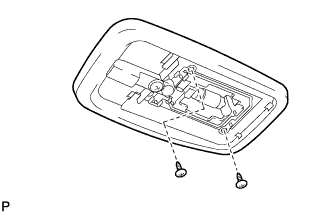
| 13. REMOVE NO. 1 ROOM LIGHT ASSEMBLY |
Using a screwdriver wrapped with protective tape, detach the 4 claws and remove the lens.
- HINT:
- Protective tape the screwdriver tip before use.
Remove the 2 screws and room light.
Disconnect the light connector.
| 14. REMOVE ROOF HEADLINING ASSEMBLY |
Partially remove the roof headlining (Toyota Fortuner RM000001JVR00MX_01_0042.html).
- HINT:
- It is not necessary to completely remove the roof headlining. Slightly lower the rear section of the roof headlining so that the quarter window glass can be removed.
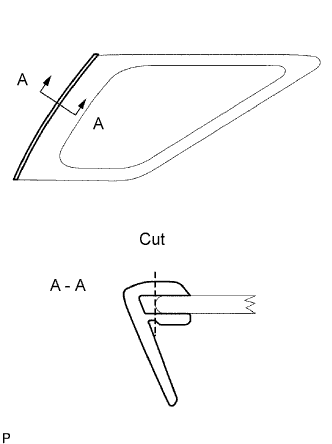
| 15. REMOVE QUARTER WINDOW ASSEMBLY RH |
- HINT:
- Apply protective tape to the outer surface of the vehicle body to prevent scratches.
- NOTICE:
- When separating the quarter window glass from the vehicle, be careful not to damage the vehicle's paint or interior/exterior ornaments.
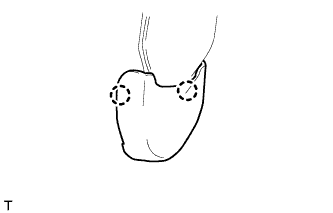
Using a knife, cut off the moulding as shown in the illustration.
- NOTICE:
- Be careful not to damage the vehicle body.
Remove the remaining moulding.
- HINT:
- Make a partial cut in the moulding. Then pull and remove it by hand.
Disconnect the connector.
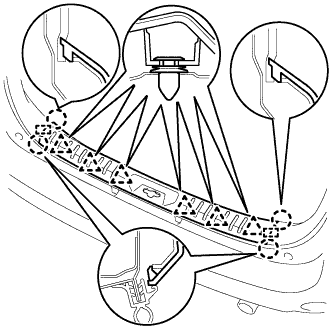
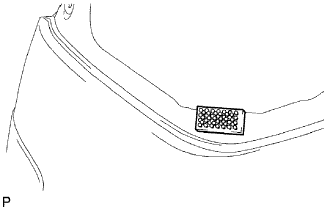
From the interior, insert a piano wire between the vehicle body and the quarter window glass as shown in the illustration.
Tie objects that can serve as handles (for example, wooden blocks) to both wire ends.
Cut through the adhesive by pulling the piano wire around the quarter window glass.
- NOTICE:
- Leave as much adhesive on the vehicle body as possible when removing the quarter window glass.
Using suction cups, remove the quarter window glass.
| 16. REMOVE QUARTER WINDOW GLASS SPACER |
Remove the spacer from the vehicle body.
| 17. CLEAN QUARTER WINDOW ASSEMBLY |
Clean the outer edges of the glass with non-residue solvent.
- NOTICE:
- Do not touch the glass surface after cleaning it.
- Be careful not to damage the glass.
- Even if using new glass, clean the glass with non-residue solvent.
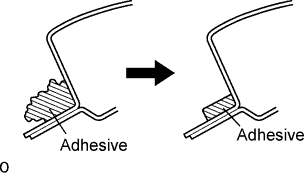
Clean and shape the contact surface of the vehicle body.
On the contact surface of the vehicle body, use a knife to cut away excess adhesive as shown in the illustration.
- HINT:
- Leave as much adhesive on the vehicle body as possible.
- NOTICE:
- Be careful not to damage the vehicle body.
Clean the contact surface of the vehicle body with cleaner.
- HINT:
- Even if all the adhesive has been removed, clean the vehicle body.