Compressor And Magnetic Clutch (For 1Gr-Fe) -- Reassembly |
| 1. INSTALL MAGNET CLUTCH ASSEMBLY |
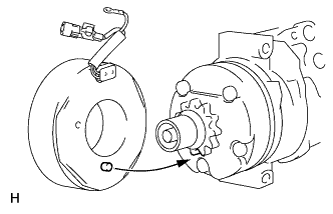 |
Install the magnet clutch stator with the parts aligned as shown in the illustration.
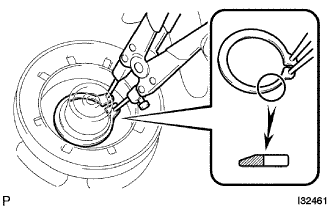
Using a snap ring expander, install a new snap ring with the chamfered side facing outward.
 |
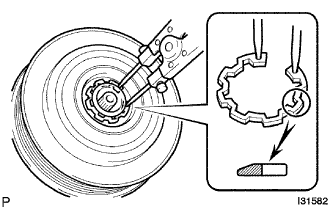
Using a snap ring expander, install the magnet clutch rotor and a new snap ring with the chamfered side facing outward.
- NOTICE:
- Do not damage the seal cover of the bearing when installing the snap ring.
 |
Install the magnet clutch washer(s) and magnet clutch hub.
- NOTICE:
- Do not change the combination of magnet clutch washer(s) used before disassembly.
Using SST, hold the magnet clutch hub and install the bolt.
- SST
- 09985-00260
- Torque:
- 18 N*m{184 kgf*cm, 13 ft.*lbf}
- NOTICE:
- Make sure that there is no foreign matter or oil on the compressor shaft, bolt, and clutch hub.
 |
| 2. INSTALL COOLER BRACKET |
 |
Connect the ground wire and install the cooler bracket with the screw.
| 3. INSPECT MAGNET CLUTCH CLEARANCE |
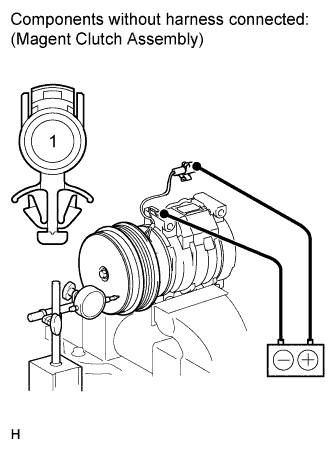 |
Clamp the cooler compressor in a vise between aluminum plates.
Set a dial indicator to the magnet clutch hub.
Connect the battery positive (+) lead to terminal 1 of the magnet clutch connector. Turn the magnet clutch on and off by connecting and disconnecting the battery negative (-) lead to and from the ground wire, and measure the clearance.
- Standard clearance:
- 0.35 to 0.60 mm (0.014 to 0.024 in.)
- Magnet clutch washer thickness:
- 0.1 mm (0.004 in.)
0.3 mm (0.012 in.)
0.5 mm (0.020 in.)
- NOTICE:
- Adjustment should be performed with 3 or fewer magnet clutch washers.
Remove the cooler compressor from the vise.