Rear Cooling Unit Removal
RECOVER REFRIGERANT FROM REFRIGERATION SYSTEM
DISCONNECT CABLE FROM NEGATIVE BATTERY TERMINAL
REMOVE ROOF HEADLINING ASSEMBLY
REMOVE REAR NO. 1 SIDE AIR DUCT
REMOVE REAR NO. 3 ROOF AIR DUCT
REMOVE REAR NO. 4 ROOF AIR DUCT
REMOVE REAR NO. 5 ROOF AIR DUCT
REMOVE REAR NO. 1 ROOF AIR DUCT
REMOVE REAR NO. 2 ROOF AIR DUCT
REMOVE REAR BUMPER COVER
REMOVE QUARTER VENT DUCT ASSEMBLY RH
DISCONNECT NO. 1 COOLER COVER
DISCONNECT AIR CONDITIONER TUBE AND ACCESSORY ASSEMBLY
REMOVE REAR COOLING UNIT ASSEMBLY
Rear Cooling Unit -- Removal |
| 1. RECOVER REFRIGERANT FROM REFRIGERATION SYSTEM |
Start up the engine.
Turn the A/C switch ON.
Operate the cooler compressor with an engine speed of approximately 1,000 rpm for 5 to 6 minutes to circulate the refrigerant and collect the compressor oil remaining in each component into the cooler compressor.
Stop the engine.
Using SST, discharge the refrigerant gas.
- SST
- 09985-20010(09985-02130,09985-02150,09985-02090,09985-02110,09985-02010,09985-02050,09985-02060,09985-02070)
| 2. DISCONNECT CABLE FROM NEGATIVE BATTERY TERMINAL |
- NOTICE:
- When disconnecting the cable, some systems need to be initialized after the cable is reconnected (Toyota Fortuner RM000002HD2006X.html).
| 3. REMOVE ROOF HEADLINING ASSEMBLY |
Remove the roof headlining assembly (Toyota Fortuner RM000001JVR00HX.html).
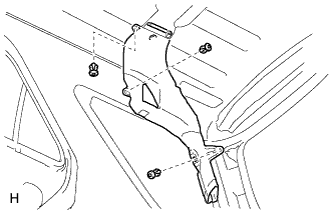
| 4. REMOVE REAR NO. 1 SIDE AIR DUCT |
Remove the 2 clips.
Detach the 2 claws and remove the air duct.
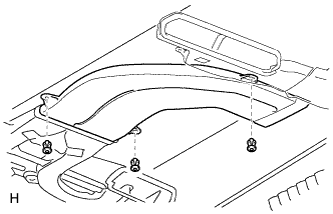
| 5. REMOVE REAR NO. 3 ROOF AIR DUCT |
Remove the 3 clips and air duct.
| 6. REMOVE REAR NO. 4 ROOF AIR DUCT |
Remove the 3 clips and air duct.
| 7. REMOVE REAR NO. 5 ROOF AIR DUCT |
Detach the 2 clamps.
Remove the 2 clips and air duct.
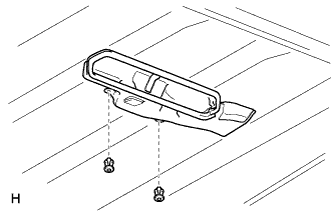
| 8. REMOVE REAR NO. 1 ROOF AIR DUCT |
Remove the 3 clips and air duct.
| 9. REMOVE REAR NO. 2 ROOF AIR DUCT |
Remove the 2 clips and air duct.
| 10. REMOVE REAR BUMPER COVER |
Remove the rear bumper cover (Toyota Fortuner RM000001FK4003X.html).
| 11. REMOVE QUARTER VENT DUCT ASSEMBLY RH |
Detach the 5 claws and remove the duct.
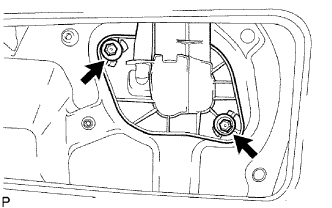
| 12. DISCONNECT NO. 1 COOLER COVER |
Remove the packing.
Remove the 2 bolts and disconnect the cooler cover.
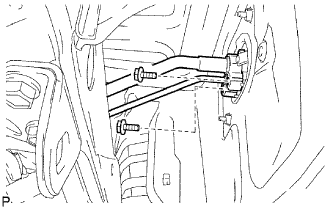
| 13. DISCONNECT AIR CONDITIONER TUBE AND ACCESSORY ASSEMBLY |
Remove the 2 bolts.
Disconnect the air conditioner tube and accessory assembly.
- NOTICE:
- Do not use a screwdriver or similar tool to disconnect the tube.
- Seal the openings of the disconnected parts using vinyl tape to prevent moisture and foreign matter from entering them.
Remove the 2 O-rings from the air conditioner tube and accessory assembly.
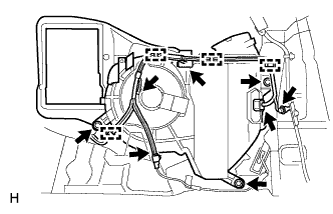
| 14. REMOVE REAR COOLING UNIT ASSEMBLY |
Remove the bolt and body ground.
Detach the 4 clamps.
Disconnect the 4 connectors.
Remove the 3 bolts and cooling unit.