INSTALL COMPRESSOR MOUNTING BRACKET (w/ Air Conditioning System)
INSTALL COOLER COMPRESSOR ASSEMBLY (w/ Air Conditioning System)
INSTALL FAN BELT ADJUSTING BAR (w/o Air Conditioning System)
INSTALL FAN & GENERATOR V BELT (w/o Air Conditioning System)
INSTALL FAN AND GENERATOR V BELT (w/ Air Conditioning System)
INSTALL COOLER COMPRESSOR V BELT (w/ Air Conditioning System)
Generator -- Installation |
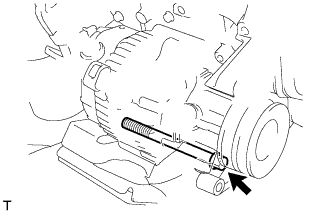
| 1. INSTALL GENERATOR ASSEMBLY |
Install the generator with the bolt.
- Torque:
- 75 N*m{765 kgf*cm, 55 ft.*lbf}
 |
Connect the vacuum oil outlet hose.
Install 2 new gaskets and the vacuum pump hose with the union bolt.
- Torque:
- 14 N*m{143 kgf*cm, 10 ft.*lbf}
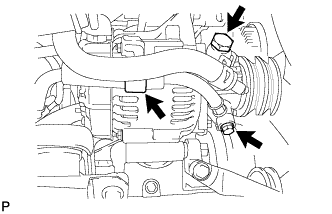 |
Install the vacuum pump oil inlet hose with 2 new gaskets and the union bolt.
- Torque:
- 14 N*m{143 kgf*cm, 10 ft.*lbf}
Attach the vacuum pump oil inlet hose to the cord clip.
Install the generator wire with the nut.
- Torque:
- 9.8 N*m{100 kgf*cm, 7 ft.*lbf}
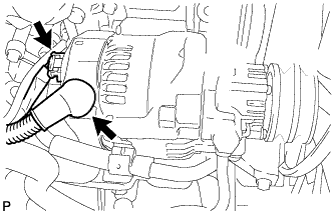 |
Attach the terminal cap.
Connect the generator connector.
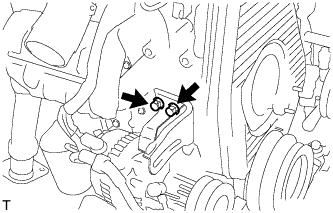
| 2. INSTALL COMPRESSOR MOUNTING BRACKET (w/ Air Conditioning System) |
Temporarily install the compressor mounting bracket with the 4 bolts.
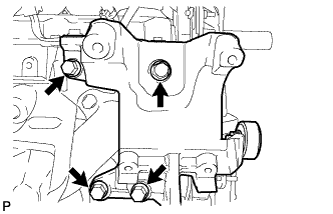 |
Using several steps, uniformly install and tighten the 4 bolts.
- Torque:
- 85 N*m{865 kgf*cm, 63 ft.*lbf}
Temporarily tighten the bolt and spacer.
 |
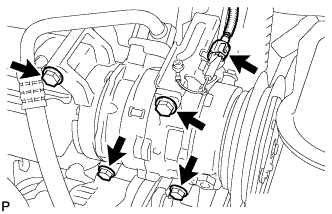
| 3. INSTALL COOLER COMPRESSOR ASSEMBLY (w/ Air Conditioning System) |
Install the compressor with the 4 bolts.
- Torque:
- 25 N*m{255 kgf*cm, 18 ft.*lbf}
 |
Connect the compressor connector.
| 4. INSTALL FAN BELT ADJUSTING BAR (w/o Air Conditioning System) |
Install the fan belt adjusting bar with the 2 bolts.
- Torque:
- 45 N*m{460 kgf*cm, 33 ft.*lbf}
 |
Temporarily install the bolt.
 |
| 5. INSTALL FAN & GENERATOR V BELT (w/o Air Conditioning System) |
Install the V belt.
 |
Using a bar, adjust the tension of the V belt.
Tighten the bolts A and B.
- Torque:
- 75 N*m{765 kgf*cm, 55 ft.*lbf}for bolt A
- 18 N*m{185 kgf*cm, 13 ft.*lbf}for bolt B
Check the deflection of the V belt (Toyota Fortuner RM000001KYZ001X_01_0001.html).
| 6. INSTALL FAN AND GENERATOR V BELT (w/ Air Conditioning System) |
Install the V belt.
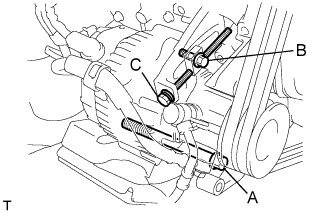 |
Tightening bolt C, adjust the deflection of the V belt (Toyota Fortuner RM000001KYZ001X_01_0001.html).
Tighten the bolts A and B.
- Torque:
- 75 N*m{765 kgf*cm, 55 ft.*lbf}for bolt A
- 18 N*m{185 kgf*cm, 13 ft.*lbf}for bolt B
Recheck the deflection of the V belt.
| 7. INSTALL COOLER COMPRESSOR V BELT (w/ Air Conditioning System) |
Install the V belt.
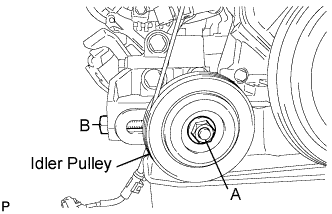 |
Tightening bolt B, adjust the deflection of the V belt (Toyota Fortuner RM000001KYZ001X_01_0001.html).
Tighten nut A.
- Torque:
- 39 N*m{400 kgf*cm, 29 ft.*lbf}
Recheck the deflection of the V belt.
| 8. INSTALL AIR CLEANER ASSEMBLY |
Install the cleaner with the 2 bolts.
- Torque:
- 14 N*m{143 kgf*cm, 10 ft.*lbf}
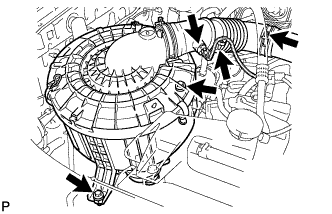 |
Connect the connector to the IAT sensor.
Connect the hose clamp.
| 9. CONNECT CABLE TO NEGATIVE BATTERY TERMINAL |