Cylinder Head -- Reassembly |
| 1. INSTALL TIGHT PLUG |
 |
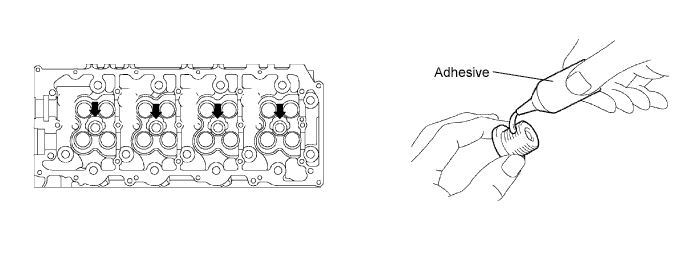
Apply adhesive to new tight plugs.
- Adhesive:
- Toyota Genuine Adhesive 1324, Three Bond 1324 or equivalent
- NOTICE:
- Do not start the engine for 1 hour after the installation.
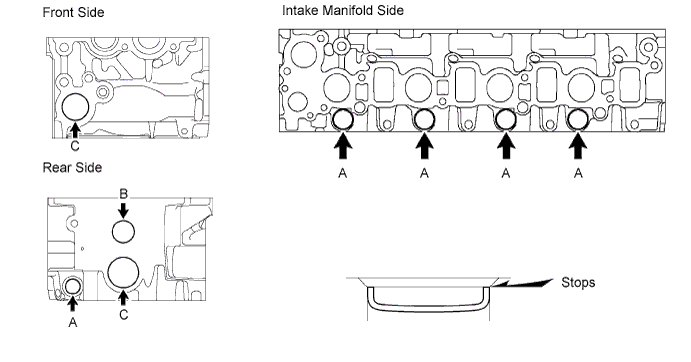
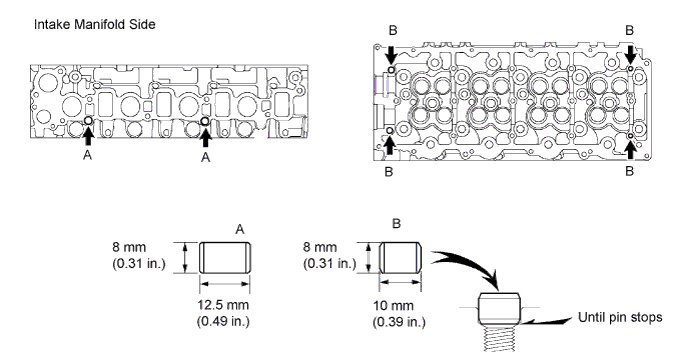
Using SST and a hammer, tap in the tight plugs to the positions shown in the illustration.
Position A- SST
- 09950-60010(09951-00200)
09950-70010(09951-07100)
- SST
- 09950-60010(09951-00300)
09950-70010(09951-07100)
- SST
- 09950-60010(09951-00350)
09950-70010(09951-07100)
| 2. INSTALL STUD BOLT |

- Torque:
- 5.0 N*m{51 kgf*cm, 44 in.*lbf} for A and F
- 7.0 N*m{71 kgf*cm, 62 in.*lbf} for B
- 15 N*m{153 kgf*cm, 11 ft.*lbf} for C
- 26 N*m{265 kgf*cm, 19 ft.*lbf} for D and E
| 3. INSTALL RING PIN |
| 4. INSTALL STRAIGHT SCREW PLUG |
Apply adhesive to the end of the screw plugs.
- Adhesive:
- Toyota Genuine Adhesive 1324, Three Bond 1324 or equivalent
Using a 6 mm hexagon wrench, install the screw plugs.
- Torque:
- 25 N*m{255 kgf*cm, 18 ft.*lbf}
| 5. INSTALL SEMICIRCULAR PLUG |
Remove any old packing (FIPG) material.
Apply seal packing to the semicircular plug as shown in the illustration.
- Seal packing:
- Toyota Genuine Seal Packing Black, Three Bond 1207B or equivalent
- NOTICE:
- The semicircular plug must be installed within 3 minutes from the completion of applying the seal packing.
- Prevent FIPG from being stuck to the camshaft thrust groove.
Install the semicircular plug to the cylinder head.

| 6. INSTALL VALVE STEM OIL SEAL |
 |
Using SST, push in a new oil seal.
- SST
- 09201-41020
| 7. INSTALL INTAKE VALVE |
 |
Install the valve, spring seat, compression spring and spring retainer.
Using SST, compress the compression spring and place the 2 valve spring retainer locks around the valve stem.
- SST
- 09202-70020(09202-00020)
Using a plastic-faced hammer, lightly tap the valve stem tip to assure a proper fit.
- NOTICE:
- Be careful not do damage the valve stem tip.
 |
| 8. INSTALL EXHAUST VALVE |
 |
Install the valve, spring seat, compression spring and spring retainer.
Using SST, compress the compression spring and place the 2 valve spring retainer locks around the valve stem.
- SST
- 09202-70020(09202-00020)
Using a plastic-faced hammer, lightly tap the valve stem tip to assure a proper fit.
- NOTICE:
- Be careful not to damage the valve stem tip.
 |
| 9. INSTALL VALVE LIFTER |
Install the valve lifter.
Check that the valve lifter rotates smoothly by hand.