Crankshaft Position Sensor -- Installation |
| 1. INSTALL CRANKSHAFT POSITION SENSOR |
Apply a light coat of engine oil to the O-ring of the sensor.
 |
Install the sensor with the bolt.
- Torque:
- 8.5 N*m{87 kgf*cm, 75 in.*lbf}
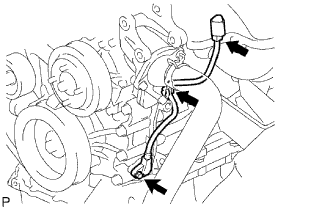
Install the connector to the connector bracket.
Attach the harness clamp.
Connect the sensor connector.
| 2. INSTALL NO. 1 COMPRESSOR MOUNTING BRACKET |
Temporarily install the mounting bracket with the 5 bolts.
- HINT:
- Make sure the flanges of the bolts are contacting the bracket surface.
 |
Install the mounting bracket by tightening the 5 bolts in the order shown in the illustration.
- Torque:
- 24.5 N*m{250 kgf*cm, 18 ft.*lbf} for bolt A
- 45 N*m{459 kgf*cm, 33 ft.*lbf} for except bolt A
- NOTICE:
- In order to prevent misalignment, which causes belt rattle, tightening of the bolts must be performed in the order shown.
| 3. INSTALL COOLER COMPRESSOR ASSEMBLY |
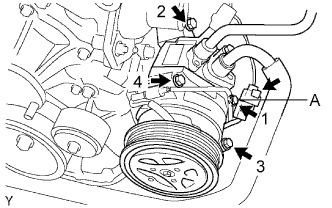 |
Temporarily install the compressor with the bolt labeled A.
Install the compressor by tightening the 4 bolts in the order shown in the illustration.
- Torque:
- 25 N*m{255 kgf*cm, 18 ft.*lbf}
- NOTICE:
- In order to prevent misalignment, which causes belt rattle, tightening of the bolts must be performed in the order shown.
Connect the compressor connector.
Install the suction hose with the 2 bolts.
- Torque:
- 5.4 N*m{55 kgf*cm, 48 in.*lbf}
 |
| 4. INSTALL DRIVE BELT |
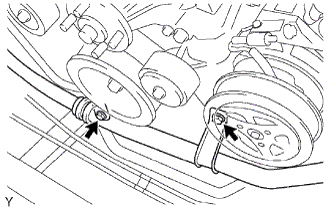
Install the drive belt to all the pulleys except the drive belt tensioner pulley.
 |
Use the hexagon-shaped part indicated by the arrow in the illustration to move the tensioner pulley downward and then install the drive belt to the tensioner pulley.
- NOTICE:
- The backside of the drive belt should face the tensioner pulley.
- Check that the drive belt is properly set to each pulley.
After a new belt has been installed, check that the tensioner indicator mark is within range A shown in the illustration.
 |
| 5. CONNECT CABLE TO NEGATIVE BATTERY TERMINAL |