Land Cruiser URJ200 URJ202 GRJ200 VDJ200 - POWER OUTLETS INT
REAR POWER OUTLET SOCKET - REMOVAL
| 1. REMOVE TONNEAU COVER ASSEMBLY (w/ Tonneau Cover) |
Remove the tonneau cover.
| 2. REMOVE REAR NO. 2 SEAT HEADREST ASSEMBLY LH (w/ Rear Center Seat Headrest) |
| 3. REMOVE REAR SEAT CUSHION HINGE COVER LH (except Face to Face Seat Type) |
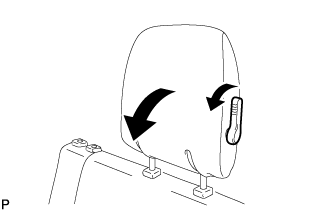
Operate the rear seat headrest handle and lower the headrest.

Operate the reclining adjuster release handle and fold down the seat.

Operate the seat cushion lock release lever and move the seat to the storage position.
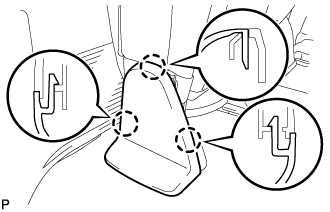
Using a screwdriver, detach the 3 claws and remove the cover.
- HINT:
- Tape the screwdriver tip before use.
| 4. REMOVE REAR NO. 2 SEAT HINGE COVER LH (except Face to Face Seat Type) |
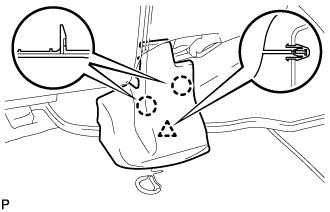
Detach the 2 claws and clip, and then remove the cover.
| 5. REMOVE REAR NO. 2 SEAT ASSEMBLY (except Face to Face Seat Type) |

Remove the 4 bolts and seat assembly.
- NOTICE:
- Be careful not to damage the vehicle body.
| 6. REMOVE REAR SIDE SEAT LEG PROTECTOR LH (for Face to Face Seat Type) |
Using a screwdriver, detach the 2 claws and remove the protector.
- HINT:
- Tape the screwdriver tip before use.
| 7. REMOVE REAR NO. 2 SEAT ASSEMBLY (for Face to Face Seat Type) |

Remove the 4 bolts and rear No. 2 seat.
| 8. REMOVE REAR STEP COVER |

- HINT:
- Use the same procedure to remove the step cover on the other side.
Detach the 2 claws and remove the step cover.
| 9. REMOVE REAR DOOR SCUFF PLATE LH |
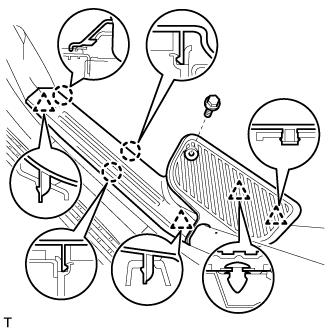
Remove the screw.
Detach the 3 claws and 4 clips, and remove the scuff plate.
| 10. REMOVE REAR FLOOR MAT REAR SUPPORT PLATE |
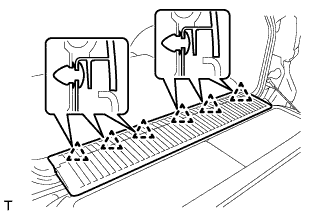
Detach the 6 clips and remove the support plate.
| 11. REMOVE NO. 1 TONNEAU COVER HOLDER CAP (w/ Tonneau Cover) |
- HINT:
- Use the same procedure to remove the tonneau cover holder cap on the other side.
Detach the 2 claws and remove the tonneau cover holder cap.
| 12. REMOVE REAR SEAT COVER CAP (except Face to Face Seat Type) |
- HINT:
- Use the same procedure to remove the rear seat cover cap on the other side.
Using a screwdriver, detach the 3 claws and remove the rear seat cover cap.
- HINT:
- Tape the screwdriver tip before use.
| 13. REMOVE FRONT QUARTER TRIM PANEL ASSEMBLY LH |

- HINT:
- When removing the front quarter trim panel, operate the reclining adjuster release handle and move the No. 1 rear seat to the position shown in the illustration.
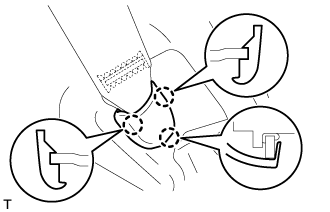
Detach the 3 claws and remove the cover.
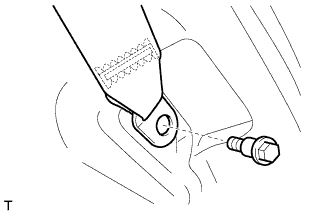
Remove the bolt and rear No. 1 seat belt anchor.

w/ Rear No. 2 Seat, except Face to Face Seat Type:
Remove the bolt and rear No. 2 seat belt anchor.
w/ Rear No. 2 Seat, except Face to Face Seat Type:
Remove the clip and bolt.
Detach the 18 clips and 2 claws.
w/o Rear Air Conditioning System:
Disconnect the rear seat lock control lever cable and then remove the quarter trim panel.
w/ Rear Air Conditioning System:
Disconnect the thermistor connector and rear seat lock control lever cable, and then remove the quarter trim panel.

w/o Rear No. 2 Seat or w/ Rear No. 2 Seat, for Face to Face Seat Type:
Remove the clip.
Detach the 18 clips and 2 claws, and remove the quarter trim panel.

w/ Tonneau Cover:
Remove the screw and clip.
Detach the 18 clips and 2 claws, and remove the quarter trim panel.

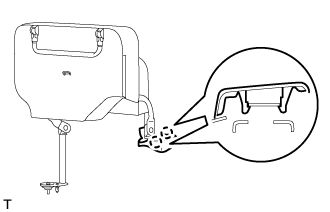
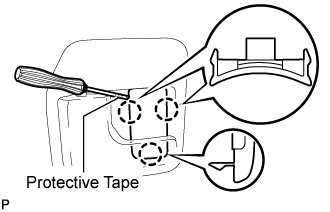
| 14. REMOVE POWER OUTLET SOCKET ASSEMBLY |

Disengage the 4 claws and remove the power outlet socket bezel.

Using a screwdriver with its tip wrapped in protective tape, disengage the claw and remove the power outlet socket assembly.
| *1 | Protective Tape |
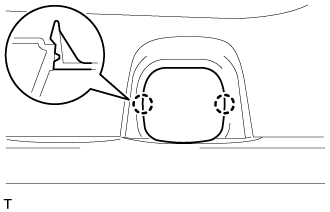
| 15. REMOVE POWER OUTLET SOCKET COVER NO.2 |

Disengage the 2 claws and remove the power outlet socket cover.