Front Seat Outer Belt Assembly (For Double Cab) -- Installation |
- HINT:
- Use the same procedure for the RH and LH sides.
- The procedure listed below is for the LH side.
- A bolt without a torque specification is shown in the standard bolt chart (HILUX_TGN26 RM00000118R007X.html).
| 1. INSTALL FRONT SHOULDER BELT ANCHOR ADJUSTER ASSEMBLY |
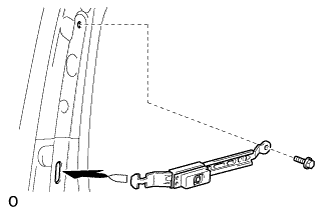 |
Insert the tip of the front shoulder belt anchor adjuster assembly to the body as shown in the illustration.
Install the front shoulder belt anchor adjuster assembly with the bolt.
- Torque:
- 42 N*m{428 kgf*cm, 31 ft.*lbf}
| 2. INSTALL SHOULDER BELT ANCHORAGE PLATE COVER |
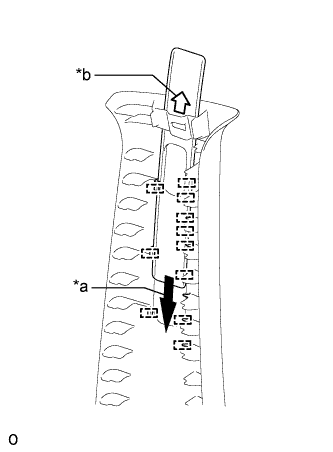 |
Install the shoulder belt anchorage plate cover as shown in the illustration.
- HINT:
- Make sure the shoulder belt anchorage plate cover is firmly set into the guides.
Text in Illustration *a Slide *b Mark
| 3. INSTALL CENTER PILLAR GARNISH LH |
Attach the guide and clip to install the center pillar garnish.
Connect the front seat belt shoulder anchor with the bolt.
- Torque:
- 42 N*m{428 kgf*cm, 31 ft.*lbf}
Attach the 4 claws to install the front seat belt shoulder anchor cover.
| 4. INSTALL FRONT SEAT OUTER BELT ASSEMBLY LH |
w/o Pretensioner:
Align the front seat outer belt assembly LH positioning holes with the 2 claws and install the retractor of the front seat outer belt assembly LH with the bolt.
- Torque:
- 4.8 N*m{49 kgf*cm, 42 in.*lbf}
 |
Install the front seat outer belt shoulder anchor with the bolt.
- Torque:
- 42 N*m{428 kgf*cm, 31 ft.*lbf}
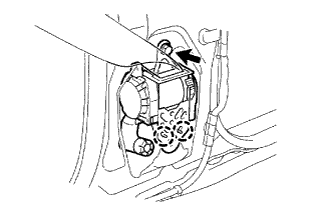
w/ Pretensioner:
Align the front seat outer belt assembly LH positioning holes with the 2 claws and install the retractor of the front seat outer belt assembly LH with the bolt.
- Torque:
- 4.8 N*m{49 kgf*cm, 42 in.*lbf}
Connect the pretensioner connector as shown in the illustration.

 |
Install the front seat outer belt shoulder anchor with the bolt.
- Torque:
- 42 N*m{428 kgf*cm, 31 ft.*lbf}
| 5. INSTALL SEAT BELT ANCHOR COVER CAP |
Install the seat belt anchor cover cap with the 4 claws.
 |
| 6. INSTALL LOWER CENTER PILLAR GARNISH LH |
Attach the 2 clips and 2 claws to install the lower center pillar garnish LH.
Install the front seat outer belt floor anchor with the bolt.
- Torque:
- 42 N*m{428 kgf*cm, 31 ft.*lbf}
| 7. INSTALL FRONT DOOR OPENING TRIM LH |
 |
Align the paint mark on the front door opening trim with the mark position on the vehicle and install the front door opening trim as shown in the illustration.
Text in Illustration *1 Paint Mark *2 Mark Position
| 8. INSTALL REAR DOOR OPENING TRIM LH |
- HINT:
- Use the same procedure described for the LH side.
| 9. INSTALL FRONT DOOR SCUFF PLATE LH |
Attach the 3 clips and 7 claws to install the front door scuff plate.
| 10. INSTALL REAR DOOR SCUFF PLATE LH |
Attach the 2 clips and 7 claws to install the rear door scuff plate.
| 11. INSTALL FRONT SEAT ASSEMBLY |
for Power Seat:
(HILUX_TGN26 RM000000Z8T0APX.html)
for Separate Seat Type:
(HILUX_TGN26 RM000003NZV00XX.html)
for Bench Seat Type:
(HILUX_TGN26 RM000000Z8Y00EX.html)
| 12. CONNECT CABLE TO NEGATIVE BATTERY TERMINAL |
- NOTICE:
- When disconnecting the cable, some systems need to be initialized after the cable is reconnected (HILUX_TGN26 RM000004QR3009X.html).