Back Door Glass (For Hatchback) Removal
REMOVE REAR SPOILER SUB-ASSEMBLY (w/ Rear Spoiler)
REMOVE BACK DOOR TRIM BOARD
REMOVE REAR WIPER ARM HEAD CAP (w/ Rear Wiper)
REMOVE REAR WIPER ARM AND BLADE ASSEMBLY (w/ Rear Wiper)
REMOVE REAR WIPER MOTOR ASSEMBLY (w/ Rear Wiper)
REMOVE REAR WIPER MOTOR GROMMET (w/ Rear Wiper)
REMOVE BACK DOOR PANEL NO. 2 PROTECTOR
REMOVE BACK DOOR PANEL NO. 1 PROTECTOR
REMOVE BACK DOOR GLASS
REMOVE BACK WINDOW GLASS ADHESIVE DAM
REMOVE BACK WINDOW GLASS CLIP LH
REMOVE BACK WINDOW GLASS CLIP RH
Back Door Glass (For Hatchback) -- Removal |
| 1. REMOVE REAR SPOILER SUB-ASSEMBLY (w/ Rear Spoiler) |
(YARIS_NCP93 RM000002RLG00BX.html)
| 2. REMOVE BACK DOOR TRIM BOARD |
Disengage the 11 clips and remove the back door trim board.
| 3. REMOVE REAR WIPER ARM HEAD CAP (w/ Rear Wiper) |
Disengage the 2 claws and the 2 hinges, and remove the rear wiper arm head cap.
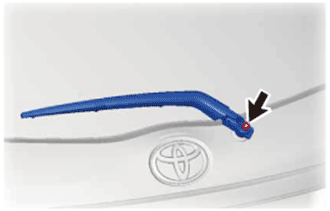
| 4. REMOVE REAR WIPER ARM AND BLADE ASSEMBLY (w/ Rear Wiper) |
Remove the nut and the rear wiper arm and blade assembly.
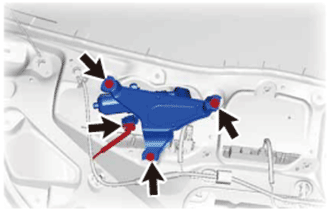
| 5. REMOVE REAR WIPER MOTOR ASSEMBLY (w/ Rear Wiper) |
Disconnect the connector.
Loosen the 3 bolts and remove the rear wiper motor assembly.
| 6. REMOVE REAR WIPER MOTOR GROMMET (w/ Rear Wiper) |
Remove the rear wiper motor grommet.
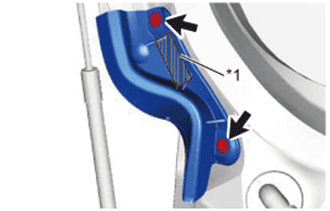
| 7. REMOVE BACK DOOR PANEL NO. 2 PROTECTOR |
Remove the 2 clips.
Text in Illustration*1
| Double-sided Tape
|
While peeling off the double-sided tape, remove the back door panel protector.
| 8. REMOVE BACK DOOR PANEL NO. 1 PROTECTOR |
- HINT:
- Use the same procedure as for the No. 2 side.
| 9. REMOVE BACK DOOR GLASS |
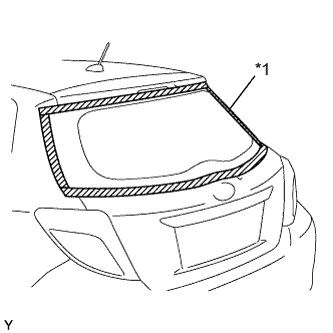
Apply protective tape to the outer surface of the vehicle body to prevent scratches.
Text in Illustration*1
| Protective Tape
|
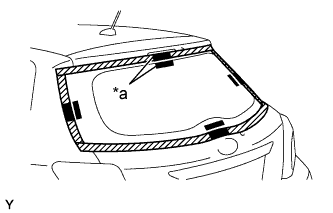
Place matchmarks on the back door glass and vehicle body on the locations indicated in the illustration.
Text in Illustration*a
| Mark
|
- HINT:
- Matchmarks are not necessary if the back door glass is not going to be reused.
Disconnect the 2 connectors.
- HINT:
- If the vehicle is equipped with rear window defogger, disconnect the connector.
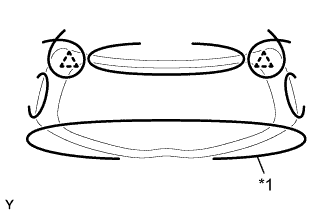
Pass a piano wire between the vehicle body and glass from the interior.
Text in Illustration*1
| Piano Wire
|
Tie both wire ends to wooden blocks or similar objects.
Cut off the adhesive by pulling the piano wire around the back door glass.
- NOTICE:
- When separating the back door glass from the vehicle, be careful not to damage the paint or interior and exterior ornaments.
Using suction cups, disengage the 2 clips and remove the back door glass.
- NOTICE:
- Be careful not to drop the back door glass.
| 10. REMOVE BACK WINDOW GLASS ADHESIVE DAM |
Using a scraper, remove the back window glass adhesive dam.
- NOTICE:
- Be careful not to damage the back door glass.
- Be sure to replace the back window glass adhesive dam with a new one.
| 11. REMOVE BACK WINDOW GLASS CLIP LH |
Using a scraper, remove the back window glass clip.
- NOTICE:
- Be careful not to damage the back door glass.
- Be sure to replace the back window glass clip with a new one.
| 12. REMOVE BACK WINDOW GLASS CLIP RH |
Using a scraper, remove the back window glass clip.
- NOTICE:
- Be careful not to damage the back door glass.
- Be sure to replace the back window glass clip with a new one.