Sliding Roof Housing -- Installation |
| 1. INSTALL SLIDING ROOF HOUSING SUB-ASSEMBLY |
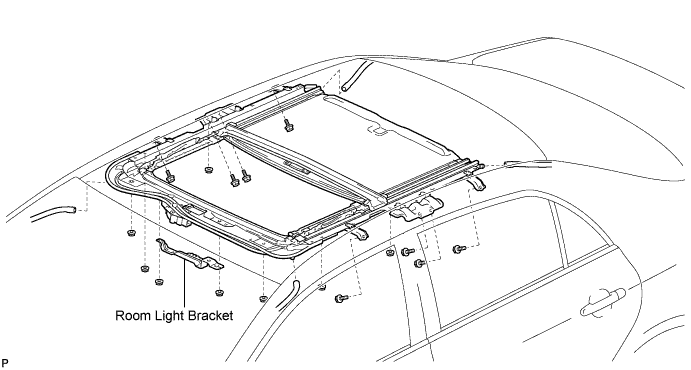
Install the sliding roof housing sub-assembly with the 8 bolts and 6 nuts.
- Torque:
- 5.5 N*m{56 kgf*cm, 49 in.*lbf}
Install the room light bracket with the 2 nuts.
- Torque:
- 5.5 N*m{56 kgf*cm, 49 in.*lbf}

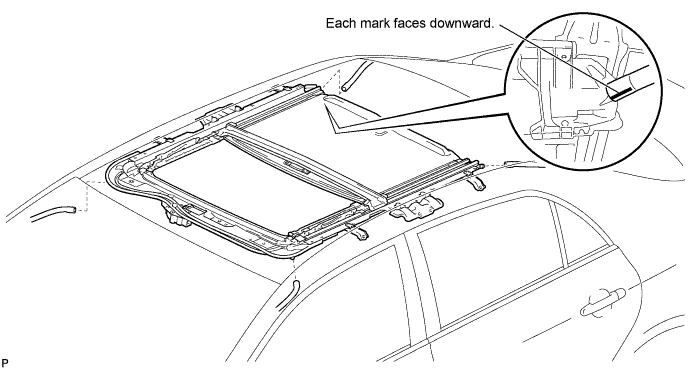
Connect the 4 sliding roof drain hoses so that each mark faces downward.
- NOTICE:
- Be sure to install the drain hoses properly to prevent entry of water.

| 2. INSTALL SLIDING ROOF GLASS SUB-ASSEMBLY |
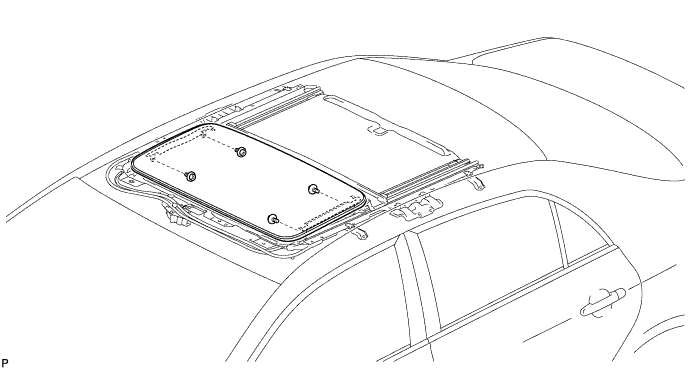
Using a T25 "TORX" driver, temporarily install the sliding roof glass sub-assembly with the 4 screws.

Perform a level check.
Check the difference in level "a" between the roof panel and the upper surface of the weatherstrip when the sliding roof glass is fully closed.
Standard Area Measurement A - A 0 + 1.0 mm (0 + 0.0393 in.)
0 - 2.0 mm (0 - 0.0784 in.)B - B 0 + 2.0 mm (0 + 0.0784 in.)
0 - 1.0 mm (0 - 0.0393 in.)C - C 0 + 1.5 mm (0 + 0.0590 in.)
0 - 1.5 mm (0 - 0.0590 in.)D - D 0 + 1.5 mm (0 + 0.0590 in.)
0 - 1.0 mm (0 - 0.0393 in.)- HINT:
- "+" represents the condition that the glass is above the panel level. "-" represents the condition that the glass is below the panel level.
 |
Perform a gap check.
Check the gap between the roof panel and roof glass.
- NOTICE:
- The gap must be even all around.
 |
After adjusting the sliding roof glass, using a T25 "TORX" socket wrench, install the sliding roof glass sub-assembly with the 4 screws.
- Torque:
- 4.0 N*m{41 kgf*cm, 35 in.*lbf}
| 3. INSPECT FOR WATER LEAK |
After adjusting the sliding roof glass sub-assembly, inspect for water leaks.
If there are any leaks, readjust the sliding roof glass sub-assembly.
| 4. INSTALL SLIDING ROOF SIDE GARNISH LH |
Engage the 5 claws and install the sliding roof side garnish LH.
 |
| 5. INSTALL SLIDING ROOF SIDE GARNISH RH |
- HINT:
- Use the same procedure as for the LH side.
| 6. INSTALL CURTAIN SHIELD AIRBAG ASSEMBLY LH |
Check that the ignition switch is off.
Check that the cable is disconnected from the negative (-) battery terminal.
- CAUTION:
- Wait at least 90 seconds after disconnecting the cable from the negative (-) battery terminal to disable the SRS system.
Install a new curtain shield airbag assembly with 5 new bolts.
- Torque:
- 9.8 N*m{100 kgf*cm, 87 in.*lbf}

- NOTICE:
- If the curtain shield airbag assembly is removed, replace it with a new one.
- Do not twist the curtain shield airbag assembly when installing it.
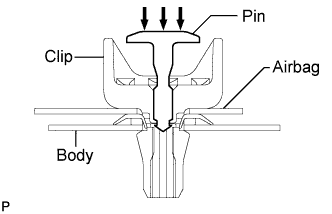
Install the 4 clips with the curtain shield airbag assembly to the body panel.

- NOTICE:
- Do not twist the curtain shield airbag assembly when installing it.
Install the 4 pins as shown in the illustration.
- NOTICE:
- Make sure that the pins of the clips are pushed in firmly.
 |
Connect the curtain shield airbag connector.
- NOTICE:
- When connecting the airbag connector, take care not to damage the airbag wire harness.
| 7. INSTALL CURTAIN SHIELD AIRBAG ASSEMBLY RH |
- HINT:
- Use the same procedure as for the LH side (COROLLA_ZRE142 RM000000UXD098X_01_0001.html).
| 8. INSTALL ROOF HEADLINING ASSEMBLY |
| 9. RESET SLIDING ROOF DRIVE GEAR SUB-ASSEMBLY |
| 10. INSPECT SLIDING ROOF SYSTEM |