Water Pump On-Vehicle Inspection
REMOVE GENERATOR ASSEMBLY
REMOVE ENGINE MOUNTING INSULATOR SUB-ASSEMBLY RH
REMOVE WATER PUMP PULLEY
INSPECT WATER PUMP ASSEMBLY
INSTALL WATER PUMP PULLEY
INSTALL ENGINE MOUNTING INSULATOR SUB-ASSEMBLY RH
INSTALL GENERATOR ASSEMBLY
Water Pump -- On-Vehicle Inspection |
| 1. REMOVE GENERATOR ASSEMBLY |
- HINT:
- COROLLA_ZRE142 RM0000026ZD00ZX.html.
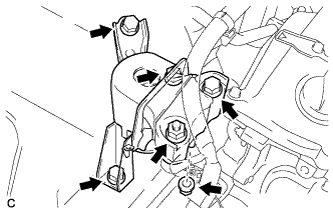
| 2. REMOVE ENGINE MOUNTING INSULATOR SUB-ASSEMBLY RH |
Place a wooden block between a floor jack and the engine, then support the engine using the floor jack.
Remove the 4 bolts and 2 nuts, then remove the engine mounting insulator sub-assembly RH.
- NOTICE:
- Do not apply excessive force to the return tube when removing the engine mounting insulator sub-assembly RH.
- HINT:
- Keep clearance by lowering the engine using the floor jack when removing the front engine mounting insulator.
| 3. REMOVE WATER PUMP PULLEY |
Using SST, remove the 4 bolts and water pump pulley.
- SST
- 09960-10010(09962-01000,09963-00700)
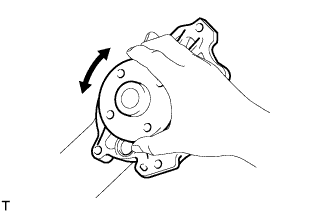
| 4. INSPECT WATER PUMP ASSEMBLY |
Visually check the drain hole and air hole for coolant leakage.
If leakage is found, replace the water pump assembly.
Turn the pulley, then check that the water pump bearing moves smoothly without making a "click" sound.
If it does not move smoothly, replace the water pump assembly.
| 5. INSTALL WATER PUMP PULLEY |
Using SST, install the water pump pulley with the 4 bolts.
- SST
- 09960-10010(09962-01000,09963-00700)
- Torque:
- 26 N*m{265 kgf*cm, 19 ft.*lbf}
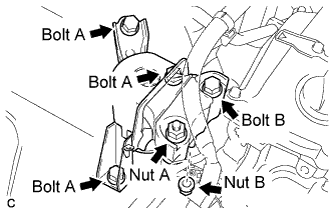
| 6. INSTALL ENGINE MOUNTING INSULATOR SUB-ASSEMBLY RH |
Install the engine mounting insulator sub-assembly RH with the 4 bolts and 2 nuts.
- Torque:
- Bolt A:
- 52 N*m{530 kgf*cm, 38 ft.*lbf}
- Bolt B:
- 95 N*m{969 kgf*cm, 70 ft.*lbf}
- Nut A:
- 95 N*m{969 kgf*cm, 70 ft.*lbf}
- Nut B:
- 52 N*m{530 kgf*cm, 38 ft.*lbf}
| 7. INSTALL GENERATOR ASSEMBLY |
- HINT:
- COROLLA_ZRE142 RM0000026ZB01OX.html.