Front Suspension Lower No. 1 Arm -- Removal |
| 1. REMOVE FRONT WHEEL |
| 2. REMOVE HOOD SUB-ASSEMBLY |
Remove the hood (RAV4_ACA30 RM00000161Z00KX.html).
| 3. SUSPEND ENGINE ASSEMBLY (for 1AZ-FE, 2AZ-FE) |
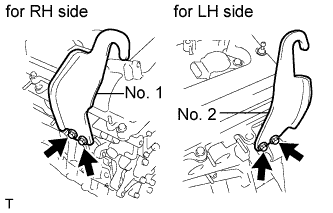
Install the No. 1 and No. 2 engine hangers with the bolts as shown in the illustration.
- Part No.:
Item Part No. No. 1 engine hanger 12281-28010 No. 2 engine hanger 12282-28010 Bolt 91512-61020
- Torque:
- 38 N*m{387 kgf*cm, 28 ft.*lbf}
 |
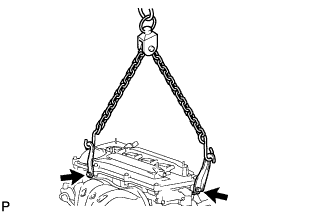
Attach the sling device to the engine hangers and chain block.
 |
Carefully remove the engine with transaxle from the vehicle.
| 4. SUSPEND ENGINE ASSEMBLY (for 2GR-FE) |
Install the No. 1 and No. 2 engine hangers with the 4 bolts as shown in the illustration.
- Torque:
- 33 N*m{337 kgf*cm, 24 ft.*lbf}
Part Name Part No. No. 1 engine hanger 12281-31120 No. 2 engine hanger 12282-31100 Bolt 91671-10825 - HINT:
- Insert the claw of the hanger into hole of the cylinder head.
- Fit the fork part of the hanger onto the rib of the cylinder head.
 |
Install an engine sling device to the engine and hold the engine with a chain block.
- CAUTION:
- Do not raise the engine more than necessary. If the engine is raised excessively, the vehicle may also be lifted up.
Set an engine lifter underneath the engine.
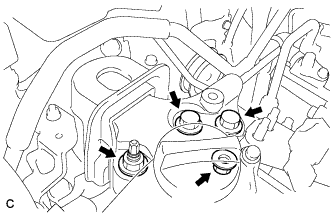
Remove the 2 bolts and 2 nuts, and disconnect the engine mounting insulator RH.
 |
Remove the bolt and nut, and disconnect the engine mounting insulator LH.
 |
Remove the 6 bolts and front suspension member brace rear RH and LH.
 |
Remove the 6 bolts, crossmember and suspension member.
Using the chain block, slowly remove the engine from the vehicle and the intermediate shaft from the pinion. Then set the engine on the engine lifter.
- NOTICE:
- Make sure that the engine is clear of all wiring and hoses.
- While lowering the engine from the vehicle, do not allow it to contact the vehicle.
- HINT:
- Place the engine on wooden blocks or equivalent so that the engine is level.
| 5. SUSPEND ENGINE ASSEMBLY (for 3ZR-FAE) |
Set an engine lifter underneath the engine.
- HINT:
- Place the engine on wooden blocks or equivalent so that the engine is level.
Remove the bolt and 2 nuts, and disconnect the engine mounting insulator RH.
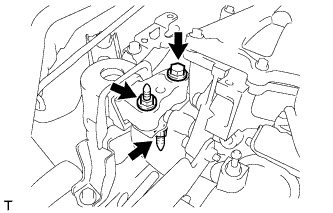 |
Remove the bolt and nut, and disconnect the engine mounting insulator LH.
 |
Remove the 6 bolts and front suspension member brace rear RH and LH.
 |
Remove the 2 bolts and front suspension crossmember.
Operate the engine lifter and slowly remove the engine from the vehicle.
- NOTICE:
- Make sure that the engine is clear of all wiring and hoses.
- While lowering the engine from the vehicle, do not allow it to contact the vehicle.
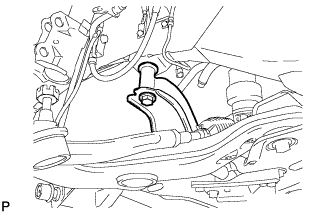
| 6. REMOVE FRONT STABILIZER LINK ASSEMBLY LH |
Remove the 2 nuts and stabilizer link.
 |
| 7. DISCONNECT FRONT SUSPENSION LOWER NO. 1 ARM SUB-ASSEMBLY LH |
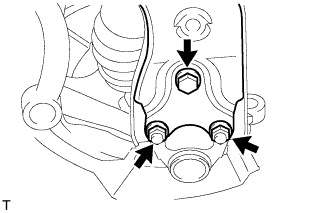 |
Remove the 2 nuts and bolt, and disconnect the lower arm from the ball joint.
| 8. DISCONNECT FRONT SUSPENSION LOWER NO. 1 ARM SUB-ASSEMBLY RH |
- HINT:
- Use the same procedures described for the LH side.
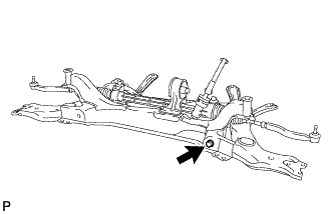
| 9. DISCONNECT FRONT SUSPENSION CROSSMEMBER SUB-ASSEMBLY |
 |
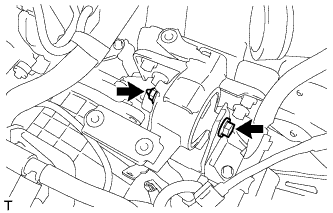
Remove the 2 nuts, 2 bolts and rear engine mounting insulator.
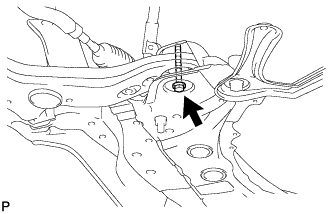
Remove the bolt from the suspension member.
 |
Support the crossmember with the jack.
 |
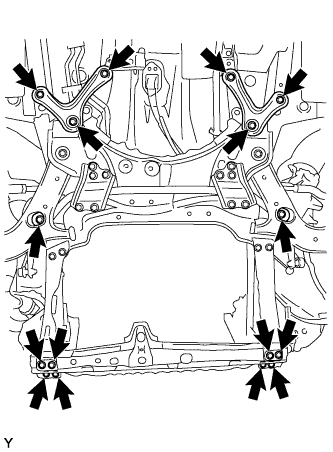
Remove the bolts labeled A.
Remove the 4 bolts from the member reinforcement.
Remove the bolts labeled B.
Remove the 4 bolts from the member brace.
Remove the bolts labeled C.
Remove the 2 bolts from the member brace.
Slowly lower the jack, and disconnect the crossmember from the vehicle.
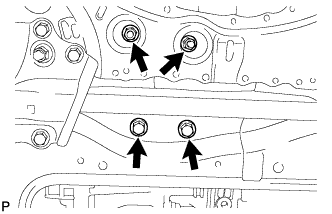
| 10. REMOVE FRONT SUSPENSION LOWER NO. 1 ARM SUB-ASSEMBLY LH |
 |
Remove the bolt and nut from the suspension member (front side).
Remove the bolt and nut from the suspension member (rear side). Then remove the lower arm.
 |
| 11. REMOVE FRONT SUSPENSION LOWER NO. 1 ARM SUB-ASSEMBLY RH |
- HINT:
- Use the same procedures described for the LH side.