Rear Cooling Unit Removal
RECOVER REFRIGERANT FROM REFRIGERATION SYSTEM
PRECAUTION
DISCONNECT CABLE FROM NEGATIVE BATTERY TERMINAL
REMOVE ROOF HEADLINING ASSEMBLY
REMOVE REAR NO. 5 ROOF AIR DUCT
REMOVE REAR NO. 4 ROOF AIR DUCT
REMOVE REAR NO. 3 ROOF AIR DUCT
REMOVE REAR NO. 2 ROOF AIR DUCT
REMOVE REAR NO. 1 ROOF AIR DUCT
REMOVE REAR NO. 1 SIDE AIR DUCT
REMOVE REAR BUMPER COVER
REMOVE QUARTER VENT DUCT ASSEMBLY RH
DISCONNECT NO. 1 COOLER COVER
DISCONNECT AIR CONDITIONING TUBE AND ACCESSORY ASSEMBLY
REMOVE REAR COOLING UNIT ASSEMBLY
Rear Cooling Unit -- Removal |
| 1. RECOVER REFRIGERANT FROM REFRIGERATION SYSTEM |
Start up the engine.
Turn the A/C switch ON.
Operate the cooler compressor with an engine speed of approximately 1,000 rpm for 5 to 6 minutes to circulate the refrigerant and collect the compressor oil remaining in each component into the cooler compressor.
Stop the engine.
Using SST, discharge the refrigerant gas.
- SST
- 09985-20010(09985-02130,09985-02150,09985-02090,09985-02110,09985-02010,09985-02050,09985-02060,09985-02070)
- NOTICE:
- After turning the ignition switch off, waiting time may be required before disconnecting the cable from the battery terminal. Therefore, make sure to read the disconnecting the cable from the battery terminal notice before proceeding with work (Toyota Fortuner RM000000UYX010X.html).
| 3. DISCONNECT CABLE FROM NEGATIVE BATTERY TERMINAL |
- NOTICE:
- When disconnecting the cable, some systems need to be initialized after the cable is reconnected (Toyota Fortuner RM000004W63000X.html).
| 4. REMOVE ROOF HEADLINING ASSEMBLY |
(Toyota Fortuner RM000001JVR00MX.html)
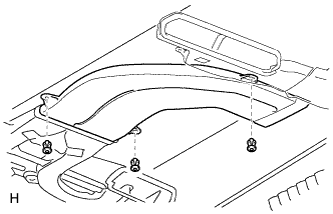
| 5. REMOVE REAR NO. 5 ROOF AIR DUCT |
Detach the 2 clamps.
Remove the 2 clips and rear No. 5 roof air duct.
| 6. REMOVE REAR NO. 4 ROOF AIR DUCT |
Remove the 3 clips and rear No. 4 roof air duct.
| 7. REMOVE REAR NO. 3 ROOF AIR DUCT |
Remove the 3 clips and rear No. 3 roof air duct.
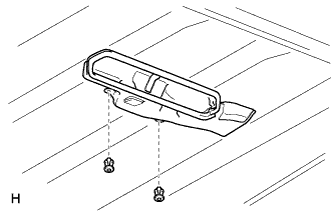
| 8. REMOVE REAR NO. 2 ROOF AIR DUCT |
Remove the 2 clips and rear No. 2 roof air duct.
| 9. REMOVE REAR NO. 1 ROOF AIR DUCT |
Remove the 3 clips and rear No. 1 roof air duct.
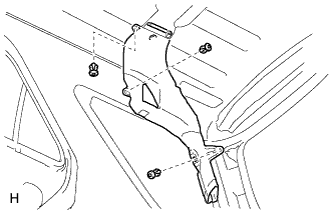
| 10. REMOVE REAR NO. 1 SIDE AIR DUCT |
Remove the 2 clips.
Detach the 2 claws and remove the rear No. 1 side air duct.
| 11. REMOVE REAR BUMPER COVER |
(Toyota Fortuner RM000004S6O00AX.html)
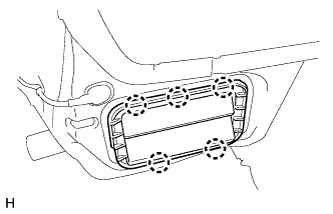
| 12. REMOVE QUARTER VENT DUCT ASSEMBLY RH |
Detach the 5 claws and remove the quarter vent duct assembly RH.
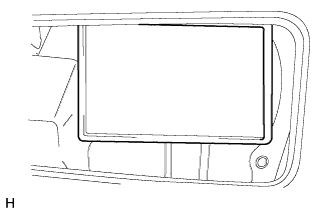
| 13. DISCONNECT NO. 1 COOLER COVER |
Remove the packing.
Remove the 2 bolts and disconnect the No. 1 cooler cover.
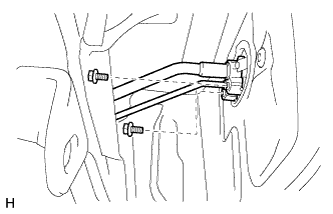
| 14. DISCONNECT AIR CONDITIONING TUBE AND ACCESSORY ASSEMBLY |
Remove the 2 bolts.
Disconnect the air conditioning tube and accessory assembly.
- NOTICE:
- Do not use a screwdriver or similar tool to disconnect the tube.
- Seal the openings of the disconnected parts using vinyl tape to prevent moisture and foreign matter from entering them.
Remove the 2 O-rings from the air conditioning tube and accessory assembly.
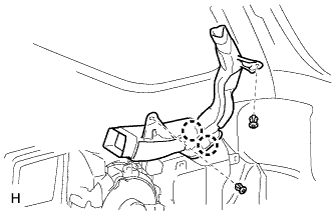
| 15. REMOVE REAR COOLING UNIT ASSEMBLY |
Remove the bolt labeled A and body ground.
Detach the 4 clamps.
Disconnect the 4 connectors.
Remove the 3 bolts labeled B and rear cooling unit assembly.
Text in Illustration*1
| Bolt A
|
*2
| Bolt B
|