Система Смазки -- Проверка Без Снятия С Автомобиля |
| 1. CHECK ENGINE OIL LEVEL |
Warm up the engine. Then stop the engine and wait for 5 minutes.
Check that the engine oil level is between the 2 marks on the oil level gauge.
If low, check for leakage and top up oil to the upper mark.- ПРИМЕЧАНИЕ:
- Do not add engine oil to above the upper mark.
| 2. CHECK ENGINE OIL QUALITY |
Check the engine oil for deterioration, water intrusion, discoloration and thinning.
If the oil quality is visibly poor, replace the oil.
| 3. INSPECT OIL PRESSURE |
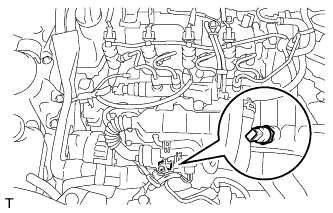
Remove the engine under cover.
Disconnect the oil pressure switch connector.
Using a 22 or 24 mm deep socket wrench, remove the oil pressure switch.
- УКАЗАНИЕ:
- As there are 2 kinds of oil pressure switches, select and use either a 22 or 24 mm deep socket wrench as appropriate.
 |
Install the oil pressure gauge.
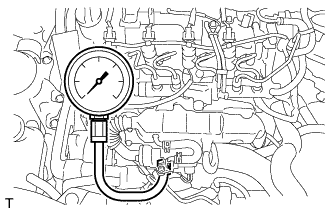 |
Warm up the engine.
Check the oil pressure.
- Oil pressure:
Engine rpm Oil pressure 770 rpm 29 kPa (0.3 kgf*cm2, 4.3 psi) or more 3000 rpm 150 to 550 kPa (1.5 to 5.6 kgf*cm2, 22 to 80 psi)
Remove the oil pressure gauge.
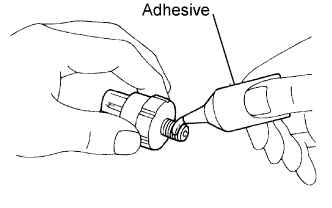
Apply adhesive to 2 or 3 threads of the oil pressure switch.
- Adhesive:
- TOYOTA Genuine Adhesive 1344, Three Bond 1344 or equivalent
 |
Using a 22 or 24 mm deep socket wrench, install the oil pressure switch.
- Момент затяжки:
- 15 Н*м{153 кгс*см, 11 фунт-сила-футов}
- ПРИМЕЧАНИЕ:
- Do not start the engine for at least 1 hour after installation.
Connect the oil pressure switch connector.
Check for engine oil leakage.
Install the engine under cover.
| 4. INSPECT ENGINE OIL LEVEL SENSOR |
Remove the engine oil level sensor.
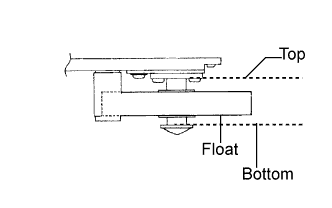 |
Measure the resistance according to the value(s) in the table below.
Standard resistance Tester Connection Condition Specified Condition 1 - 2 Float position is at the top Below 1 Ω 1 - 2 Float position is at the bottom 10 kΩ or higher