Насос Системы Охлаждения Проверка Без Снятия С Автомобиля. Corolla Auris
Двигатель. COROLLA, AURIS. ZZE150 ZRE151,152 NDE150
REMOVE ENGINE UNDER COVER REAR RH
REMOVE NO. 1 ENGINE COVER
REMOVE V-RIBBED BELT
INSPECT WATER PUMP ASSEMBLY
REMOVE WATER PUMP PULLEY
INSPECT WATER PUMP
INSTALL WATER PUMP PULLEY
INSTALL V-RIBBED BELT
ADJUST V-RIBBED BELT
INSPECT DRIVE BELT DEFLECTION AND TENSION
INSTALL WIRE HARNESS
INSTALL ENGINE UNDER COVER REAR RH
INSTALL NO. 1 ENGINE COVER
Насос Системы Охлаждения -- Проверка Без Снятия С Автомобиля |
| 1. REMOVE ENGINE UNDER COVER REAR RH |
Remove the 5 clips and engine under cover rear RH.
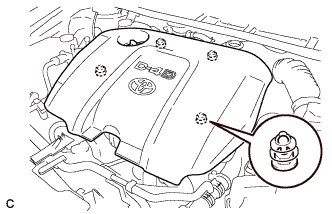
| 2. REMOVE NO. 1 ENGINE COVER |
Disengage the 4 pins and remove No. 1 engine cover sub-assembly.
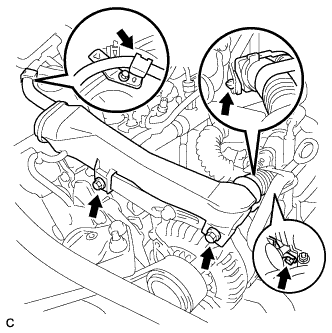
Remove the 3 bolts and 2 wire harness clamps, then separate the wire harness.
Loosen bolts A and B.
Remove the v-ribbed belt.
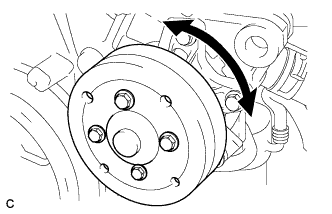
| 4. INSPECT WATER PUMP ASSEMBLY |
Turn the pulley and check that the water pump bearing moves smoothly and quietly.
If necessary, replace the water pump assembly.
| 5. REMOVE WATER PUMP PULLEY |
Using SST, hold the water pump pulley.
- SST
- 09960-10010(09962-01000,09963-00700)
Remove the 4 bolts, then remove the water pump pulley.
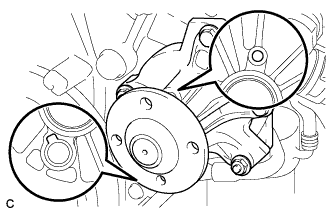
Visually check the drain hole and air hole for coolant leakage.
If leakage is found, replace the water pump assembly.
| 7. INSTALL WATER PUMP PULLEY |
Temporarily install the water pump pulley with the 4 bolts.
Using SST, hold the water pump pulley.
- SST
- 09960-10010(09962-01000,09963-00700)
Tighten the 4 bolts to the specified torque.
- Момент затяжки:
- 15 Н*м{153 кгс*см, 11 фунт-сила-футов}
Temporarily install the v-ribbed belt onto each pulley.
- ПРИМЕЧАНИЕ:
- Before installing the V belt, check each pulley for any kind of liquid and chips.
- Check that the ribs of the V belt are correctly fitted into the grooves of the pulleys.
Insert a bar between the generator and the engine. Pull the bar toward the front of the vehicle and adjust the tension.
Tighten bolt A, then tighten bolt B.
- Момент затяжки:
- Bolt A:
- 19 Н*м{189 кгс*см, 14 фунт-сила-футов}
- Bolt B:
- 32 Н*м{326 кгс*см, 24 фунт-сила-футов}
| 10. INSPECT DRIVE BELT DEFLECTION AND TENSION |
Inspect the v-ribbed belt deflection.
- Pressing force:
- 98 N (10 kgf, 221 lbf)
New belt
mm (in.)
| Used belt
mm (in.)
|
5.0 to 6.0
(0.197 to 0.236)
| 7.0 to 8.5
(0.276 to 0.335)
|
Inspect the v-ribbed V belt tension.
New belt
N (kg, lb)
| Used belt
N (kg, lb)
|
980 to 1176
(100 to 120, 220 to 264)
| 490 to 686
(50 to 70, 110 to 154)
|
- ПРИМЕЧАНИЕ:
- Check the V belt deflection at the specified point.
- When installing a new belt, set its tension value as specified.
- When checking a belt used for over 5 minutes, confirm that the deflection value is within the specified range for a used belt.
- When reinstalling a belt used for over 5 minutes, check whether its deflection value is within the specified range for the used belt.
- When using a belt tension gauge, confirm its accuracy first by using a master gauge.
Install the wire harness with the 3 bolts and 2 wire harness clamps.
- Момент затяжки:
- Bolt A:
- 13 Н*м{131 кгс*см, 14 фунт-сила-футов}
- Bolt B:
- 11 Н*м{112 кгс*см, 8 фунт-сила-футов}
| 12. INSTALL ENGINE UNDER COVER REAR RH |
Install the engine under cover rear RH with the 5 clips.
| 13. INSTALL NO. 1 ENGINE COVER |
Fit the 4 retainers and install the No. 1 engine cover.