Manual Transaxle Assembly Installation
INSTALL MANUAL TRANSAXLE CASE PROTECTOR
INSTALL MANUAL TRANSAXLE ASSEMBLY
INSTALL STIFFENER PLATE RH
INSTALL STIFFENER PLATE LH
INSTALL OIL PAN INSULATOR
INSTALL REAR ENGINE MOUNTING BRACKET
INSTALL ENGINE MOUNTING BRACKET LH
INSTALL FRONT ENGINE MOUNTING BRACKET
INSTALL TRANSAXLE CONTROL CABLE ASSEMBLY
INSTALL CLUTCH RELEASE CYLINDER ASSEMBLY
INSTALL BACK-UP LIGHT SWITCH ASSEMBLY
INSTALL TRANSFER ASSEMBLY
INSTALL ENGINE ASSEMBLY WITH MANUAL TRANSAXLE
ADD TRANSAXLE OIL
INSPECT TRANSAXLE OIL
ADD TRANSFER OIL
INSPECT TRANSFER OIL
INSTALL FRONT WHEELS
CONNECT CABLE TO NEGATIVE BATTERY TERMINAL
Manual Transaxle Assembly -- Installation |
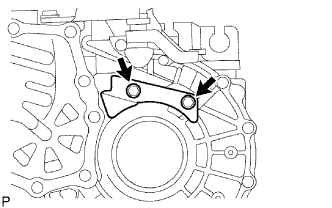
| 1. INSTALL MANUAL TRANSAXLE CASE PROTECTOR |
Install the case protector with the 2 bolts.
- Torque:
- 18 N*m{184 kgf*cm, 13 ft.*lbf}
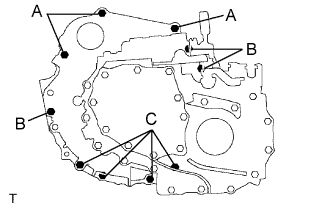
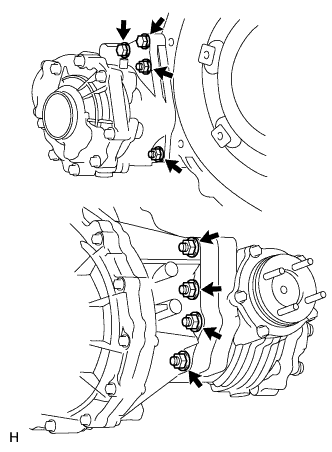
| 2. INSTALL MANUAL TRANSAXLE ASSEMBLY |
Align the input shaft with the clutch disc and install the transaxle to the engine.
Install the 10 bolts.
- Torque:
- 64 N*m{653 kgf*cm, 47 ft.*lbf}for bolt A
- 46 N*m{469 kgf*cm, 34 ft.*lbf}for bolt B
- 44 N*m{449 kgf*cm, 32 ft.*lbf}for bolt C
| 3. INSTALL STIFFENER PLATE RH |
Install the stiffener plate with the 4 bolts.
- Torque:
- 46 N*m{469 kgf*cm, 34 ft.*lbf}
| 4. INSTALL STIFFENER PLATE LH |
Install the stiffener plate with the 4 bolts.
- Torque:
- 46 N*m{469 kgf*cm, 34 ft.*lbf}
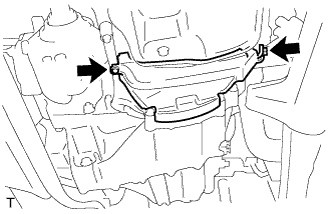
| 5. INSTALL OIL PAN INSULATOR |
Install the insulator with the 2 bolts.
- Torque:
- 9.0 N*m{92 kgf*cm, 80 in.*lbf}
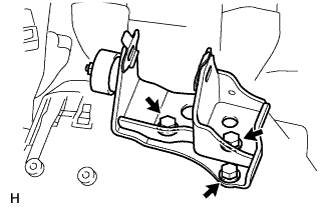
| 6. INSTALL REAR ENGINE MOUNTING BRACKET |
Install the bracket with the 3 bolts.
- Torque:
- 45 N*m{459 kgf*cm, 33 ft.*lbf}
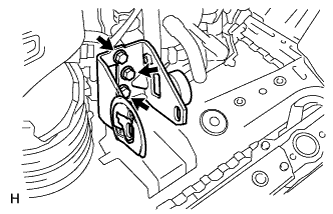
| 7. INSTALL ENGINE MOUNTING BRACKET LH |
Install the bracket with the 3 bolts.
- Torque:
- 64 N*m{653 kgf*cm, 47 ft.*lbf}
| 8. INSTALL FRONT ENGINE MOUNTING BRACKET |
Install the bracket with the 3 bolts.
- Torque:
- 64 N*m{653 kgf*cm, 47 ft.*lbf}
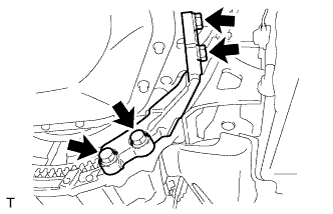
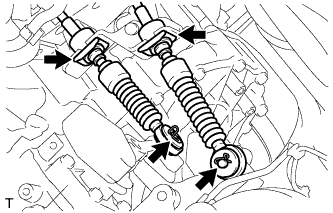
| 9. INSTALL TRANSAXLE CONTROL CABLE ASSEMBLY |
Connect the 2 cable ends with the 2 washers and 2 clips.
Install 2 new clips to the control cable bracket.
| 10. INSTALL CLUTCH RELEASE CYLINDER ASSEMBLY |
1AZ-FE:
Install the clutch release cylinder (RAV4_ACA30 RM000001DEP00AX.html).
2AZ-FE:
Install the clutch release cylinder (RAV4_ACA30 RM000001DEP00BX.html).
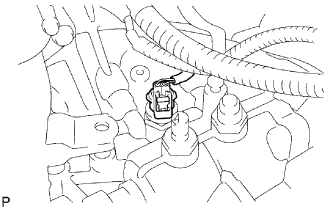
| 11. INSTALL BACK-UP LIGHT SWITCH ASSEMBLY |
Install the back-up light switch and gasket to the manual transaxle case.
- Torque:
- 40 N*m{410 kgf*cm, 30 ft.*lbf}
Connect the back-up light switch connector.
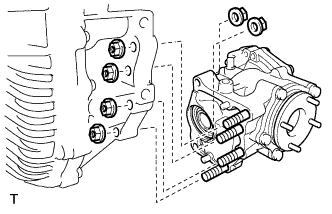
| 12. INSTALL TRANSFER ASSEMBLY |
except K111F:
Install the transfer to the transaxle with the 6 nuts and 2 bolts.
- Torque:
- 69 N*m{700 kgf*cm, 51 ft.*lbf}
for K111F:
Install the transfer to the transaxle with the 6 nuts and 2 bolts.
- Torque:
- 69 N*m{700 kgf*cm, 51 ft.*lbf}
| 13. INSTALL ENGINE ASSEMBLY WITH MANUAL TRANSAXLE |
for 1AZ-FE:
Install the engine with manual transaxle (RAV4_ACA30 RM000001BC100NX.html).
for 2AZ-FE:
Install the engine with manual transaxle (RAV4_ACA30 RM000001BC100OX.html).
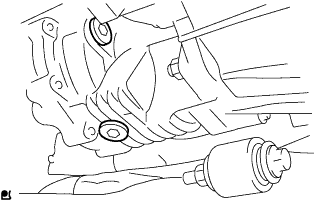
| 15. INSPECT TRANSAXLE OIL |
Stop the vehicle in a level place.
Remove the transaxle filler plug and gasket.
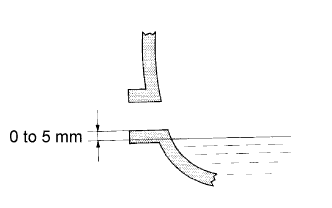
Check that the oil level is between 0 to 5 mm (0 to 0.20 in.) from the bottom lip of the filler plug opening. If the result is not as specified, add transaxle oil.
- Oil grade:
- GL-4
- Viscosity:
- SAE 75W
- Standard capacity:
- 2.5 liters (2.6 US qts, 2.2 Imp. qts)
- NOTICE:
- Too much or too little oil will lead to transaxle problems.
- After adjusting the oil level, drive the vehicle and check the oil level again.
Check for oil leakage if the oil level is low.
Install the transaxle filler plug and a new gasket.
- Torque:
- 49 N*m{500 kgf*cm, 36 ft.*lbf}
Remove the transfer case plug No. 2 (for filler) and gasket.
Check that the oil level is between 0 to 5.0 mm (0 to 0.20 in.) from the bottom lip of the case plug (for filler) hole.
If the result is not as specified, add transfer oil.
- Oil grade:
- Hypoid gear oil SX API GL-5 or equivalent
- Viscosity:
- SAE 85W-90
- Standard capacity:
- 0.45 liter (0.48 US qts, 0.40 Imp. qts)
- NOTICE:
- When adding oil, pour it slowly.
- Too much or too little oil will lead to transfer problems.
When the oil level is too low, check for oil leakage.
Install a new gasket into the case plug (for filler) and then install the plug.
- Torque:
- 39 N*m{398 kgf*cm, 28 ft.*lbf}
- Torque:
- 103 N*m{1,050 kgf*cm, 76 ft.*lbf}
| 19. CONNECT CABLE TO NEGATIVE BATTERY TERMINAL |