Condenser (For 2Tr-Fbe) Removal
RECOVER REFRIGERANT FROM REFRIGERATION SYSTEM
REMOVE FRONT BUMPER COVER
DISCONNECT NO. 1 COOLER REFRIGERANT DISCHARGE HOSE
DISCONNECT AIR CONDITIONING TUBE AND ACCESSORY ASSEMBLY
REMOVE HOOD LOCK ASSEMBLY
REMOVE UPPER RADIATOR SUPPORT SUB-ASSEMBLY
REMOVE COOLER CONDENSER ASSEMBLY
Condenser (For 2Tr-Fbe) -- Removal |
| 1. RECOVER REFRIGERANT FROM REFRIGERATION SYSTEM |
Start the engine.
Operate the cooler compressor under the conditions shown below:
Item
| Condition
|
Engine Speed
| Idling
|
Operating Time
| 3 minutes or more
|
A/C Switch Status
| On
|
Blower Switch Status
| HI
|
Set Temperature
| MAX COOL
|
This causes most of the compressor oil from the various components of the A/C system to collect in the A/C compressor.
- NOTICE:
- It is not necessary to operate the cooler compressor if the A/C does not operate because of compressor lock, etc.
Stop the engine.
Recover the refrigerant from the A/C system using a refrigerant recovery unit.
- HINT:
- Use the refrigerant recovery unit in accordance with the manufacturer's instruction manual.
| 2. REMOVE FRONT BUMPER COVER |
(HILUX_TGN26 RM000003NOW00GX.html)
| 3. DISCONNECT NO. 1 COOLER REFRIGERANT DISCHARGE HOSE |
Remove the bolt and disconnect the No. 1 cooler refrigerant discharge hose from the cooler condenser.
Remove the O-ring from the No. 1 cooler refrigerant discharge hose.
- NOTICE:
- Seal the openings of the disconnected parts using vinyl tape to prevent moisture and foreign matter from entering.
| 4. DISCONNECT AIR CONDITIONING TUBE AND ACCESSORY ASSEMBLY |
Remove the bolt and disconnect the air conditioning tube and accessory assembly from the cooler condenser.
Remove the O-ring from the air conditioning tube and accessory assembly.
- NOTICE:
- Seal the openings of the disconnected parts using vinyl tape to prevent moisture and foreign matter from entering.
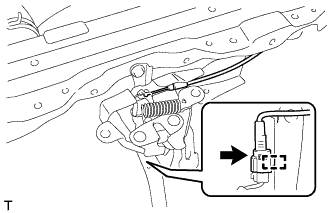
| 5. REMOVE HOOD LOCK ASSEMBLY |
Remove the 3 bolts.
Move the hood lock assembly as shown in the illustration to remove it.
Detach the clamp and disconnect the connector.
Disconnect the hood lock control cable and remove the hood lock assembly.
| 6. REMOVE UPPER RADIATOR SUPPORT SUB-ASSEMBLY |
Remove the 7 bolts and upper radiator support sub-assembly.
| 7. REMOVE COOLER CONDENSER ASSEMBLY |
Remove the cooler condenser assembly.