REMOVE FRONT SEAT INNER BELT ASSEMBLY RH (for Front Passenger Side)
REMOVE VERTICAL SEAT ADJUSTER KNOB LH (w/ Vertical Adjuster)
REMOVE SEAT TRACK CONTROL CABLE BRACKET RH (for Walk in Seat Type)
REMOVE SEAT TRACK CONTROL CABLE BRACKET LH (for Walk in Seat Type)
REMOVE NO. 1 FOLD SEAT LOCK CONTROL CABLE ASSEMBLY RH (for Walk in Seat Type)
REMOVE FRONT NO. 2 SEAT ADJUSTER PIN LH (w/ Vertical Adjuster)
REMOVE VERTICAL ADJUSTING SHAFT SUB-ASSEMBLY (w/ Vertical Adjuster)
REMOVE FRONT SEAT CUSHION EDGE PROTECTOR RH (for Walk in Seat Type)
REMOVE NO. 1 FOLD SEAT LOCK CONTROL CABLE ASSEMBLY LH (for Walk in Seat Type)
Front Seat Assembly (For Separate Seat Type) -- Disassembly |
- CAUTION:
- Wear protective gloves. Sharp areas on the parts may injure your hands.
- HINT:
- Use the same procedure for the RH and LH sides.
- The procedure listed below is for the LH side.
| 1. REMOVE FRONT SEAT INNER BELT ASSEMBLY LH (for Driver Side) |
 |
Detach the clamp.
Detach the wire harness from the clamp.
 |
Roll up the front seat cushion cover LH.
Remove the nut and front seat inner belt assembly LH.
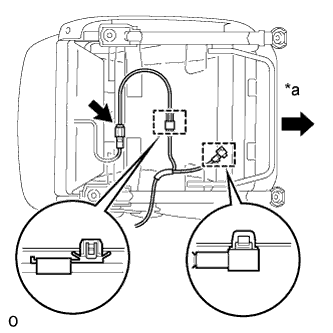
| 2. REMOVE FRONT SEAT INNER BELT ASSEMBLY RH (for Front Passenger Side) |
w/ Front Passenger Seat Belt Warning System:
Remove the hog rings and open the cover.
 |
w/ Front Passenger Seat Belt Warning System:
Disconnect the connector.
Detach the 2 clamps.
Text in Illustration *a Front Detach the wire harness from the clamp.
Roll up the front seat cushion cover RH.
Remove the nut and front seat inner belt assembly RH.

w/o Front Passenger Seat Belt Warning System:
Roll up the front seat cushion cover RH.
Remove the nut and front seat inner belt assembly RH.
 |
| 3. REMOVE FRONT SEAT CUSHION COVER LH |
Remove the front seat cushion cover LH.
| 4. REMOVE FRONT SEAT INNER CUSHION SHIELD LH |
 |
Remove the 2 screws.
Detach the 2 hooks in the order shown in the illustration and remove the front seat inner cushion shield LH.
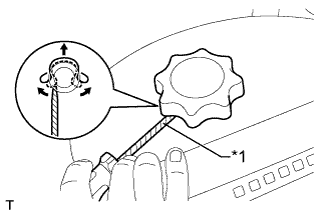
| 5. REMOVE VERTICAL SEAT ADJUSTER KNOB LH (w/ Vertical Adjuster) |
Using a screwdriver, remove the snap ring as shown in the illustration.
- HINT:
- Tape the screwdriver tip before use.
Text in Illustration *1 Protective Tape
 |
Remove the vertical seat adjuster knob LH.
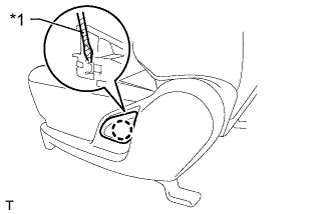
| 6. REMOVE RECLINING ADJUSTER RELEASE HANDLE LH |
Raise the reclining adjuster release handle LH to reveal the claw. Using a screwdriver, detach the claw and remove the reclining adjuster release handle LH.
- HINT:
- Tape the screwdriver tip before use.
Text in Illustration *1 Protective Tape
 |
| 7. REMOVE FRONT SEAT CUSHION SHIELD LH |
 |
Remove the 2 screws.
Detach the 2 hooks in the order shown in the illustration, and then detach the guide and remove the front seat cushion shield LH.
Text in Illustration *1 Hook *2 Guide
| 8. REMOVE SEATBACK SPRING LH |
Remove the seatback spring LH.
 |
| 9. REMOVE ADJUSTER TUBE RH (for Walk in Seat Type) |
Remove the adjuster tube RH from the seatback spring LH.
 |
| 10. REMOVE SEAT TRACK CONTROL CABLE BRACKET RH (for Walk in Seat Type) |
 |
Using a screwdriver, remove the E-ring.
Detach the hook and remove the seat track control cable bracket RH.
| 11. REMOVE SEAT TRACK CONTROL CABLE BRACKET LH (for Walk in Seat Type) |
- HINT:
- Use the same procedure described for the RH side.
| 12. REMOVE FRONT SEATBACK HINGE PLATE (for Walk in Seat Type) |
 |
Remove the front seatback hinge plate.
| 13. REMOVE NO. 1 FOLD SEAT LOCK CONTROL CABLE ASSEMBLY RH (for Walk in Seat Type) |
Detach the hook and remove the No. 1 fold seat lock control cable assembly RH.
 |
| 14. REMOVE SEPARATE TYPE FRONT SEATBACK COVER |
for Power Seat, Front Passenger Side:
Remove the hog rings and fold back the separate type front seat cushion cover and rubber bands of the separate type front seatback cover.
 |
Remove the 4 bolts and front seatback assembly.
 |
Detach the 2 pieces of fastening tape and remove the hog rings, and then roll up the separate type front seatback cover.

Text in Illustration *1 Fastening Tape - -
Remove the hog rings and detach the 2 straps of the separate type front seatback cover, and then roll up the separate type front seatback cover.
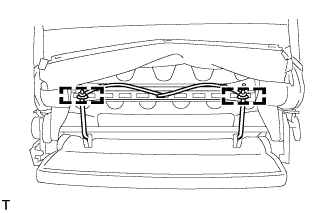 |
Pass the strap of the separate type front seatback cover through the holes of the separate type front seatback pad.
 |
for Vinyl Seat, for Cloth Seat:
Remove the hog rings and roll up the separate type front seatback cover.
Text in Illustration *A for Vinyl Seat *B for Cloth Seat *a Front view of front seatback *b Rear view of front seatback
for Leather Seat:
Remove the hog rings and roll up the separate type front seatback cover.
Text in Illustration *A for TASA Made *B for TMT Made *a Front view of front seatback *b Rear view of front seatback
Detach the 4 claws and remove the 2 front seat headrest supports and separate type front seatback cover from the separate type front seatback pad.
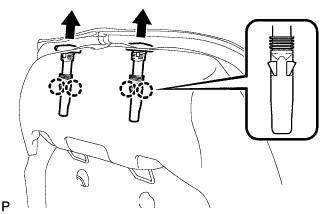 |
| 15. REMOVE SEPARATE TYPE FRONT SEATBACK PAD |
Remove the separate type front seatback pad from the separate type front seatback spring assembly.
 |
| 16. REMOVE NO. 1 SEATBACK CLOTH (for TASA Made) |
 |
Remove the No. 1 seatback cloth.
| 17. REMOVE SEPARATE TYPE FRONT SEAT CUSHION COVER |
Remove the hog rings and fold back the separate type front seat cushion cover.
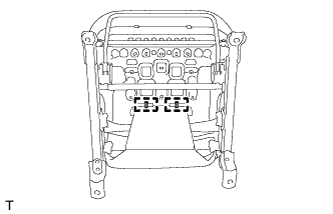 |
for Front Passenger Side, w/ Seat Belt Warning System:
Detach the wire harness clamp.
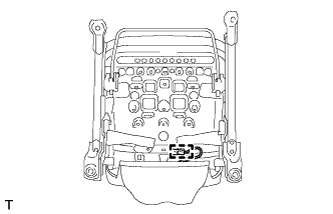 |
Remove the hog rings.
 |
Bend the 2 front seat cushion frame claws upward.
 |
Detach the hooks and remove the separate type front seat cushion cover together with the pad from the front seat cushion frame sub-assembly LH.

Remove the hog rings and separate type front seat cushion cover from the separate type front seat cushion pad.

Text in Illustration *A for Vinyl Seat, for Cloth Seat *B for Leather Seat
| 18. REMOVE FRONT SEAT CUSHION PROTECTOR |
Remove the 2 front seat cushion protectors.
 |
| 19. REMOVE FRONT SEAT CUSHION FRAME SUB-ASSEMBLY LH |
Remove the 4 bolts and front seat cushion frame sub-assembly LH from the lower reclining adjuster arm sub-assembly RH and the lower reclining adjuster arm sub-assembly LH.
 |
| 20. REMOVE FRONT SEAT ADJUSTER ROD (w/ Vertical Adjuster) |
Remove the 2 bolts and front seat adjuster rod.
 |
| 21. REMOVE SEAT TRACK HANDLE SUB-ASSEMBLY LH |
Using a screwdriver, detach the 2 springs and remove the seat track handle sub-assembly LH as shown in the illustration.
- HINT:
- The seat track handle sub-assembly LH will get caught on the springs when removing it. Detach the springs to remove the seat track handle sub-assembly LH.
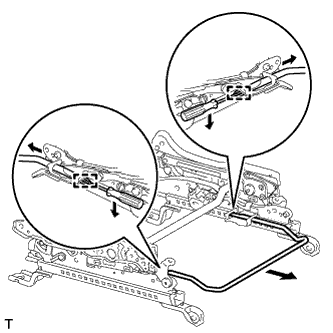 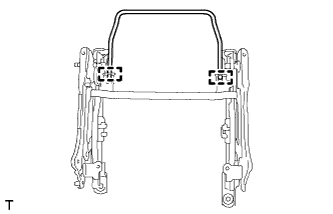 |
| 22. REMOVE SEAT SPRING (w/ Vertical Adjuster) |
Temporarily install the vertical seat adjuster knob LH.
Turn the vertical seat adjuster knob LH clockwise and move the lower reclining adjuster arm sub-assembly to the uppermost position.
Remove the vertical seat adjuster knob LH.
Detach the seat spring from the lower reclining adjuster arm sub-assembly.
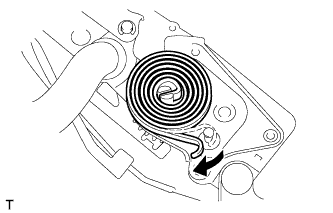 |
Using a screwdriver, spread apart the tabs that hold the spring, and then remove the seat spring.
 |
| 23. REMOVE FRONT NO. 2 SEAT ADJUSTER PIN LH (w/ Vertical Adjuster) |
Using a 6 mm socket hexagon wrench, remove the front No. 2 seat adjuster pin LH.
 |
| 24. REMOVE VERTICAL ADJUSTING SHAFT SUB-ASSEMBLY (w/ Vertical Adjuster) |
Temporarily install the vertical seat adjuster knob LH.
Turn the vertical seat adjuster knob LH counterclockwise and move the gear of the vertical adjusting shaft sub-assembly to the position shown in the illustration.
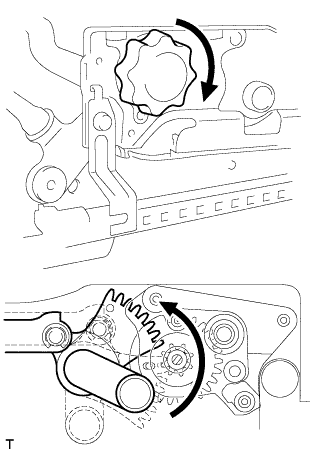 |
Remove the vertical seat adjuster knob LH.
Using a screwdriver, remove the 2 E-rings.
 |
Disconnect the 2 vertical travel links from the vertical adjusting shaft sub-assembly.
Text in Illustration *1 Vertical Travel Link
Disconnect the vertical adjusting shaft sub-assembly from the 2 lower reclining adjuster arms and remove the vertical adjusting shaft sub-assembly.
 |
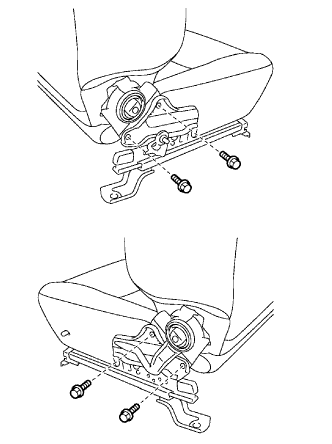
| 25. REMOVE LOWER RECLINING ADJUSTER ARM SUB-ASSEMBLY LH |
w/ Vertical Adjuster:
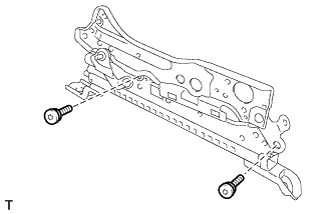
Using a T40 "TORX" socket wrench, remove the 2 "TORX" bolts and lower reclining adjuster arm sub-assembly LH.
 |
w/o Vertical Adjuster:
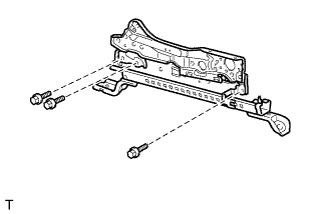
Remove the 3 bolts and lower reclining adjuster arm sub-assembly LH.
 |
| 26. REMOVE LOWER RECLINING ADJUSTER ARM SUB-ASSEMBLY RH |
w/ Vertical Adjuster:
- HINT:
- Use the same procedure described for the LH side.
w/o Vertical Adjuster:
- HINT:
- Use the same procedure described for the LH side.
| 27. REMOVE FRONT SEAT CUSHION EDGE PROTECTOR LH |
Remove the front seat cushion edge protector LH.
 |
| 28. REMOVE FRONT SEAT CUSHION EDGE PROTECTOR RH (for Walk in Seat Type) |
- HINT:
- Use the same procedure described for the LH side.
| 29. REMOVE NO. 1 FOLD SEAT LOCK CONTROL CABLE ASSEMBLY LH (for Walk in Seat Type) |
Detach the hook and remove the No. 1 fold seat lock control cable assembly LH.
 |
| 30. REMOVE SEAT TRACK COVER SPRING (for Walk in Seat Type) |
Operate the lock lever of the front seat outer track assembly so that the front seat outer track assembly is in the position shown in the illustration.
- NOTICE:
- When operating the lock lever of the front seat outer track assembly, the front seat outer track upper sub-assembly will suddenly move from the force of the spring. Therefore, hold down the front seat outer track upper sub-assembly while operating the lock lever of the front seat outer track assembly.
Remove the seat track cover spring.

Text in Illustration *1 Lock Lever - -