Oil Pump -- Installation |
| 1. INSTALL ENGINE WATER PUMP ASSEMBLY |
Install a new gasket and the engine water pump with the 8 bolts.
- Torque:
- 13 N*m{133 kgf*cm, 10 ft.*lbf}
| 2. INSTALL TIMING CHAIN COVER SUB-ASSEMBLY |
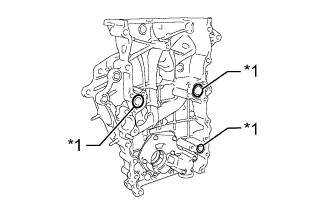
Install 3 new O-rings to the timing chain cover as shown in the illustration.
Text in Illustration *1 New O-Ring
 |
Apply seal packing to the timing chain cover in a continuous line as shown in the following illustration.
- Seal packing:
- Toyota Genuine Seal Packing Black, Three Bond 1207B or equivalent
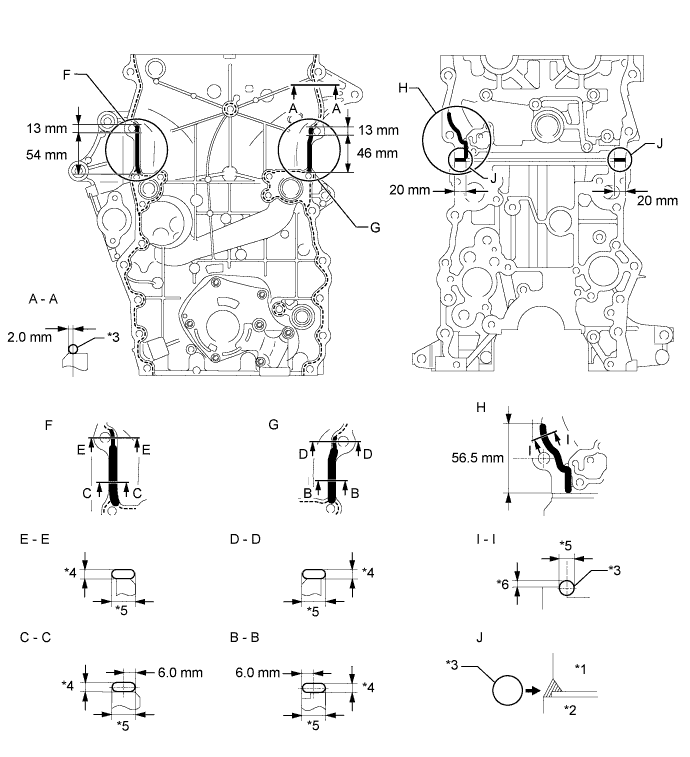
Text in Illustration *1 Cylinder Head *2 Cylinder Block *3 Seal Packing *4 Seal Packing Thickness *5 Seal Packing Width *6 Protrusion - Application Specification:
Area Seal Packing Diameter Distance from Edge of Cover to Center of Seal Packing Seal Packing Application Length Protrusion from Cylinder Head A - A
(Dashed line)2.5 to 4.0 mm (0.0984 to 0.157 in.) 2.0 mm (0.0787 in.) - - B - B
(Continuous line)10 to 14 mm (0.394 to 0.551 in.) wide and 2.5 to 4.0 mm (0.0984 to 0.157 in.) thick 6.0 mm (0.236 in.) 46 mm (1.81 in.) from top of bolt hole - C - C
(Continuous line)10 to 14 mm (0.394 to 0.551 in.) wide and 2.5 to 4.0 mm (0.0984 to 0.157 in.) thick 6.0 mm (0.236 in.) 54 mm (2.13 in.) from top of bolt hole - D - D
(Continuous line)9.0 to 13 mm (0.354 to 0.512 in.) wide and 2.5 to 4.0 mm (0.0984 to 0.157 in.) thick - 13 mm (0.512 in.) from top of bolt hole - E - E
(Continuous line)9.0 to 13 mm (0.354 to 0.512 in.) wide and 2.5 to 4.0 mm (0.0984 to 0.157 in.) thick - 13 mm (0.512 in.) from top of bolt hole - I - I
(Continuous line)8.0 mm (0.315 in.) - 56.5 mm (2.22 in.) from bottom of cylinder head 2.0 to 3.0 mm (0.0787 to 0.118 in.) J 10 mm (0.394 in.) - 20 mm (0.787 in.) -
- NOTICE:
- Remove any oil from the contact surface.
- When the contact surfaces are wet, wipe them with an oil-free cloth before applying seal packing.
- Install the timing chain cover within 3 minutes and tighten the bolts within 15 minutes after applying seal packing.
- Do not start the engine for at least 4 hours after the installation.
Align the drive rotor spline of the oil pump and crankshaft timing gear as shown in the illustration.
Text in Illustration *1 Drive Rotor Spline *2 Crankshaft Timing Gear
 |
Temporarily install the timing chain cover with the 19 bolts and 2 nuts.

Text in Illustration *1 Area 1 *2 Area 2 *3 Area 3 *4 Area 4 *5 Nut - - - Bolt Length:
Item Length Thread Diameter Bolt A 75 mm (2.95 in.) 10 mm (0.394 in.) Bolt B 75 mm (2.95 in.) 8 mm (0.315 in.) Bolt C 90 mm (3.54 in.) 8 mm (0.315 in.) Bolt D 95 mm (3.74 in.) 8 mm (0.315 in.) Bolt E 35 mm (1.38 in.) 8 mm (0.315 in.) Bolt F 75 mm (2.95 in.) 10 mm (0.394 in.)
Excluding the bolts labeled A and F, tighten the bolts and nuts in this order: Area 1, Area 3, Area 2.
- Torque:
- for bolt C:
- 26 N*m{265 kgf*cm, 19 ft.*lbf}
- for bolt B, D and nut:
- 21 N*m{214 kgf*cm, 15 ft.*lbf}
Tighten the bolts labeled A in this order: Area 2 and Area 3.
- Torque:
- 60 N*m{612 kgf*cm, 44 ft.*lbf}
Tighten the bolts labeled F.
- Torque:
- 46 N*m{469 kgf*cm, 34 ft.*lbf}
Tighten the bolts labeled E in Area 4.
- Torque:
- 21 N*m{214 kgf*cm, 15 ft.*lbf}
Apply adhesive to the timing chain cover plug.
- Adhesive:
- Toyota Genuine Adhesive 1324, Three Bond 1324 or equivalent
Using a 10 mm socket hexagon wrench, install the timing chain cover plug.
- Torque:
- 17 N*m{169 kgf*cm, 12 ft.*lbf}
| 3. INSTALL V-RIBBED BELT TENSIONER ASSEMBLY |
 |
Temporarily install the belt tensioner with the 3 bolts.
- HINT:
- Make sure the flanges of the bolts are contacting the tensioner surface.
Install the tensioner with the 3 bolts.
- Torque:
- for bolt A:
- 43 N*m{438 kgf*cm, 32 ft.*lbf}
- for bolt B:
- 40 N*m{408 kgf*cm, 30 ft.*lbf}
- for bolt C:
- 21 N*m{214 kgf*cm, 15 ft.*lbf}
Text in Illustration 
Bolt A 
Bolt B 
Bolt C
| 4. INSTALL FRONT CRANKSHAFT OIL SEAL |
Apply MP grease to the lip of a new oil seal.
- NOTICE:
- Do not allow foreign matter to contact the lip of the oil seal.
- Do not allow MP grease to contact the dust seal.
 |
Temporarily install the oil seal to the timing chain cover.
Using SST and a hammer, tap in the oil seal until its surface is flush with the chain cover edge.
- SST
- 09223-75010
09950-70010(09951-07100)
- NOTICE:
- Keep the lip free from foreign matter.
- Do not tap the oil seal at an angle.
| 5. INSTALL CRANKSHAFT POSITION SENSOR |
Apply a light coat of engine oil to the O-ring of the sensor.
Install the sensor with the bolt.
- Torque:
- 8.5 N*m{87 kgf*cm, 75 in.*lbf}
- NOTICE:
- Make sure that the O-ring is not cracked or jammed when installing.
Install the connector to the connector bracket.
Attach the harness clamp.
Connect the sensor connector.
| 6. INSTALL OIL PAN SUB-ASSEMBLY |
Install a new O-ring.
Apply seal packing in a continuous line as shown in the illustration.
- Seal packing:
- Toyota Genuine Seal Packing Black, Three Bond 1207B or equivalent
- Application Specification:
Area Seal Packing Diameter Distance from Edge of Cover or Center of Bolt Hole to Center of Seal Packing A - A and C - C 2.0 to 3.0 mm (0.0787 to 0.118 in.) 8.0 mm (0.315 in.) B - B 2.0 to 3.0 mm (0.0787 to 0.118 in.) 6.5 mm (0.256 in.)
Text in Illustration *1 Seal Packing - NOTICE:
- Remove any oil from the contact surface.
- Install the oil pan within 3 minutes after applying seal packing.
- Do not start the engine for at least 4 hours after the installation.
 |
Temporarily install the oil pan with the 16 bolts and 2 nuts.
- Bolt Length:
Item Length Bolt A 20 mm (0.787 in.) Bolt B 40 mm (1.57 in.)
Text in Illustration 
Bolt A 
Bolt B 
Nut
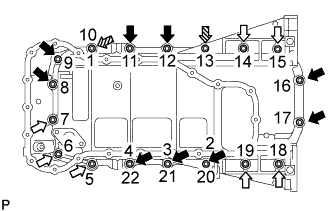 |
Uniformly tighten the 16 bolts and 2 nuts in the order shown in the illustration.
- Torque:
- 26 N*m{265 kgf*cm, 19 ft.*lbf}
| 7. INSTALL OIL STRAINER SUB-ASSEMBLY |
Install a new gasket and the oil strainer with the bolt and 2 nuts.
- Torque:
- 20 N*m{204 kgf*cm, 15 ft.*lbf}
| 8. INSTALL NO. 2 OIL PAN SUB-ASSEMBLY |
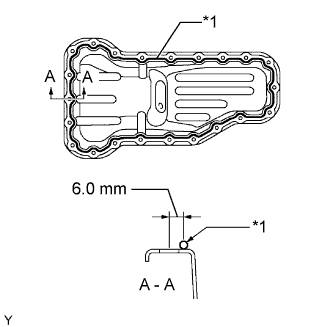
Apply seal packing in a continuous line as shown in the illustration.
- Seal packing:
- Toyota Genuine Seal Packing Black, Three Bond 1207B or equivalent
- Application Specification:
Seal Packing Diameter Distance from Edge of Cover or Center of Bolt Hole to Center of Seal Packing 2.5 to 3.5 mm (0.0984 to 0.138 in.) 6.0 mm (0.236 in.)
Text in Illustration *1 Seal Packing - NOTICE:
- Remove any oil from the contact surface.
- Install the oil pan within 3 minutes after applying seal packing.
- Do not start the engine for at least 4 hours after the installation.
 |
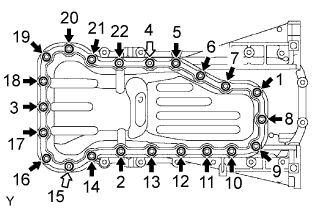
Temporarily install the No. 2 oil pan with the 20 bolts and 2 nuts.
Uniformly tighten the 20 bolts and 2 nuts in the order shown in the illustration.
- Torque:
- 9.0 N*m{92 kgf*cm, 80 in.*lbf}
Text in Illustration 
Bolt 
Nut
 |
Install a new gasket and the drain plug.
- Torque:
- 38 N*m{382 kgf*cm, 28 ft.*lbf}
| 9. INSTALL CRANKSHAFT PULLEY |
Align the pulley set key with the key groove of the pulley, and slide on the pulley.
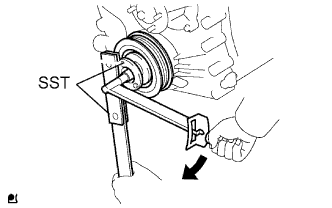 |
Using SST, install the crankshaft pulley bolt.
- SST
- 09213-54015(91651-60855)
09330-00021
- Torque:
- 260 N*m{2651 kgf*cm, 192 ft.*lbf}
- NOTICE:
- Do not reuse the pulley bolt.
| 10. INSTALL CAMSHAFT POSITION SENSOR |
Apply a light coat of engine oil to the O-ring of the sensor.
Install the sensor with the bolt.
- Torque:
- 8.5 N*m{87 kgf*cm, 75 in.*lbf}
- NOTICE:
- Make sure that the O-ring is not cracked or jammed when installing.
Connect the sensor connector.
| 11. INSTALL CYLINDER HEAD COVER SUB-ASSEMBLY |
Install 2 new cover gaskets to the head cover.
Apply seal packing to the places shown in the illustration.
- Seal packing:
- Toyota Genuine Seal Packing Black, Three Bond 1207B or equivalent
- Seal packing diameter:
- 4.0 mm (0.157 in.)
Text in Illustration 
Seal Packing - NOTICE:
- Remove any oil from the contact surface.
- Install the head cover within 3 minutes after applying seal packing.
- Do not start the engine for at least 4 hours after the installation.
 |
Temporarily install the cylinder head cover with the 19 bolts and 2 nuts.
Uniformly tighten the 19 bolts and 2 nuts in the order shown in the illustration.
- Torque:
- 9.0 N*m{92 kgf*cm, 80 in.*lbf}
 |
In numerical order, confirm that the bolts labeled 1 to 8 are tightened to the specified torque. Tighten the bolts as necessary.
| 12. INSTALL OIL FILLER CAP SUB-ASSEMBLY |
Install the gasket to the oil filler cap.
Install the oil filler cap.
| 13. INSTALL NO. 1 WATER BY-PASS PIPE |
Install a new gasket and the water by-pass pipe with the 2 nuts.
- Torque:
- 18 N*m{178 kgf*cm, 13 ft.*lbf}
| 14. INSTALL NO. 1 IDLER PULLEY SUB-ASSEMBLY |
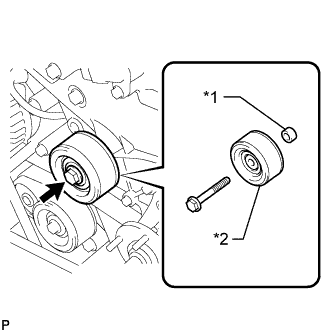 |
Install the spacer and pulley with the bolt.
- Torque:
- 43 N*m{438 kgf*cm, 32 ft.*lbf}
Text in Illustration *1 Spacer *2 Pulley
| 15. INSTALL THERMOSTAT |
Install a new gasket to the thermostat.
Text in Illustration *1 Gasket *a CORRECT *b INCORRECT *c Upward - HINT:
- When installing the thermostat to the gasket, be careful not to deform the gasket. Make sure that the thermostat is properly installed into the groove of the gasket as shown in the illustration.
 |
Insert the thermostat into the cylinder block with the jiggle valve facing straight upward.
- HINT:
- The jiggle valve may be set within 10° of either side of the prescribed position.
| 16. INSTALL WATER INLET |
Install a new gasket and the water inlet with the 2 nuts and bolt.
- Torque:
- 20 N*m{204 kgf*cm, 15 ft.*lbf}
Connect the power steering pump connector.
| 17. INSTALL NO. 1 COMPRESSOR MOUNTING BRACKET (w/ Air Conditioning System) |
- NOTICE:
- In order to prevent misalignment, which causes belt rattle, the 5 bolts must be tightened exactly as described in the procedures below.
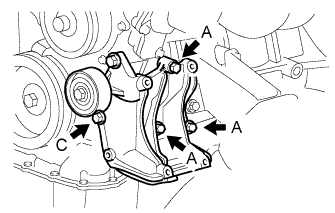
Temporarily install the mounting bracket with the 3 bolts labeled A.
Text in Illustration *1 Bolt B *2 Mounting Bracket *a Engine Front *b No Clearance - HINT:
- Make sure the flanges of the bolts are contacting the bracket surface.
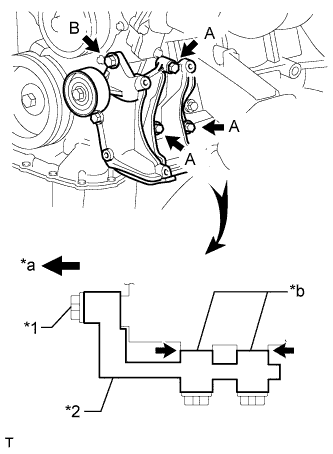 |
Make sure there is no clearance between the cylinder block and bracket as shown in the illustration. Then install the bolt labeled B.
- Torque:
- for bolt B:
- 45 N*m{459 kgf*cm, 33 ft.*lbf}
Tighten the bolts labeled A and install the bolt labeled C.
- Torque:
- for bolt A:
- 45 N*m{459 kgf*cm, 33 ft.*lbf}
- for bolt C:
- 25 N*m{250 kgf*cm, 18 ft.*lbf}
 |
| 18. INSTALL GENERATOR ASSEMBLY |
Install the generator with the 2 bolts.
- Torque:
- 43 N*m{438 kgf*cm, 32 ft.*lbf}
Connect the generator connector.
Install the generator wire with the bolt and nut.
- Torque:
- for nut:
- 9.8 N*m{100 kgf*cm, 87 in.*lbf}
- for bolt:
- 13 N*m{133 kgf*cm, 10 ft.*lbf}
Attach the terminal cap.
| 19. INSTALL INTAKE MANIFOLD |
Install the purge line hose to the intake manifold.
Install the 2 wire harness clamp brackets to the intake manifold with the 2 bolts.
- Torque:
- 8.0 N*m{82 kgf*cm, 71 in.*lbf}
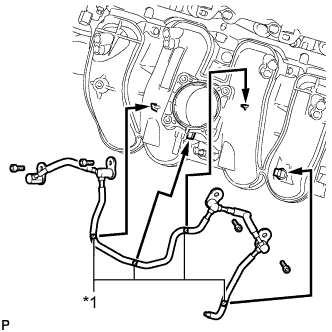
Apply gasoline to 4 new O-rings. Then install the 4 O-rings to the No. 1 fuel pipe sub-assembly.
Set the No. 1 fuel pipe sub-assembly against the 4 protrusions and install it with the 4 bolts.
- Torque:
- 10 N*m{102 kgf*cm, 7 ft.*lbf}
Text in Illustration *1 Paint Mark (White) - NOTICE:
- Set the areas of the fuel pipe marked with white paint marks against the protrusions of the intake manifold from the directions indicated by the arrows in the illustration.
- Make sure the fuel pipe does not become deformed when installing it.
 |
Install a new gasket to the intake manifold.
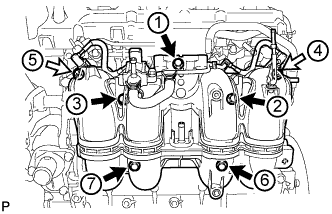
Install the intake manifold with the 5 bolts and 2 nuts, and tighten the bolts and nuts in the sequence shown in the illustration.
- Torque:
- 25 N*m{255 kgf*cm, 18 ft.*lbf}
Text in Illustration 
Bolt 
Nut
 |
Connect the No. 3 PCV hose and vacuum hose to the intake manifold.
Attach the No. 2 water by-pass hose.
Attach the No. 1 fuel hose to the intake manifold.
Install the clamp.
Attach the 3 wire harness clamps to the 2 wire harness clamp brackets.
| 20. INSTALL FUEL INJECTOR ASSEMBLY |
Install a new insulator to the fuel injector.
Text in Illustration *1 New O-Ring *2 New Insulator
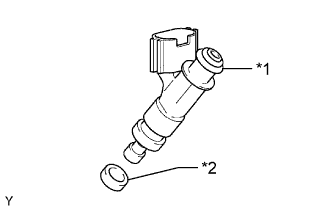 |
Apply a light coat of grease or gasoline to a new O-ring and install it to the fuel injector.
Apply a light coat of grease or gasoline on the place where the delivery pipe touches the O-ring.
Text in Illustration 
Turn 
Push
 |
To install the fuel injector into the fuel delivery pipe, push the fuel injector while twisting it back and forth.
- NOTICE:
- Be careful not to twist the O-ring.
- After installing the fuel injector, check that it turns smoothly. If not, reinstall it with a new O-ring.
Position the fuel injector connector so that it faces downward.
| 21. INSTALL FUEL DELIVERY PIPE SUB-ASSEMBLY |
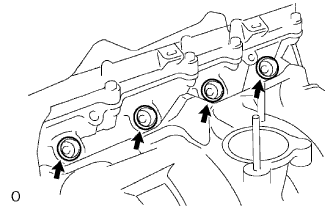
Apply a light coat of gasoline or spindle oil to new O-rings, and then install one to each spacer.
Install the 4 spacers to the cylinder head.
 |
Install 4 new injector vibration insulators to the cylinder head.
Install the 2 No. 1 delivery pipe spacers to the cylinder head.
Install the fuel delivery pipe together with the 4 fuel injectors with the 2 bolts.
- Torque:
- 12 N*m{122 kgf*cm, 9 ft.*lbf}
- NOTICE:
- Do not drop the fuel injectors when installing the fuel delivery pipe.
Connect the 4 injector connectors.
Connect the 4 clamps and wire harness to the delivery pipe.
Connect the vacuum hose.
| 22. INSTALL THROTTLE BODY WITH MOTOR ASSEMBLY |
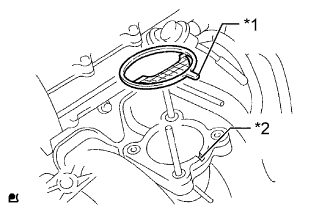
Install a new gasket on the intake manifold.
Text in Illustration *1 Protrusion *2 Groove - HINT:
- Align the protrusion of the gasket with the groove of the intake manifold.
 |
Install the throttle body with motor the 2 bolts and 2 nuts.
- Torque:
- 9.0 N*m{92 kgf*cm, 80 in.*lbf}
Connect the 2 water by-pass hoses to the throttle body with motor.
Connect the throttle position sensor and control motor connector.
| 23. INSTALL PCV PIPE |
Install the PCV pipe with the bolt.
- Torque:
- 18 N*m{184 kgf*cm, 13 ft.*lbf}
Connect the PCV hose to the PCV valve sub-assembly and intake manifold.
| 24. INSTALL SPARK PLUG |
Using a 16 mm plug wrench, install the 4 spark plugs.
- Torque:
- 18 N*m{184 kgf*cm, 13 ft.*lbf}
| 25. INSTALL IGNITION COIL ASSEMBLY |
Install the 4 ignition coils with the 4 bolts.
- Torque:
- 9.0 N*m{92 kgf*cm, 80 in.*lbf}
Connect the ignition coil connector.
| 26. REMOVE ENGINE FROM ENGINE STAND |
Attach an engine sling device and hang the engine with a chain block.
- NOTICE:
- Pay attention to the angle of the sling device as the engine assembly or engine hangers may be damaged or deformed if the angle is incorrect.
Lift the engine and remove it from the engine stand.
- NOTICE:
- With the exception of installing the engine assembly to an engine stand or removing the engine assembly from an engine stand, do not perform any work on the engine while it is suspended, as doing so is dangerous.
Place the engine onto a workbench.
| 27. INSTALL ENGINE ASSEMBLY |