INSTALL VALVE STEM OIL SEAL
INSTALL INTAKE VALVE
INSTALL EXHAUST VALVE
INSTALL VALVE LIFTER
INSTALL NO. 1 CAMSHAFT BEARING
INSTALL NO. 2 CAMSHAFT BEARING
INSTALL CAMSHAFT POSITION SENSOR
INSTALL ENGINE COOLANT TEMPERATURE SENSOR
INSTALL OIL PRESSURE SWITCH
INSTALL RADIO SETTING CONDENSER
Cylinder Head -- Reassembly |
- УКАЗАНИЕ:
- Thoroughly clean all parts to be assembled.
- Before installing the parts, apply fresh engine oil to all sliding and rotating surfaces.
- Replace oil seals with new ones.
| 1. INSTALL VALVE STEM OIL SEAL |
Using SST, push in a new oil seal.
- УКАЗАНИЕ:
- The intake valve oil seal is gray and the exhaust valve oil seal is black.
- ПРИМЕЧАНИЕ:
- Pay close attention when installing the intake and exhaust oil seals. For example, installing the intake oil seal into the exhaust or installing the exhaust oil seal to the intake can cause installation problems later.
Place the cylinder head on wooden blocks.
Install the valve, seat, spring and retainer onto the cylinder head.
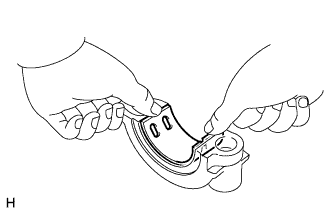
Using SST, compress the spring, and place the 2 retainer locks around the valve stem.
- Специальный инструмент (SST):
- 09202-70020(09202-00010)
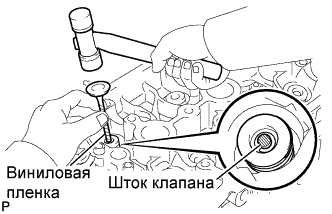
Using a plastic-faced hammer and discarded valve (with its tip wrapped with tape), lightly tap the installed valve to fit it into place.
- ПРИМЕЧАНИЕ:
- Be careful not to damage the valve stem tip.
Place the cylinder head on wooden blocks.
Install the valve, seat, spring and retainer onto the cylinder head.
Using SST, compress the spring, and place the 2 retainer locks around the valve stem.
- Специальный инструмент (SST):
- 09202-70020(09202-00010)
Using a plastic-faced hammer and discarded valve (with its tip wrapped with tape), lightly tap the installed valve to fit it into place.
- ПРИМЕЧАНИЕ:
- Be careful not to damage the valve stem tip.
Assemble the valve lifter and the tip of the valve stem with a light coat of engine oil applied.
- ПРИМЕЧАНИЕ:
- Install the valve lifters in their original places.
| 5. INSTALL NO. 1 CAMSHAFT BEARING |
Clean the contact surface of the bearing and the bearing cap.
- ПРИМЕЧАНИЕ:
- Do not apply engine oil to the bearing its contact surface.
Align the bearing claw with the claw groove of No. 1 and No. 2 bearing cap, and push in the No. 1 camshaft bearing.
| 6. INSTALL NO. 2 CAMSHAFT BEARING |
Clean the contact surface of the bearing and the cylinder head.
- ПРИМЕЧАНИЕ:
- Do not apply engine oil to the bearing its contact surface.
Install the No. 2 camshaft bearing onto the cylinder head.
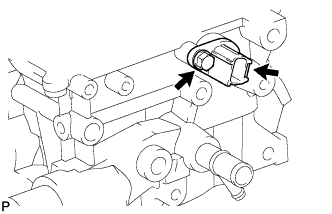
| 7. INSTALL CAMSHAFT POSITION SENSOR |
Install the sensor with the bolt.
- Момент затяжки:
- 9.0 Н*м{92 кгс*см, 80 фунт-сила-дюймов}
| 8. INSTALL ENGINE COOLANT TEMPERATURE SENSOR |
Using SST, install a new gasket and the ECT sensor.
- Момент затяжки:
- 20 Н*м{204 кгс*см, 15 фунт-сила-футов}
- Специальный инструмент (SST):
- 09817-33190
| 9. INSTALL OIL PRESSURE SWITCH |
Apply adhesive to 2 or 3 threads of the oil pressure switch.
- Adhesive:
- Toyota Genuine Adhesive 1344, Three Bond 1344 or Equivalent
Using a 24 mm deep socket wrench, install the oil pressure switch.
- Момент затяжки:
- 13 Н*м{133 кгс*см, 10 фунт-сила-футов}
| 10. INSTALL RADIO SETTING CONDENSER |
Install the condenser with the bolt.
- Момент затяжки:
- 10 Н*м{102 кгс*см, 7 фунт-сила-футов}