Intercooler -- Installation |
| 1. INSTALL RADIATOR AND INTERCOOLER |
- ПРИМЕЧАНИЕ:
- When reusing the air hose or air tube, check that there is no damage and foreign objects. If necessary, clean it.
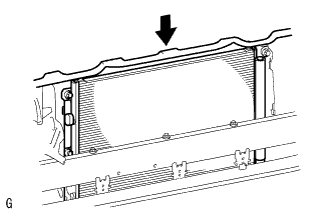
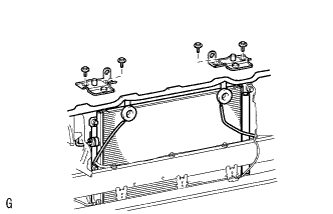
Align the intercooler with the radiator, and then install the intercooler to the radiator with the 4 bolts.
- Момент затяжки:
- 6.0 Н*м{61 кгс*см, 53 фунт-сила-дюймов}
 |
Install the No. 2 air tube to the intercooler and No. 3 air hose.
Install the bolt.
- Момент затяжки:
- 31 Н*м{316 кгс*см, 23 фунт-сила-футов}
Tighten the 2 clamps as shown in the illustration.
 |
Install the No. 2 air hose to the intercooler. Tighten the clamp as shown in the illustration.
 |
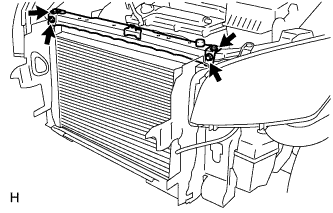
Install the radiator (with intercooler) to the vehicle.
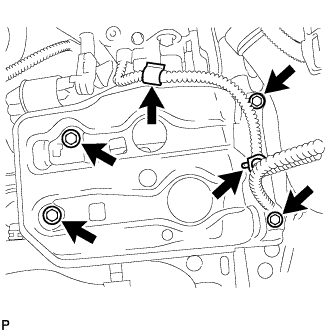
Connect the No. 2 and No. 3 air hoses to the engine.
Tighten the 2 clamps as shown in the illustration.
 |
| 2. CONNECT OUTLET RADIATOR HOSE |
 |
Connect the outlet radiator hose to the engine.
Position the clip as illustrated.
 |
| 3. CONNECT INLET RADIATOR HOSE |
 |
Connect the inlet radiator hose to the engine.
Position the clip as illustrated.
 |
| 4. INSTALL RADIATOR SUPPORT UPPER |
 |
Install the radiator support upper with the 4 bolts.
- Момент затяжки:
- 29 Н*м{296 кгс*см, 21 фунт-сила-футов}
| 5. INSTALL COOLER CONDENSER ASSEMBLY |
Установите конденсатор системы кондиционирования.
 |
| 6. INSTALL NO. 1 RADIATOR SUPPORT |
 |
Установите 2 кронштейна радиатора и закрепите их 4 болтами.
- Момент затяжки:
- 5,5 Н*м{56 кгс*см, 49 фунт-сила-дюймов}
| 7. INSTALL RADIATOR SUPPORT UPPER BRACKET |
 |
Установите 2 кронштейна и закрепите их 2 болтами.
- Момент затяжки:
- 45 Н*м{459 кгс*см, 33 фунт-сила-футов}
| 8. INSTALL HOOD LOCK ASSEMBLY |
Подсоедините трос к замку.
 |
Установите замок и закрепите его 3 болтами.
- Момент затяжки:
- 8,0 Н*м{82 кгс*см, 71 фунт-сила-дюймов}
 |
Отрегулируйте замок.
с выключателем освещения проема капота двигателя:
Подсоедините разъем.
| 9. INSTALL NO. 1 WATER BY-PASS HOSE |
 |
Connect the No. 1 water by-pass hose to the radiator and radiator reservoir.
Position clips A and B as illustrated.
 |
Install the No. 1 water by-pass hose with the 2 bolts to the radiator support upper.
- Момент затяжки:
- 5.0 Н*м{51 кгс*см, 44 фунт-сила-дюймов}
Attach the No. 1 water by-pass hose to the hose clamp.
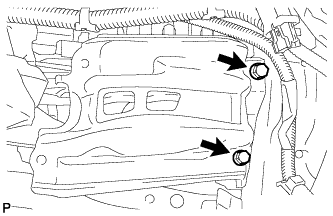
| 10. INSTALL BATTERY BRACKET REINFORCEMENT |
Install the bracket reinforcement with the 2 bolts.
- Момент затяжки:
- 19 Н*м{194 кгс*см, 14 фунт-сила-футов}
 |
| 11. INSTALL FRONT BATTERY BRACKET |
Install the bracket front with the 4 bolts.
- Момент затяжки:
- 19 Н*м{194 кгс*см, 14 фунт-сила-футов}
 |
Attach the 2 wire harness clamps.
| 12. INSTALL BATTERY |
| 13. INSTALL BATTERY CLAMP SUB-ASSEMBLY |
Attach the hook of the battery clamp to the battery bracket front.
 |
Temporarily tighten the nut and install the bolt.
Adjust the battery clamp's position.
Fully tighten the nut and bolt.
- Момент затяжки:
- 5.0 Н*м{51 кгс*см, 44 фунт-сила-дюймов}
Attach the 2 wire harness clamps.
| 14. INSTALL FRONT BUMPER REINFORCEMENT SUB-ASSEMBLY UPPER |
Установите усиление и закрепите его 2 болтами.
Присоедините 2 разъема звукового сигнала.
| 15. INSTALL FRONT BUMPER |
Install the front bumper (see page RAV4_ACA30 RM0000015RH003X.html).
| 16. ADD ENGINE COOLANT |
Tighten the radiator drain cock plug by hand.
Tighten the cylinder block drain cock plug.
- Момент затяжки:
- 12.7 Н*м{130 кгс*см, 10 фунт-сила-футов}
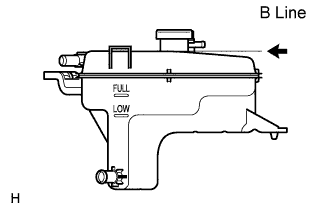
Add TOYOTA Super Long Life Coolant (SLLC) to the radiator reservoir filler opening.
Continue adding TOYOTA SLLC until it is filled to the B line.
- УКАЗАНИЕ:
- The B line is the lower edge of the inner wall of the filler neck.
- Standard capacity:
Item Specified Condition w/o Combustion Type Power Heater 7.3 liters
(7.7 US qts, 6.4 Imp. qts)w/ Combustion Type Power Heater 7.7 liters
(8.1 US qts, 6.8 Imp. qts)
- УКАЗАНИЕ:
- TOYOTA vehicles are filled with TOYOTA SLLC at the factory. In order to avoid damage to the engine cooling system and other technical problems, only use TOYOTA SLLC or similar high quality ethylene glycol based non-silicate, non-amine, non-nitrite, non-borate coolant with long-life hybrid organic acid technology (coolant with long-life hybrid organic acid technology consists of a combination of low phosphates and organic acids).
- ПРИМЕЧАНИЕ:
- Never use water as a substitute for engine coolant.
 |
Press the inlet and outlet radiator hoses several times by hand, and then check the level of the coolant.
If the coolant level drops below the B line, add TOYOTA SLLC to the B line.
Install the radiator reservoir cap.
Start the engine, and warm it up until the cooling fan operates.
Set the air conditioning as follows while warming up the engine.
Item Specified Condition Manual Air Conditioning System Fan speed - Any setting except "OFF" Temperature - Toward WARM
Air conditioning switch "OFF"Automatic Air Conditioning System Temperature - Toward MAX
Air conditioning switch "OFF"Maintain the engine speed at 2,000 to 2,500 rpm and warm up the engine until the cooling fan operates.
- ПРИМЕЧАНИЕ:
- Make sure that the radiator reservoir still has some coolant in it.
- Pay attention to the needle of the water temperature meter. Make sure that the needle does not show an abnormally high temperature.
- If there is not enough coolant, the engine may burn out or overheat.
- Immediately after starting the engine, if the radiator reservoir does not have any coolant, perform the following: 1) stop the engine, 2) wait until the coolant has cooled down, and 3) add coolant until the coolant is filled to the B line.
- Until the coolant level has stabilized, run the engine at 2,000 rpm.
Press the inlet and outlet radiator hoses several times by hand to bleed air.
- ПРЕДОСТЕРЕЖЕНИЕ:
- When pressing the radiator hoses:
- Wear protective gloves.
- Be careful as the radiator hoses are hot.
- Keep your hands away from the radiator fan.
Stop the engine and wait until the coolant cools down to ambient temperature.
Check that the coolant level is between the FULL and LOW line.
If the coolant level is below the LOW line, repeat all of the procedures above.
If the coolant level is above the FULL line, drain coolant so that the coolant level is between the FULL and LOW line.
 |
| 17. CHECK FOR ENGINE COOLANT LEAKS |
Remove the radiator reservoir cap.
- ПРЕДОСТЕРЕЖЕНИЕ:
- To avoid the danger of being burned, do not remove the radiator reservoir cap while the engine and radiator are still hot. Thermal expansion will cause hot engine coolant and steam to blow out from the radiator.
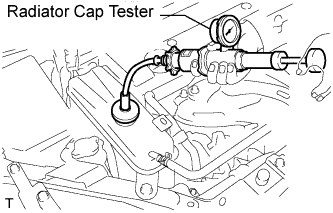
Fill the radiator with coolant, and then attach a radiator cap tester.
 |
Warm up the engine.
Pump the radiator cap tester to 137 kPa (1.4 kgf/cm2, 19 psi), and then check that the pressure does not drop.
If the pressure drops, check the hoses, radiator and water pump for leakage.
If there are no signs of external coolant leaks, check the heater core, cylinder block and head.
Reinstall the radiator cap.
| 18. INSTALL ENGINE UNDER COVER REAR LH |
Install the under cover with the 2 clips.
| 19. INSTALL ENGINE UNDER COVER REAR RH |
Install the under cover with the 2 clips.
| 20. INSTALL NO. 1 ENGINE UNDER COVER |
Install the under cover with the 4 bolts and 12 clips.
| 21. INSTALL NO. 1 ENGINE COVER |
Attach the 4 clips to install the engine cover.
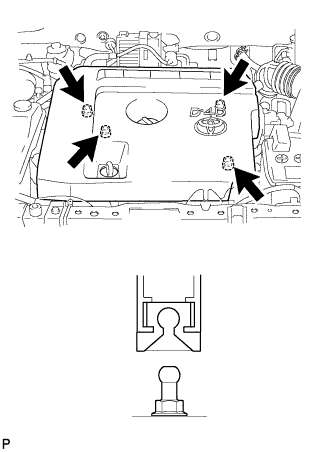 |
| 22. INSTALL RADIATOR SUPPORT OPENING COVER |
Install the cover with the 9 clips.
| 23. CONNECT CABLE TO NEGATIVE BATTERY TERMINAL |
| 24. CHARGE WITH REFRIGERANT |
Используя вакуумный насос, выполните вакуумную очистку.
Заправьте хладагент HFC-134a (R134a).
- Номинальное значение / Номинальный режим:
- 430 +-30 г (15,2 +-1,1 унции)
- Специальный инструмент (SST):
- 07110-58060(07117-58060,07117-58070,07117-58080,07117-58090,07117-78050,07117-88060,07117-88070,07117-88080)
- ПРИМЕЧАНИЕ:
- Не включайте компрессор системы кондиционирования, пока не заправите ее хладагентом, иначе компрессор перегреется, поскольку без хладагента он не может функционировать правильно.
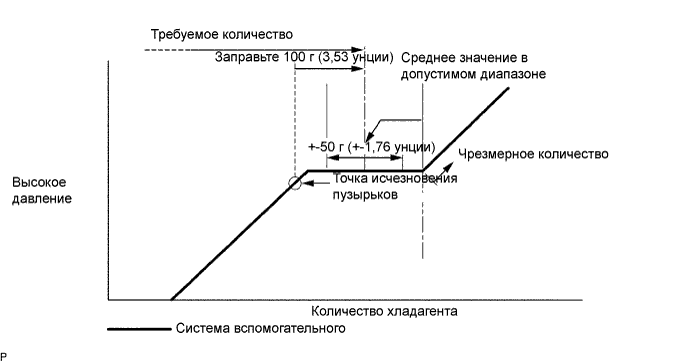
- После исчезновения пузырьков может потребоваться заправить примерно 100 г (3,53 унции) хладагента. В процессе заправки необходимо контролировать количество хладагента, не обращая внимания на смотровое окошко.
| 25. WARM UP ENGINE |
После заправки хладагента в течение, по крайней мере, 2 мин. прогрейте двигатель при частоте вращения коленчатого вала 1850 об/мин.
- ПРИМЕЧАНИЕ:
- Во избежание повреждения компрессора при включении системы кондиционирования после снятия и установки трубопроводов хладагента кондиционера (включая компрессор) обязательно прогревайте компрессор.
| 26. CHECK FOR LEAKAGE OF REFRIGERANT |
После заправки газообразного хладагента с помощью галоидного течеискателя проверьте, нет ли утечек хладагента.
Перед проверкой обеспечьте выполнение следующих условий:
- Выключите двигатель.
- Обеспечьте хорошую вентиляцию (детектор утечки газа может реагировать на летучие газы, не являющиеся хладагентом - такие, как пары бензина и отработавшие газы).
- Испытание необходимо выполнить 2 или 3 раза.
- Убедитесь, что в системе охлаждения осталось некоторое количество хладагента. Показания при выключенном компрессоре: примерно 392-588 кПа (4-6 кгс/см2, 57-85 фунтов на кв. дюйм)
- Выключите двигатель.
С помощью детектора утечки газа проверьте, нет ли утечки из трубопровода хладагента.
 |
Если в сливном шланге утечка газа не обнаруживается, снимите блок управления электродвигателем вентилятора (резистор вентилятора) с блока охлаждения. Затем вставьте датчик детектора утечки газа в блок и выполните испытание.
Отсоедините разъем и оставьте контактный датчик давления в текущем состоянии прибл. на 20 минут. Поднесите детектор утечки газа к контактному датчику давления и выполните испытание.