Exhaust Manifold Converter -- Installation |
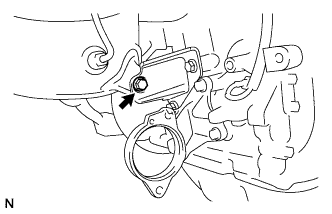
| 1. INSTALL NO. 2 VACUUM PIPE |
Temporarily install the vacuum pipe with the bolt and union nut.
 |
Tighten the bolt.
- Момент затяжки:
- 25 Н*м{255 кгс*см, 18 фунт-сила-футов}
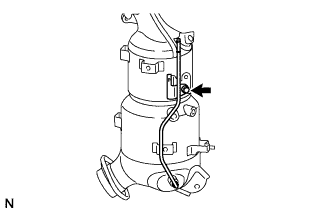 |
Using SST, tighten the union nut.
- Специальный инструмент (SST):
- 09023-38401
- Момент затяжки:
- 27 Н*м{275 кгс*см, 20 фунт-сила-футов} for use with SST
- 30 Н*м{306 кгс*см, 22 фунт-сила-футов} for use without SST
- УКАЗАНИЕ:
- Use a torque wrench with a fulcrum length of 30 cm (11.81 in.).
 |
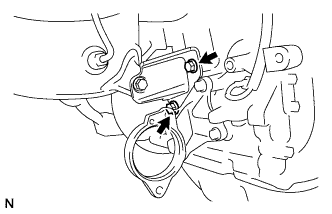
| 2. INSTALL NO. 1 VACUUM PIPE |
Temporarily install the vacuum pipe with the bolt and union nut.
 |
Tighten the bolt.
- Момент затяжки:
- 25 Н*м{255 кгс*см, 18 фунт-сила-футов}
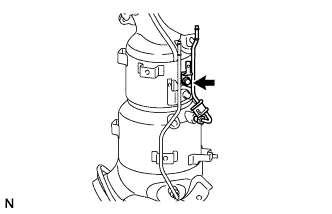 |
Using SST, tighten the union nut.
- Специальный инструмент (SST):
- 09023-38401
- Момент затяжки:
- 27 Н*м{275 кгс*см, 20 фунт-сила-футов} for use with SST
- 30 Н*м{306 кгс*см, 22 фунт-сила-футов} for use without SST
- УКАЗАНИЕ:
- Use a torque wrench with a fulcrum length of 30 cm (11.81 in.).
 |
| 3. INSTALL EXHAUST GAS TEMPERATURE SENSOR (for Lower Side) |
Temporarily install the sensor with the 2 nuts and union nut.
 |
Tighten the 2 nuts.
- Момент затяжки:
- 6.4 Н*м{65 кгс*см, 57 фунт-сила-дюймов}
 |
Using SST, tighten the union nut.
- Специальный инструмент (SST):
- 09023-38401
- Момент затяжки:
- 27 Н*м{275 кгс*см, 20 фунт-сила-футов} for use with SST
- 30 Н*м{306 кгс*см, 22 фунт-сила-футов} for use without SST
 |
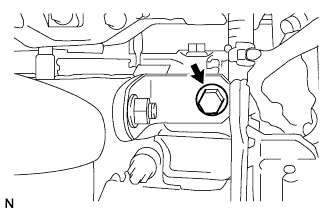
| 4. INSTALL EXHAUST GAS TEMPERATURE SENSOR (for Upper Side) |
Temporarily install the sensor.
Using SST, tighten the union nut.
- Специальный инструмент (SST):
- 09023-38401
- Момент затяжки:
- 27 Н*м{275 кгс*см, 20 фунт-сила-футов} for use with SST
- 30 Н*м{306 кгс*см, 22 фунт-сила-футов} for use without SST
- УКАЗАНИЕ:
- Use a torque wrench with a fulcrum length of 30 cm (11.81 in.).
 |
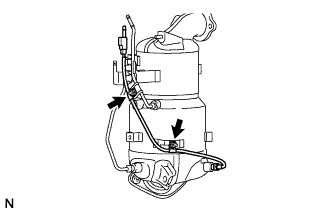
| 5. INSTALL NO. 2 VACUUM TRANSMITTING HOSE ASSEMBLY |
Using pliers, grip the claws of the clip and slide the clip to install the vacuum transmitting hose.
 |
| 6. INSTALL NO. 1 VACUUM TRANSMITTING HOSE ASSEMBLY |
Using pliers, grip the claws of the clip and slide the clip to install the vacuum transmitting hose.
 |
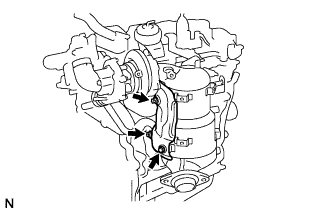
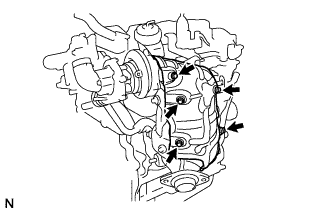
| 7. INSTALL EXHAUST MANIFOLD CONVERTER SUB-ASSEMBLY |
Temporarily install a new gasket and the exhaust manifold converter with the 3 nuts.
 |
Temporarily install the No. 2 exhaust manifold stay LH with the 2 bolts and nut.
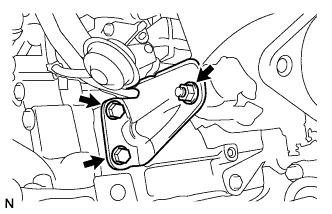 |
Temporarily install the No. 2 manifold stay RH with the 3 bolts.
 |
Temporarily install the No. 1 manifold stay with the bolt and nut.
 |
Tighten the 2 bolts holding the No. 2 exhaust manifold stay to the cylinder block (upper bolt → lower bolt).
- Момент затяжки:
- 56 Н*м{571 кгс*см, 41 фунт-сила-футов}
 |
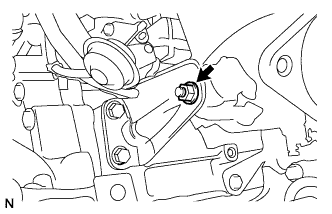
While pushing the manifold converter towards the cylinder block, tighten the 3 nuts holding the exhaust manifold converter to the turbocharger.
- Момент затяжки:
- 25 Н*м{255 кгс*см, 18 фунт-сила-футов}
 |
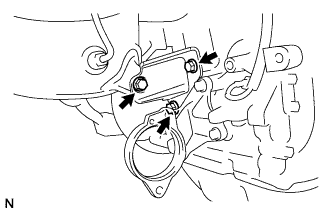
Tighten the nut holding the No. 2 exhaust manifold stay to the exhaust manifold converter.
- Момент затяжки:
- 56 Н*м{571 кгс*см, 41 фунт-сила-футов}
 |
Tighten the bolt holding the No. 2 manifold stay to the exhaust manifold converter.
- Момент затяжки:
- 56 Н*м{571 кгс*см, 41 фунт-сила-футов}
- УКАЗАНИЕ:
- Ensure that the stay is pushed flush to the cylinder block and manifold converter while tightening.
 |
Tighten the 2 bolts holding the No. 2 manifold stay to the cylinder block.
- Момент затяжки:
- 56 Н*м{571 кгс*см, 41 фунт-сила-футов}
 |
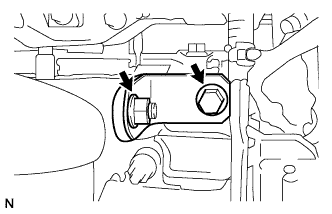
Tighten the bolt holding the No. 1 manifold stay to the cylinder head.
- Момент затяжки:
- 25 Н*м{255 кгс*см, 18 фунт-сила-футов}
- УКАЗАНИЕ:
- Ensure that the stay is pushed flush to the cylinder head and manifold converter while tightening.
 |
Tighten the nut holding the No. 1 manifold stay to the exhaust manifold converter.
- Момент затяжки:
- 25 Н*м{255 кгс*см, 18 фунт-сила-футов}
 |
| 8. INSTALL NO. 2 MANIFOLD CONVERTER INSULATOR |
Install the manifold converter insulator with the 3 nuts.
- Момент затяжки:
- 28.5 Н*м{291 кгс*см, 21 фунт-сила-футов}
 |
| 9. INSTALL NO. 1 MANIFOLD CONVERTER INSULATOR |
Install the manifold converter insulator with the 5 bolts.
- Момент затяжки:
- 28.5 Н*м{291 кгс*см, 21 фунт-сила-футов}
 |
| 10. INSTALL ENGINE ASSEMBLY |
Install the engine assembly to the vehicle (see page RAV4_ACA30 RM0000019Y7008X.html).
| 11. CONNECT CABLE TO NEGATIVE BATTERY TERMINAL |
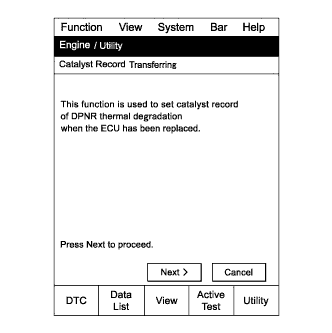
| 12. PERFORM CATALYST RECORD OF DPNR THERMAL DETERIORATION CLEAR FUNCTION |
- ПРИМЕЧАНИЕ:
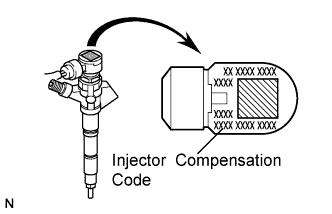
- Injector compensation codes are unique, 30-digit, alphanumeric values printed on the head portion of each injector. If an incorrect injector compensation code is input into the ECM, the engine may rattle or engine idling may become rough. In addition, engine failure may occur and the life of the engine may be shortened.
- УКАЗАНИЕ:
- The following operation is available with ECMs that can transmit the registered injector compensation codes and catalyst record of DPNR thermal deterioration to the intelligent tester.
Read the catalyst record of DPNR thermal deterioration.
Connect the intelligent tester to the DLC3.
Turn the ignition switch on (IG) and turn the tester ON.
- ПРИМЕЧАНИЕ:
- Do not start the engine.
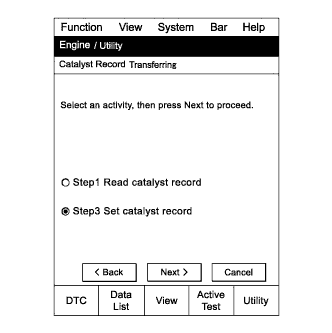
Enter the following menus: Powertrain / Engine and ECT / Utility / Catalyst Record Transferring.
Press "Next".
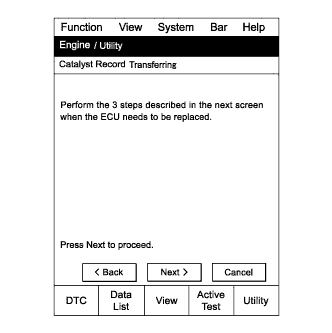
Press "Next" again to proceed.
Press "Next" again to proceed.
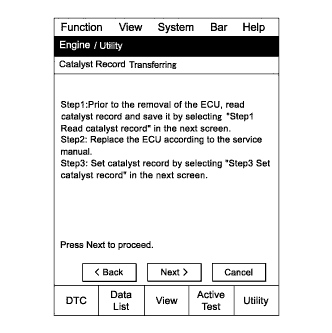
Select "Step 1 Read catalyst record".
Press "Next".
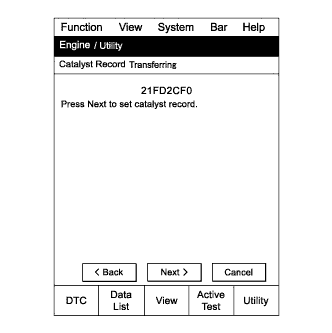
Confirm the catalyst record and press "Next".
- ПРИМЕЧАНИЕ:
- If a code cannot be read, replace the DPNR catalyst with a new one.
- УКАЗАНИЕ:
- When installing a new ECM that has a registered catalyst record such as "FFFFFFFF", perform the procedures below by following the prompts on the tester screen.
- When replacing only the ECM, be sure to transfer the catalyst record from the removed ECM to the new ECM.
- When replacing the DPNR catalyst, clear the catalyst record registered in the ECM (see page RAV4_ACA30 RM000000TIN007X.html).
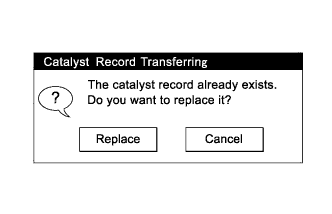
If the catalyst record has already been stored in the tester, the message in the illustration will appear. Press "Replace".
Press "Exit".


Read the injector compensation codes.
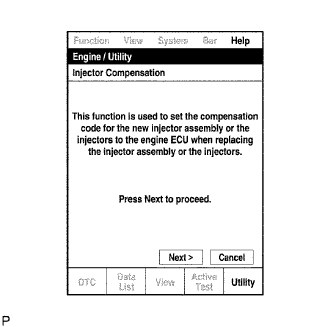
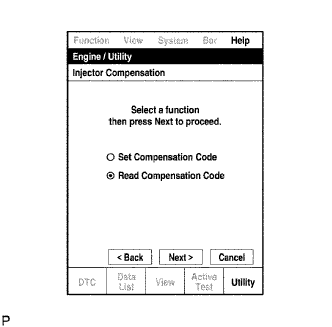
Enter the following menus: Powertrain / Engine and ECT / Utility / Injector Compensation.
Press "Next".
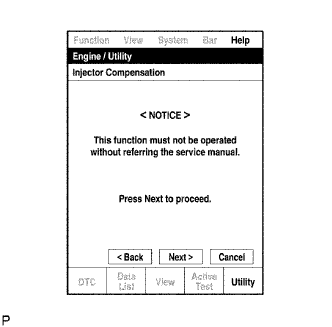
Press "Next" again to proceed.
Select "Read Compensation Code".
Press "Next".
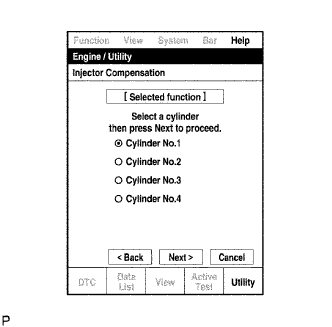
Select the number of the cylinder corresponding to the injector compensation code that you want to read.
Press "Next".
- УКАЗАНИЕ:
- The reading process may fail due to a problem with the wire harness or a bad connection with the DLC3. Check the wire harness and the DLC3 connection. If no problem is found, the ECM may be malfunctioning. Check the ECM and repeat this operation.
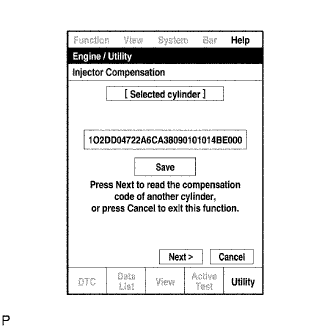
Check that the injector compensation code (30-digit alphanumeric value) is displayed on the tester screen.
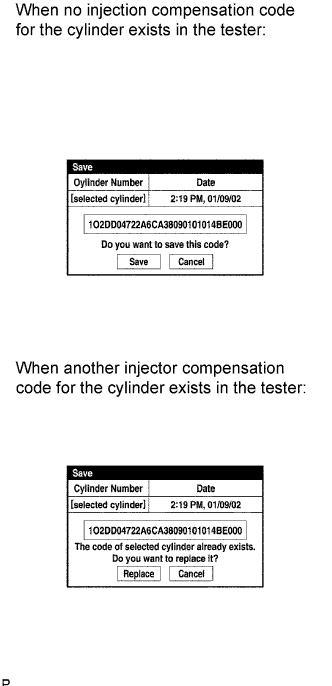
Press "Save".
Check that the compensation code displayed on the tester screen is correct.
Press "Save" or "Replace" to save the injector compensation code.
- УКАЗАНИЕ:
- The existing compensation code is overwritten with the new compensation code and is deleted from the tester.
- The saving process may fail due to a problem with the wire harness or a bad connection with the DLC3. Check the wire harness and the DLC3 connection. If no problem is found, the ECM may be malfunctioning. Check the ECM and repeat this operation.
To read and save injector compensation codes for other cylinders, press "Next" to continue. To finish this operation, press "Cancel".
Turn the ignition switch off and turn the tester OFF.
 |
Replace the ECM (see page RAV4_ACA30 RM000001SOK001X.html).
Set the catalyst record of DPNR thermal deterioration.
Connect the intelligent tester to the DLC3.
Turn the ignition switch on (IG) and turn the tester ON.
Enter the following menus: Powertrain / Engine and ECT / Utility / Catalyst Record Transferring
Press "Next".
Press "Next" again to proceed.
Press "Next" again to proceed.
Select "Step 3 Set catalyst record".
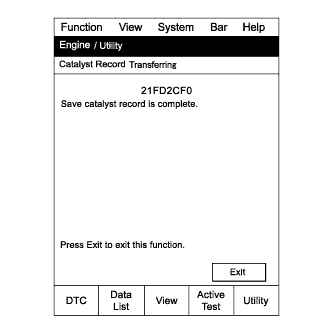
Confirm the catalyst record and press "Next".
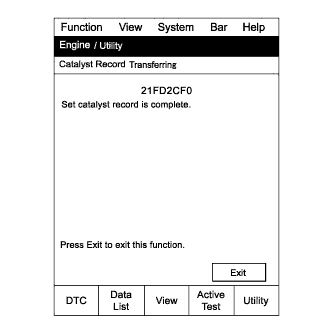
Press "Exit".
Set the injector compensation code.
- ПРИМЕЧАНИЕ:
- Do not start the engine.
- УКАЗАНИЕ:
- The injector compensation code is imprinted on the head portion of each injector.
Enter the following menus: Powertrain / Engine and ECT / Utility / Injector Compensation.
Press "Next".
Press "Next" again to proceed.
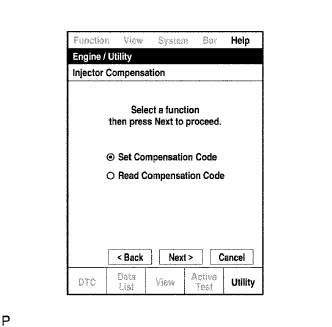
Select "Set Compensation Code".
Press "Next".
Select the number of the cylinder corresponding to the injector compensation code that you want to read.
Press "Next".
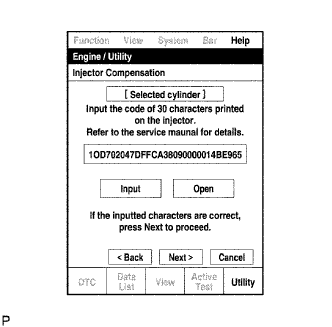
Check that the compensation code displayed on the screen is correct, by comparing it with the 30-digit alphanumeric value on the head portion of the injector.
- ПРИМЕЧАНИЕ:
- If an incorrect injector compensation code was input into the ECM, the engine may rattle or engine idling may become rough. In addition, engine failure may occur and the life of the engine may be shortened.
- УКАЗАНИЕ:
- If a wrong compensation code was input or read, return to the "Input Value" screen by pressing "Input". The saving process may fail due to a problem with the wire harness or a bad connection with the DLC3. Check the wire harness and the DLC3 connection. If no problem is found, the ECM may be malfunctioning. Check the ECM and repeat this operation.
Press "Next" to set the compensation code to the ECM.
- УКАЗАНИЕ:
- If the setting fails, the compensation code may be incorrect. Check the compensation code again.
- If the attempted compensation code is correct, a problem with the wire harness or a bad connection with the DLC3 may cause the failure. Check the wire harness and the DLC3 connection. If no problem is found, the ECM may be malfunctioning. Check the ECM and repeat this operation.
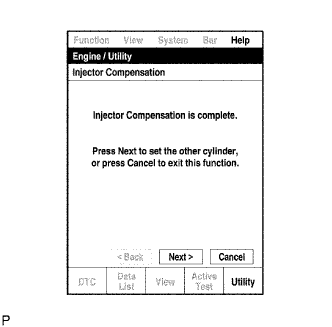
To continue with compensation code registrations for other cylinders, press "Next". To finish the registration, press "Cancel".
|
Clear DTC P1601 stored in the ECM using the tester.
Turn the ignition switch off and turn the tester OFF.
Wait for at least 30 seconds.
Turn the ignition switch on (IG) and turn the tester ON.
Clear DTC P1601 (see page RAV4_ACA30 RM000000PDK01FX.html).