Механическая Трансмиссия В Сборе -- Снятие |
| 1. DISCONNECT CABLE FROM NEGATIVE BATTERY TERMINAL |
- ПРЕДОСТЕРЕЖЕНИЕ:
- Wait at least 90 seconds after disconnecting the cable from the negative (-) battery terminal to disable the SRS system.
- ПРИМЕЧАНИЕ:
- After turning the ignition switch off, waiting time may be required before disconnecting the cable from the battery terminal. Therefore, make sure to read the disconnecting the cable from the battery terminal notice before proceeding with work (See page Нажмите здесь).
- When disconnecting the cable, some systems need to be initialized after the cable is reconnected (See page Нажмите здесь).
| 2. REMOVE SHIFT LEVER KNOB SUB-ASSEMBLY |
| 3. REMOVE CONSOLE PANEL SUB-ASSEMBLY |
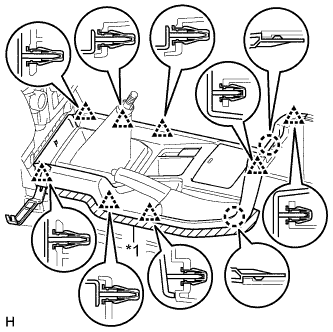 |
Наклейте защитную клейкую ленту вокруг облицовки панели пола.
Обозначения на рисунке *1 Защитная клейкая лента
С помощью съемника молдингов расцепите 8 фиксаторов и 2 захвата.
Отсоедините все разъемы и снимите облицовку панели пола.
| 4. REMOVE NO. 1 SHIFT AND SELECT LEVER BOOT |
Remove the 4 screws, 2 clips and boot.
Text in Illustration *1 Clip *2 Screw
 |
| 5. REMOVE FLOOR SHIFT SHIFT LEVER ASSEMBLY |
Cover the shift lever cap with a cloth.
Text in Illustration *1 Cloth *a Down *b Counterclockwise
 |
Press down on the shift lever cap and rotate it counterclockwise to remove it.
Pull out the shift lever to remove it.
| 6. REMOVE TRANSFER CASE LOWER PROTECTOR |
Remove the 4 bolts and transfer case lower protector.
| 7. DRAIN MANUAL TRANSMISSION OIL |
Remove the drain plug and gasket and then drain the manual transmission oil.
 |
Remove the filler plug and gasket.
 |
Install a new gasket and the drain plug.
- Момент затяжки:
- 37 N*m{377 kgf*cm, 27 ft.*lbf}
| 8. REMOVE FRONT PROPELLER SHAFT ASSEMBLY |
Remove the front propeller shaft (See page Нажмите здесь).
| 9. REMOVE PROPELLER SHAFT ASSEMBLY |
Remove the propeller shaft (See page Нажмите здесь).
| 10. REMOVE FRONT EXHAUST PIPE ASSEMBLY |
Remove the front exhaust pipe (See page Нажмите здесь).
| 11. DISCONNECT WIRE HARNESS |
Disconnect the 2 connectors and detach the 4 clamps.
 |
| 12. REMOVE TRANSFER AND MANUAL TRANSMISSION BREATHER HOSE SUB-ASSEMBLY |
Detach the clamp and disconnect the 3 breather hoses from the shift lever retainer and transfer adapter.
 |
Remove the breather hose.
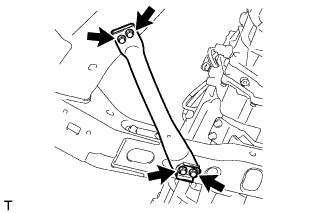
| 13. DISCONNECT CLUTCH RELEASE CYLINDER ASSEMBLY |
Remove the 2 bolts and disconnect the release cylinder.
 |
| 14. REMOVE STARTER ASSEMBLY |
Remove the starter (See page Нажмите здесь).
| 15. REMOVE FRONT SUSPENSION MEMBER BRACKET LH |
Remove the 4 bolts and member bracket.
 |
| 16. REMOVE FRONT SUSPENSION MEMBER BRACKET RH |
Remove the 4 bolts and member bracket.
 |
| 17. REMOVE NO. 3 FRAME CROSSMEMBER SUB-ASSEMBLY |
Support the rear side of the transmission with a support stand.
Remove the 4 bolts of the rear No. 1 engine mounting insulator.
 |
Remove the 4 bolts, 4 nuts and frame crossmember.
 |
| 18. REMOVE REAR NO. 1 ENGINE MOUNTING INSULATOR |
Remove the 4 bolts and engine mounting insulator.
 |
| 19. REMOVE STIFFENER PLATE LH |
Remove the 4 bolts and stiffener plate.
 |
| 20. REMOVE STIFFENER PLATE RH |
Remove the 4 bolts and stiffener plate.
 |
| 21. REMOVE MANUAL TRANSMISSION UNIT ASSEMBLY |
Using a transmission jack, support the transmission.
Remove the support stand from the transmission.
Remove the 4 bolts and transmission.
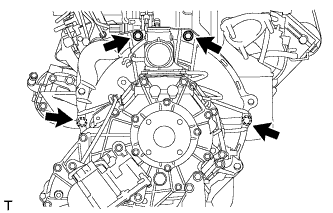 |
| 22. REMOVE TRANSFER ASSEMBLY |
Для моделей с 1KD-FTV:
Выверните 8 болтов и снимите 2 кронштейна.Обозначения на рисунке *A Для моделей с 1KD-FTV, RA61F *B Для моделей с 1KD-FTV, A750F
 |
Кроме моделей с 1KD-FTV:
Выверните 8 болтов и снимите кронштейн.
 |
Отсоедините раздаточную коробку от трансмиссии.