Насос Системы Охлаждения -- Снятие |
| 1. DISCONNECT CABLE FROM NEGATIVE BATTERY TERMINAL |
- ПРИМЕЧАНИЕ:
- When disconnecting the cable, some systems need to be initialized after the cable is reconnected (See page Нажмите здесь).
| 2. DRAIN ENGINE COOLANT |
- ПРЕДОСТЕРЕЖЕНИЕ:
- Не снимайте пробку расширительного бачка радиатора, пока двигатель и радиатор не остынут. Выброс горячей охлаждающей жидкости и пара под давлением может стать причиной серьезных ожогов.
Ослабьте пробку сливного крана радиатора.

Обозначения на рисунке *1 Пробка радиатора *2 Бачок радиатора *3 Пробка сливного крана радиатора *4 Пробка сливного крана блока цилиндров - УКАЗАНИЕ:
- Слейте охлаждающую жидкость в контейнер и утилизируйте ее в соответствии с местными требованиями.
Слейте охлаждающую жидкость, сняв крышку радиатора.
Ослабьте пробку сливного крана блока цилиндров.
Ослабьте пробку сливного крана блока цилиндров и слейте охлаждающую жидкость из двигателя.
- ПРИМЕЧАНИЕ:
- Если охлаждающая жидкость не сливается через пробку сливного крана радиатора, пробки сливных кранов блока цилиндров и расширительный бачок радиатора, возможны засорение радиатора и утечка охлаждающей жидкости через уплотнение насоса системы охлаждения.
| 3. REMOVE UPPER RADIATOR SUPPORT SEAL |
Освободите 13 фиксаторов и снимите верхнее уплотнение кронштейна радиатора.
| 4. REMOVE FRONT BUMPER COVER LOWER |
Remove the clip, 5 bolts and front bumper cover lower.
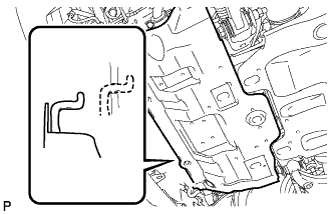
| 5. REMOVE NO. 1 ENGINE UNDER COVER SUB-ASSEMBLY |
Remove the 4 bolts.
Unhook the engine under cover from the vehicle body as shown in the illustration.
 |
| 6. REMOVE REAR ENGINE UNDER COVER ASSEMBLY |
Remove the 4 bolts and rear engine under cover.
| 7. REMOVE RESONATOR WITH AIR CLEANER CAP |
Disconnect the sensor connector.
 |
Detach the wire harness clamp.
Loosen the hose clamp and remove the resonator with air cleaner cap.
Detach the 4 hook clamps, and then remove the air cleaner cap and resonator with air cleaner cap.
 |
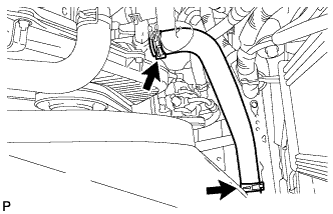
| 8. REMOVE NO. 1 RADIATOR HOSE |
Detach the clamp and remove the No. 1 radiator hose.
 |
Remove the 2 nuts and hose clamp.
 |
| 9. REMOVE NO. 2 RADIATOR HOSE |
 |
| 10. REMOVE RADIATOR RESERVOIR |
Disconnect the reservoir hose from the upper side of the radiator tank.
 |
Remove the 3 bolts and radiator reservoir.
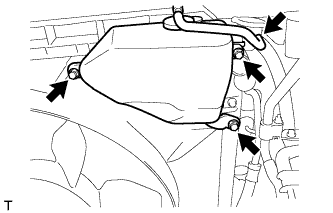
| 11. REMOVE FAN SHROUD |
Loosen the 4 nuts holding the fluid coupling fan.
 |
Remove the vane pump V belt and the fan and generator V belt (See page Нажмите здесь).
Remove the 2 bolts holding the fan shroud.
 |
Remove the 4 nuts of the fluid coupling fan, and then remove the shroud together with the coupling fan.
- ПРИМЕЧАНИЕ:
- Be careful not to damage the radiator core.
Remove the fan pulley from the water pump.
| 12. DISCONNECT COMPRESSOR AND MAGNETIC CLUTCH |
Remove the 4 bolts and idle pulley bracket.
 |
Disconnect the connector.
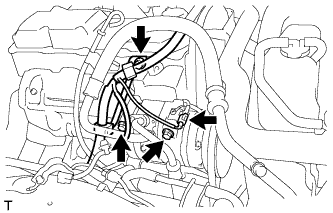 |
Remove the 3 bolts and disconnect the cooler compressor.
- УКАЗАНИЕ:
- It is not necessary to completely remove the cooler compressor. With the hoses connected to the compressor, hang the compressor on the vehicle body with a rope.
| 13. REMOVE NO. 2 IDLE PULLEY ASSEMBLY |
Remove the 2 bolts and Idle pulley bracket.
 |
| 14. REMOVE TIMING BELT |
Remove the timing belt (See page Нажмите здесь).
| 15. REMOVE WATER PUMP ASSEMBLY |
Remove the 6 bolts and tension spring bracket.
 |
Remove the water pump and gasket.