Радиатор Установка. Corolla Auris
Двигатель. COROLLA, AURIS. ZZE150 ZRE151,152 NDE150
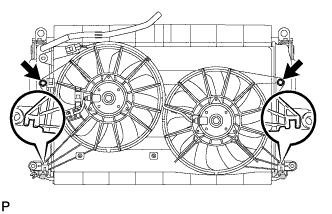
INSTALL FAN SHROUD
INSTALL RADIATOR ASSEMBLY
CONNECT NO. 2 RADIATOR HOSE
CONNECT NO. 1 RADIATOR HOSE
CONNECT AIR HOSE
INSTALL VACUUM TRANSMITTING HOSE ASSEMBLY
INSTALL RADIATOR SUPPORT SUB-ASSEMBLY
INSTALL INJECTOR DRIVER
INSTALL HOOD LOCK ASSEMBLY
INSTALL THERMISTOR ASSEMBLY
INSTALL BATTERY TRAY
INSTALL BATTERY
INSTALL BATTERY CLAMP SUB-ASSEMBLY
CONNECT CABLE TO NEGATIVE BATTERY TERMINAL
ADD ENGINE COOLANT
INSPECT FOR COOLANT LEAK
INSTALL FRONT BUMPER REINFORCEMENT SUB-ASSEMBLY
INSTALL FRONT BUMPER ENERGY ABSORBER
INSTALL FRONT BUMPER ASSEMBLY
INSTALL UPPER RADIATOR AIR DEFLECTOR
INSTALL NO. 1 ENGINE UNDER COVER
Install the fan shroud to the radiator with the 2 bolts.
- Момент затяжки:
- 6.2 Н*м{63 кгс*см, 55 фунт-сила-дюймов}
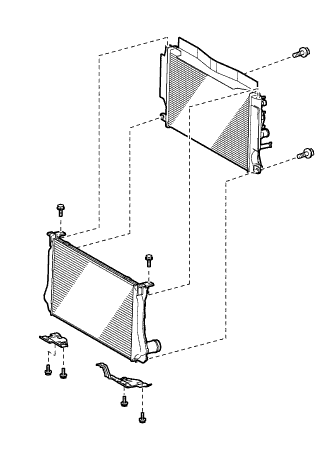
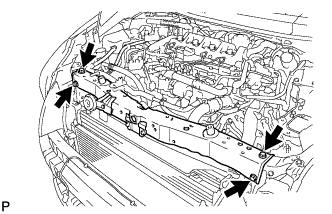
| 2. INSTALL RADIATOR ASSEMBLY |
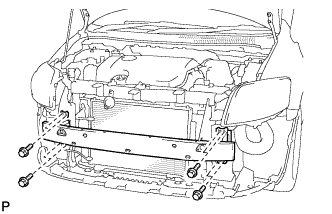
Install the intercooler, lower radiator support sub-assembly LH and lower radiator support sub-assembly RH with the 8 bolts.
- Момент затяжки:
- 7.0 Н*м{71 кгс*см, 62 фунт-сила-дюймов}
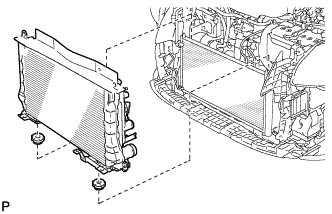
Install the 2 radiator cushions.
Install the vacuum hose.
Install the radiator.
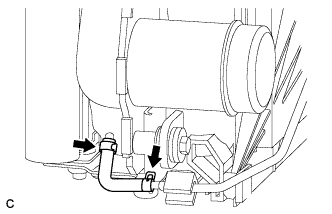
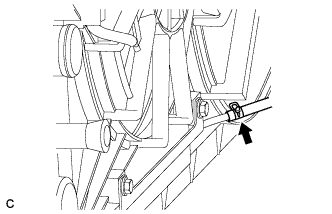
| 3. CONNECT NO. 2 RADIATOR HOSE |
Connect the No. 2 radiator hose.
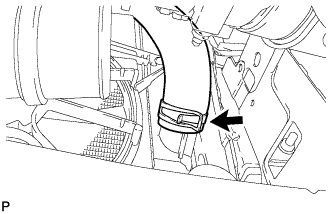
| 4. CONNECT NO. 1 RADIATOR HOSE |
Connect the No. 1 radiator hose.
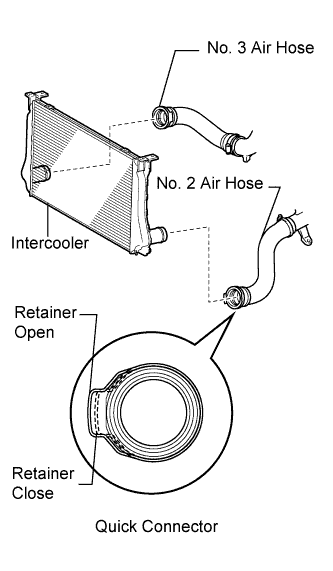
Connect the air hoses No. 2 and No. 3.
- ПРИМЕЧАНИЕ:
- Check that retainer is closed when the connector is inserted.
- If replacing the hose, check for deposits in the intercooler and air hoses No. 2 and No. 3. If necessary, wipe up deposits.
- If replacing the hose, apply fresh oil to the O-ring.
- The connector should be inserted until a clicking sound indicating that they are completely connected is heard. Then, check that the connectors cannot be disconnected by pulling on them.
- Do not use a quick connector that has been dropped.
| 6. INSTALL VACUUM TRANSMITTING HOSE ASSEMBLY |
Connect the vacuum transmitting hose assembly.
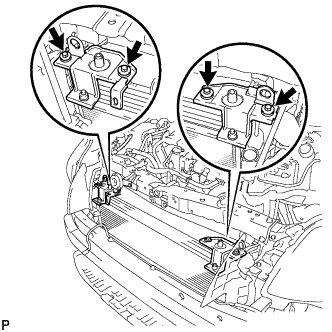
| 7. INSTALL RADIATOR SUPPORT SUB-ASSEMBLY |
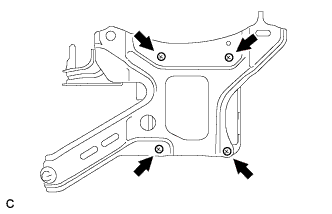
Install the radiator support sub-assembly with the 4 bolts.
- Момент затяжки:
- 13 Н*м{130 кгс*см, 9 фунт-сила-футов}
Install the upper radiator support sub-assembly LH and upper radiator support sub-assembly RH with the 4 bolts.
- Момент затяжки:
- 7.0 Н*м{71 кгс*см, 62 фунт-сила-дюймов}
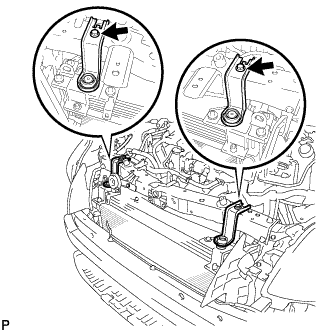
Install the 2 radiator cushions.
Install the 2 upper radiator supports with the 2 bolts.
- Момент затяжки:
- 19 Н*м{194 кгс*см, 14 фунт-сила-футов}
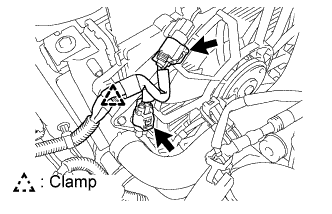
Install the radiator reserve tank hose to the hose clamp.
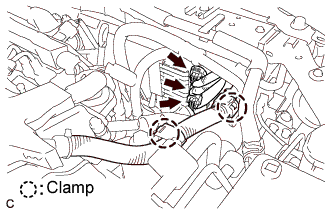
Connect the 2 connectors and clamp.
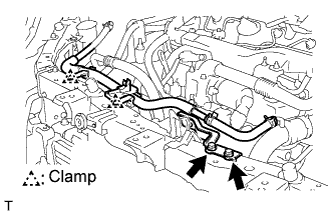
Install the radiator reserve tank hose to the radiator support sub-assembly with the 2 bolts and 2 clamps.
- Момент затяжки:
- 5.0 Н*м{51 кгс*см, 44 фунт-сила-дюймов}
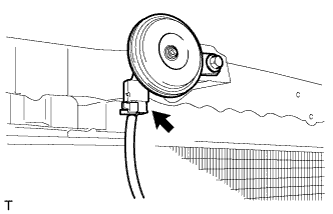
Connect the horn connector.
| 8. INSTALL INJECTOR DRIVER |
Install the injector driver with the 4 bolts.
- Момент затяжки:
- 2.0 Н*м{20 кгс*см, 18 фунт-сила-дюймов}
Install the injector driver assembly with the clip and 2 bolts.
- Момент затяжки:
- 8.0 Н*м{82 кгс*см, 70 фунт-сила-дюймов}
Connect the 3 injector driver connectors and install the 2 clamps.
| 9. INSTALL HOOD LOCK ASSEMBLY |
- УКАЗАНИЕ:
- w/o Engine Hood Courtesy Switch: See page Нажмите здесь
- w/ Engine Hood Courtesy Switch: See page Нажмите здесь
| 10. INSTALL THERMISTOR ASSEMBLY |
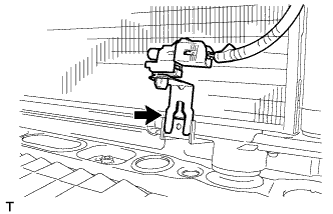
Install the thermistor assembly with the clip.
| 13. INSTALL BATTERY CLAMP SUB-ASSEMBLY |
Install the battery clamp.
- Момент затяжки:
- for bolt:
- 17 Н*м{168 кгс*см, 12 фунт-сила-футов}
- for nut:
- 3.5 Н*м{36 кгс*см, 31 фунт-сила-дюймов}
| 14. CONNECT CABLE TO NEGATIVE BATTERY TERMINAL |
Tighten the radiator drain cock plug.
Tighten the cylinder block drain cock plug.
- Момент затяжки:
- 13 Н*м{130 кгс*см, 9 фунт-сила-футов}
Add TOYOTA Super Long Life Coolant (SLLC) to the radiator reservoir filler opening.
- Standard capacity:
Item
| Specified Condition
|
w/o Power heater
| 7.4 liters (7.8 US qts, 6.5 lmp. qts)
|
w/ Power heater
| 7.8 liters (8.2 US qts, 6.8 lmp. qts)
|
- УКАЗАНИЕ:
- TOYOTA vehicles are filled with TOYOTA SLLC at the factory. In order to avoid damage to the engine cooling system and other technical problems, only use TOYOTA SLLC or similar high quality ethylene glycol based non-silicate, non-amine, non-nitrite, non-borate coolant with long-life hybrid organic acid technology (coolant with long-life hybrid organic acid technology consists of a combination of low phosphates and organic acids).
- Contact your TOYOTA dealer for further details.
- ПРИМЕЧАНИЕ:
- Never use water as a substitute for engine coolant.
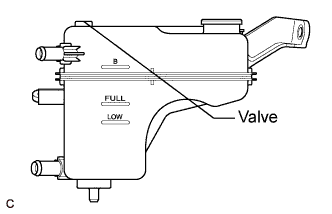
Remove the radiator cap and air-bleeding valve and add coolant to line B of the reservoir tank.
Squeeze the inlet and outlet radiator hoses several times by hand, and then check the level of the coolant.
If the coolant level is low, add coolant.
Install the cap and valve, and warm up the engine sufficiently.
Bleed air from the cooling system.
- ПРИМЕЧАНИЕ:
- Before starting the engine, turn the A/C switch OFF.
- Adjust the air conditioner set temperature to MAX (HOT).
- Adjust the air conditioner set blower to Lo.
Warm up the engine until the thermostat opens. While the thermostat is open, allow the coolant to circulate for several minutes.
- УКАЗАНИЕ:
- The thermostat opening timing can be confirmed by squeezing the inlet radiator hose by hand, and sensing vibrations when the engine coolant starts to flow inside the hose.
- ПРЕДОСТЕРЕЖЕНИЕ:
- When squeezing the radiator hose:
- Wear protective gloves.
- Be careful as the radiator hoses are hot.
- Keep your hands away from the radiator fan.
After the engine has warmed up, run the engine using the following cycle for at least 7 minutes: at 3000 rpm for 5 seconds, at idle speed for 45 seconds. (Repeat this cycle at least 8 times.)
Squeeze the inlet and outlet radiator hoses several times by hand to bleed air from the system.
- ПРЕДОСТЕРЕЖЕНИЕ:
- When squeezing the radiator hose:
- Wear protective gloves.
- Be careful as the radiator hoses are hot.
- Keep your hands away from the radiator fan.
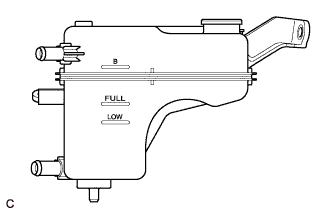
After the engine has cooled down, check that the coolant level is between FULL and LOW.
If the coolant level is low, add coolant to the reservoir tank FULL line.
| 16. INSPECT FOR COOLANT LEAK |
Remove the radiator reservoir cap.
- ПРЕДОСТЕРЕЖЕНИЕ:
- To avoid the danger of being burned, do not remove the radiator reservoir cap while the engine and radiator are still hot. Thermal expansion will cause hot engine coolant and steam to blow out from the radiator.
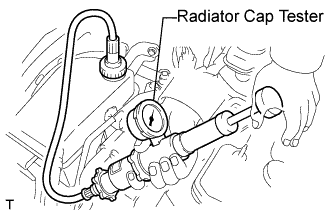
Fill the radiator with coolant, and then attach a radiator cap tester.
Warm up the engine.
Pump the radiator cap tester to 108 kPa (1.1 kgf/cm2, 15.6 psi), and then check that the pressure does not drop.
If the pressure drops, check the hoses, radiator and water pump for leakage.
If there are no signs of external coolant leaks, check the heater core, cylinder block and head.
Reinstall the radiator reservoir cap.
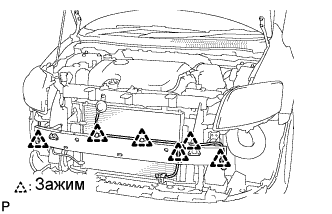
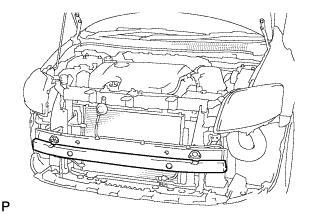
| 17. INSTALL FRONT BUMPER REINFORCEMENT SUB-ASSEMBLY |
Установите усилитель переднего бампера в сборе и закрепите его 8 болтами.
- Момент затяжки:
- 50 Н*м{510 кгс*см, 37 фунт-сила-футов}
Введите в зацепление все зажимы.
| 18. INSTALL FRONT BUMPER ENERGY ABSORBER |
Установите передний поглотитель энергии удара на усилитель переднего бампера.
| 19. INSTALL FRONT BUMPER ASSEMBLY |
- УКАЗАНИЕ:
- See page Нажмите здесь
| 20. INSTALL UPPER RADIATOR AIR DEFLECTOR |
Install the 6 clips and upper radiator air deflector.
| 21. INSTALL NO. 1 ENGINE UNDER COVER |