Насос Системы Охлаждения -- Установка |
| 1. INSTALL WATER PUMP ASSEMBLY |
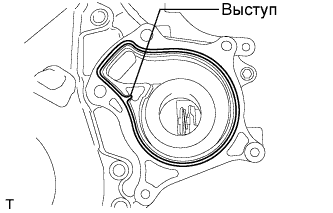
Align the protrusion of the new water pump gasket with the cutout in the timing chain cover and install the gasket to the groove of the timing chain cover.
- УКАЗАНИЕ:
- Be sure to clean the contact surfaces.
 |
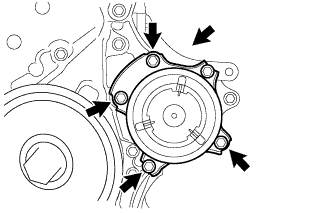
Install the water pump assembly to the timing chain cover with the 5 bolts.
- Момент затяжки:
- 21 Н*м{214 кгс*см, 16 фунт-сила-футов}
 |
| 2. INSTALL GENERATOR ASSEMBLY |
Установите кронштейн зажима жгута проводов и закрепите его болтом.
- Момент затяжки:
- 8,4 Н*м{86 кгс*см, 74 фунт-сила-дюймов}
 |
Временно установите генератор в сборе и закрепите его 2 болтами.
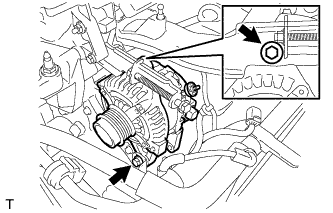 |
Подсоедините жгут проводов к выводу В, закрепите его гайкой и установите крышку вывода.
- Момент затяжки:
- 9,8 Н*м{100 кгс*см, 87 фунт-сила-дюймов}
 |
Подсоедините разъем и зажим жгута проводов.
| 3. INSTALL V-RIBBED BELT |
Установите ремень.
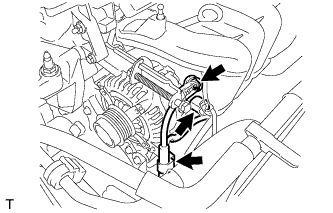
| 4. ADJUST V-RIBBED BELT |
С помощью регулировочного болта C отрегулируйте натяжение поликлинового ремня.
 |
Затяните болты А и В.
- Момент затяжки:
- Болт A:
- 19 Н*м{190 кгс*см, 14 фунт-сила-футов}
- Болт B:
- 43 Н*м{438 кгс*см, 32 фунт-сила-футов}
- ПРИМЕЧАНИЕ:
- Не ослабляйте болт D.
| 5. INSPECT V-RIBBED BELT |
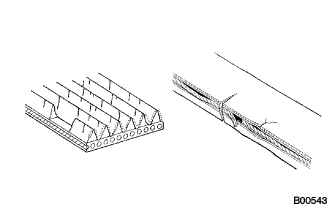
Осмотрите приводной ремень и убедитесь в отсутствии износа, протирания волокон и т.д. При обнаружении дефектов замените ремень.
- УКАЗАНИЕ:
- При обнаружении каких-либо дефектов замените ремень.
- Допускается наличие трещин на рифленой стороне ремня. При обнаружении отсутствующих фрагментов ребер ремня последний следует заменить.
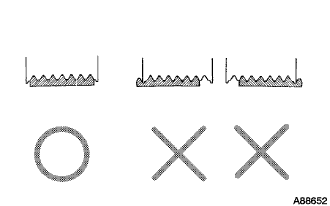
 |
После установки приводного ремня убедитесь в том, что он правильно располагается в углублениях рифления. Рукой проверьте, не выскользнул ли ремень из канавки нижней части шкива коленчатого вала.
- УКАЗАНИЕ:
- Под "новым ремнем" подразумевается ремень, который использовался на работающем двигателе менее 5 минут.
- Под "ремнем, бывшим в употреблении" подразумевается ремень, находившийся на работающем двигателе 5 минут или более.
- После установки нового ремня запустите двигатель на 5 минут, после чего снова проверьте натяжение.
 |
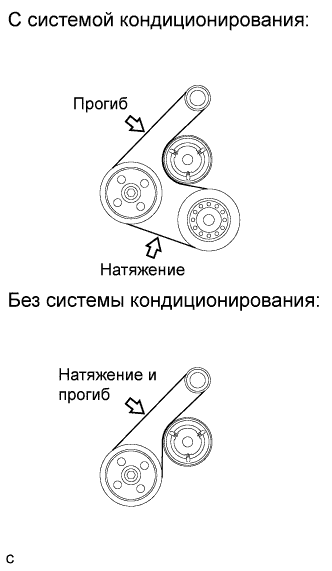
Проверьте прогиб и натяжение поликлинового ремня
- Прогиб:
Параметр / Устройство Заданные условия Новый ремень 7,5–8,6 мм (0,30–0,34 дюйма) Ремень, бывший в употреблении 8,0–10,0 мм (0,32–0,39 дюйма)
- Натяжение:
Параметр / Устройство Заданные условия Новый ремень
(для моделей с системой кондиционирования)688-940 Н (70-96 кг, 155-211 фунтов) Новый ремень
(для моделей без системы кондиционирования)688-884 Н (70-90 кг, 155-199 фунтов) Ремень, бывший в употреблении 402-598 Н (41-61 кг, 90-134 фунта)
- УКАЗАНИЕ:
- Проверьте прогиб поликлинового ремня в указанных точках.
- Проверьте отклонение приводного ремня в указанных точках.
- При установке нового ремня отрегулируйте его натяжение до указанной величины.
- При проверке ремня, использовавшегося более 5 минут, необходимо использовать данные для "ремней, бывших в употреблении".
- При повторной установке ремня, использовавшегося более 5 минут, отрегулируйте его натяжение и прогиб по промежуточным значениям для "ремней, бывших в употреблении".
- Натяжение и прогиб поликлинового ремня следует проверять после проворачивания двигателя на 2 оборота.
- При использовании прибора для проверки натяжения ремня, необходимо сначала проверить его точность по эталонному прибору.
 |
| 6. CONNECT CABLE TO NEGATIVE BATTERY TERMINAL |
- Момент затяжки:
- 5.4 Н*м{55 кгс*см, 48 фунт-сила-дюймов}
| 7. ADD ENGINE COOLANT |
Tighten the radiator drain cock plug.
Tighten the cylinder block drain cock plug.
- Момент затяжки:
- 13 Н*м{130 кгс*см, 9 фунт-сила-футов}
Add TOYOTA Super Long Life Coolant (SLLC) to the radiator reservoir filler opening.
- Standard capacity:
Item Capacity Engine coolant for manual transaxle:
5.6 liters (5.9 US qts, 4.9 lmp. qts)for automatic transaxle:
5.5 liters (5.8 US qts, 4.8 lmp. qts)
- УКАЗАНИЕ:
- TOYOTA vehicles are filled with TOYOTA SLLC at the factory. In order to avoid damage to the engine cooling system and other technical problems, only use TOYOTA SLLC or similar high quality ethylene glycol based non-silicate, non-amine, non-nitrite, non-borate coolant with long-life hybrid organic acid technology (coolant with long-life hybrid organic acid technology consists of a combination of low phosphates and organic acids).
- Contact your TOYOTA dealer for further details.
- ПРИМЕЧАНИЕ:
- Never use water as a substitute for engine coolant.
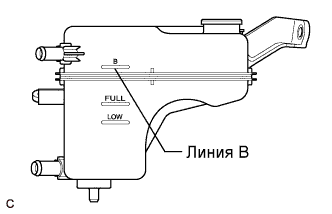
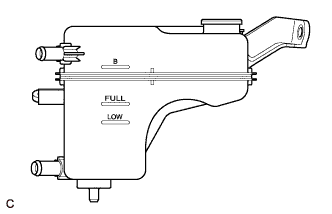
Remove the radiator cap and add coolant to line B of the reservoir tank.
 |
Squeeze the inlet and outlet radiator hoses several times by hand, and then check the level of the coolant.
If the coolant level is low, add coolant.
Install the cap and valve, and warm up the engine sufficiently.
Bleed air from the cooling system.
- ПРИМЕЧАНИЕ:
- Before starting the engine, turn the A/C switch OFF.
- Adjust the air conditioner set temperature to MAX (HOT).
- Adjust the air conditioner set blower to Lo.
Warm up the engine until the thermostat opens. While the thermostat is open, allow the coolant to circulate for several minutes.
- УКАЗАНИЕ:
- The thermostat opening timing can be confirmed by squeezing the inlet radiator hose by hand, and sensing vibrations when the engine coolant starts to flow inside the hose.
- ПРЕДОСТЕРЕЖЕНИЕ:
- When squeezing the radiator hose:
- Wear protective gloves.
- Be careful as the radiator hoses are hot.
- Keep your hands away from the radiator fan.
After the engine has warmed up, run the engine using the following cycle for at least 7 minutes: at 3000 rpm for 5 seconds, at idle speed for 45 seconds. (Repeat this cycle at least 8 times.)
Squeeze the inlet and outlet radiator hoses several times by hand to bleed air from the system.
- ПРЕДОСТЕРЕЖЕНИЕ:
- When squeezing the radiator hose:
- Wear protective gloves.
- Be careful as the radiator hoses are hot.
- Keep your hands away from the radiator fan.
After the engine has cooled down, check that the coolant level is between FULL and LOW.
If the coolant level is low, add coolant to the FULL line on the reservoir tank.
 |
| 8. INSPECT FOR COOLANT LEAK |
- ПРЕДОСТЕРЕЖЕНИЕ:
- To avoid the danger of being burned, do not remove the radiator cap sub-assembly while the engine and radiator assembly are still hot. Thermal expansion will cause hot engine coolant and steam to blow out from the radiator assembly.
Fill the radiator assembly with engine coolant, then attach a radiator cap tester.
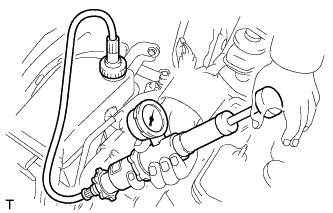 |
Pump it to 108 kPa (1.1 kgf/cm2, 15.6 psi), then check that the pressure does not drop.
If the pressure drops, check the hoses, radiator assembly and water pump assembly for leakage. If there are no signs or traces of external engine coolant leakage, check the heater core, cylinder block and head.
| 9. INSTALL REAR ENGINE UNDER COVER RH |
| 10. INSTALL NO. 2 CYLINDER HEAD COVER |
| 11. INSTALL UPPER RADIATOR AIR DEFLECTOR |