Датчик Уровня Топлива В Сборе Снятие. Corolla Auris
Двигатель. COROLLA, AURIS. ZZE150 ZRE151,152 NDE150
REMOVE REAR SEAT HEADREST ASSEMBLY (for LH Side)
REMOVE NO. 1 REAR SEAT CUSHION HINGE COVER (for LH Side)
REMOVE NO. 2 REAR SEAT CUSHION HINGE COVER (for LH Side)
REMOVE REAR SEAT ASSEMBLY LH
REMOVE REAR DOOR SCUFF PLATE LH
REMOVE REAR SEAT HEADREST ASSEMBLY (for RH Side)
REMOVE CENTER REAR SEAT HEADREST ASSEMBLY
REMOVE NO. 1 REAR SEAT CUSHION HINGE COVER (for RH Side)
REMOVE NO. 2 REAR SEAT CUSHION HINGE COVER (for RH Side)
REMOVE REAR SEAT ASSEMBLY RH
REMOVE REAR SEAT INNER BELT ASSEMBLY RH
REMOVE REAR DOOR SCUFF PLATE RH
REMOVE REAR FLOOR SERVICE HOLE COVER
REMOVE FUEL TANK VENT TUBE SUB-ASSEMBLY
REMOVE FUEL SENDER GAUGE ASSEMBLY
Датчик Уровня Топлива В Сборе -- Снятие |
| 1. REMOVE REAR SEAT HEADREST ASSEMBLY (for LH Side) |
| 2. REMOVE NO. 1 REAR SEAT CUSHION HINGE COVER (for LH Side) |
- УКАЗАНИЕ:
- See page Нажмите здесь for 5 door
| 3. REMOVE NO. 2 REAR SEAT CUSHION HINGE COVER (for LH Side) |
- УКАЗАНИЕ:
- See page Нажмите здесь for 5 door
- See page Нажмите здесь for 3 door
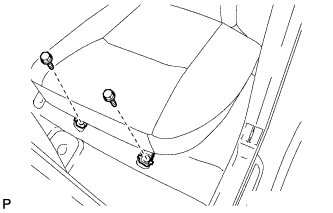
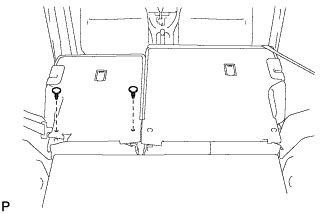
| 4. REMOVE REAR SEAT ASSEMBLY LH |
Выверните 2 болта с передней стороны левого заднего сиденья в сборе.
Снимите 2 фиксатора.
Наклоните левое заднее сиденье в сборе вперед, чтобы вывернуть 2 болта, и снимите левое заднее сиденье в сборе.
- ПРИМЕЧАНИЕ:
- Соблюдайте осторожность, чтобы не повредить кузов автомобиля.
| 5. REMOVE REAR DOOR SCUFF PLATE LH |
- УКАЗАНИЕ:
- See page Нажмите здесь for 5 door
| 6. REMOVE REAR SEAT HEADREST ASSEMBLY (for RH Side) |
| 7. REMOVE CENTER REAR SEAT HEADREST ASSEMBLY |
| 8. REMOVE NO. 1 REAR SEAT CUSHION HINGE COVER (for RH Side) |
- УКАЗАНИЕ:
- See page Нажмите здесь for 5 door
| 9. REMOVE NO. 2 REAR SEAT CUSHION HINGE COVER (for RH Side) |
- УКАЗАНИЕ:
- See page Нажмите здесь for 5 door
- See page Нажмите здесь for 3 door
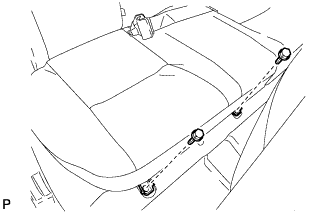
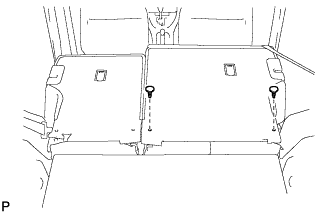
| 10. REMOVE REAR SEAT ASSEMBLY RH |
Выверните 2 болта с передней стороны правого заднего сиденья в сборе.
Снимите 2 фиксатора.
Наклоните правое заднее сиденье в сборе вперед, чтобы вывернуть 2 болта на задней части, и снимите правое заднее сиденье в сборе.
- ПРИМЕЧАНИЕ:
- Соблюдайте осторожность, чтобы не повредить кузов автомобиля.
| 11. REMOVE REAR SEAT INNER BELT ASSEMBLY RH |
- УКАЗАНИЕ:
- See page Нажмите здесь
| 12. REMOVE REAR DOOR SCUFF PLATE RH |
- УКАЗАНИЕ:
- See page Нажмите здесь for 5 door
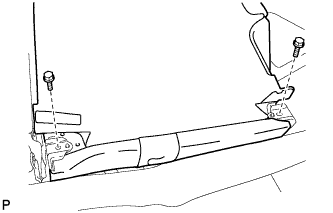
| 13. REMOVE REAR FLOOR SERVICE HOLE COVER |
Turn back the floor carpet.
Remove the butyl tape, then remove the rear floor service hole cover.
Disconnect the fuel sender gauge connector.
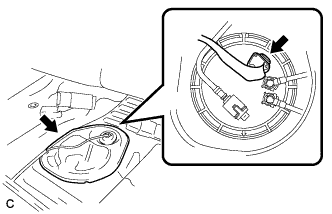
| 14. REMOVE FUEL TANK VENT TUBE SUB-ASSEMBLY |
Remove the fuel tank cap, then discharge the pressure in the fuel tank completely.
Disconnect the fuel tank main tube and return tube.
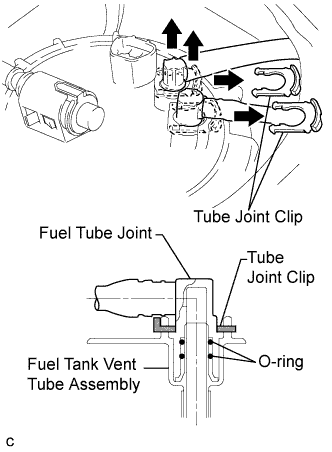
- ПРИМЕЧАНИЕ:
- Before beginning this procedure, check for foreign matter on the joint clips. Clean if necessary.
Remove the 2 tube joint clips, then pull out the fuel tube joint from the plug of the fuel tank vent tube assembly.
- ПРИМЕЧАНИЕ:
- Keep the O-ring free of foreign matter, as it becomes contaminated easily.
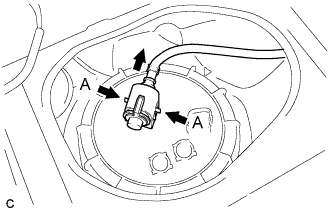
- Do not use any tools in this procedure.
- Do not forcefully bend, kink or twist the tube.
- Put the tube in a plastic bag to prevent damage and contamination.
- If the fuel suction plate and tube are stuck together, pinch the tube and turn it carefully to disconnect it.
- Be careful not to damage the clips. If any clip is damaged, replace it.
Press on tabs A from both sides of the tube.
Pull on the tube in the direction indicated by the arrow in the illustration.
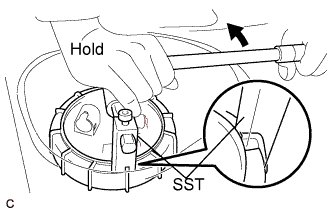
Using a 6 mm socket, set SST to the fuel pump gauge retainer.
- SST
- 09808-14020(09808-01410,09808-01420,09808-01430)
- ПРИМЕЧАНИЕ:
- Do not use any other tools such as a screwdriver.
- УКАЗАНИЕ:
- Fit the tips of SST on the ribs of the retainer.
While holding SST by hand, remove the fuel pump gauge retainer.
Remove the fuel tank vent tube assembly.
- ПРИМЕЧАНИЕ:
- Do not damage the fuel pump filter.
- Be careful not to bend the fuel sender gauge arm.
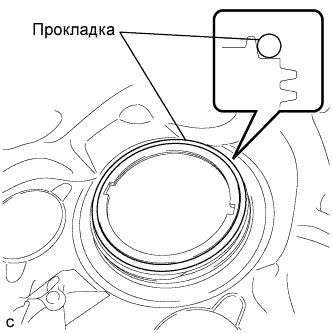
Remove the gasket from the fuel tank assembly.
| 15. REMOVE FUEL SENDER GAUGE ASSEMBLY |
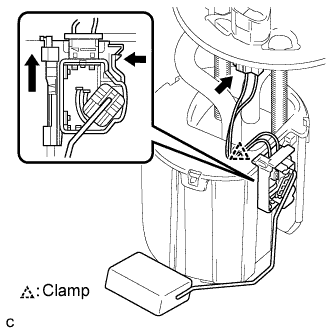
Disconnect the connector of the fuel sender gauge assembly.
Remove the harness protector from the wire harness.
Disconnect the harness clamp.
- ПРИМЕЧАНИЕ:
- Do not damage the wire harness.
Release the lock as shown in the illustration and slide the fuel sender gauge assembly to remove it.