Топливная Форсунка Снятие. Corolla Auris
Двигатель. COROLLA, AURIS. ZZE150 ZRE151,152 NDE150
REMOVE NO. 1 ENGINE COVER
DISCONNECT ENGINE WIRE
REMOVE NO. 1 INJECTION PIPE SUB-ASSEMBLY
REMOVE NO. 2 INJECTION PIPE SUB-ASSEMBLY
REMOVE NO. 3 INJECTION PIPE SUB-ASSEMBLY
REMOVE NO. 4 INJECTION PIPE SUB-ASSEMBLY
REMOVE NO. 1 NOZZLE LEAKAGE PIPE ASSEMBLY
REMOVE NO. 1 NOZZLE HOLDER CLAMP
REMOVE INJECTOR ASSEMBLY
Топливная Форсунка -- Снятие |
| 1. REMOVE NO. 1 ENGINE COVER |
Detach the 4 clips and remove the engine cover.
- ПРИМЕЧАНИЕ:
- Lift the area around the clips on the top of the engine cover.
- Do not suddenly lift the engine cover. Remove the cover slowly by detaching the clips on by one.
- Lift area A shown in the illustration particularly slowly because there is a cowl on the top of the area around A. Failure to do so may damage the cover.
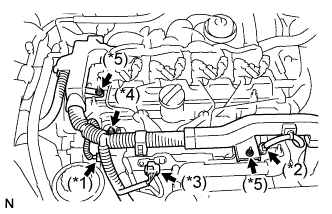
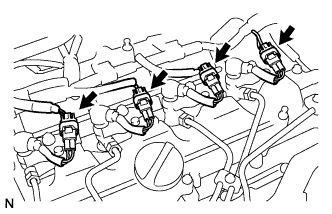
| 2. DISCONNECT ENGINE WIRE |
Disconnect the fuel pressure sensor connector (*1).
Disconnect the pressure discharge valve connector (*2).
Disconnect the turbo pressure sensor connector (*3).
Remove the grommet and nut (*4) and disconnect the glow plug harness.
Remove the 2 nuts (*5) and disconnect the engine wire from the engine cover bracket.
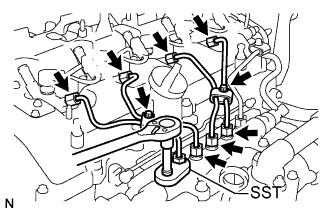
| 3. REMOVE NO. 1 INJECTION PIPE SUB-ASSEMBLY |
- ПРИМЕЧАНИЕ:
- After removing the fuel pipe, cover the common rail with electrical tape to prevent dirt or foreign objects from entering the pipe inlet. Also protect the injector inlets with electrical tape or plastic bags.
Remove the 2 bolts and 4 injection pipe clamps.
Using SST, loosen the nut at the common rail end of the injection pipe.
- SST
- 09023-38401
Using SST, loosen the nut at the injector end of the injection pipe.
- SST
- 09023-38401
Remove the No. 1 injection pipe sub-assembly.
| 4. REMOVE NO. 2 INJECTION PIPE SUB-ASSEMBLY |
- УКАЗАНИЕ:
- Perform the same procedure as for the No. 1 injection pipe.
| 5. REMOVE NO. 3 INJECTION PIPE SUB-ASSEMBLY |
- УКАЗАНИЕ:
- Perform the same procedure as for the No. 1 injection pipe.
| 6. REMOVE NO. 4 INJECTION PIPE SUB-ASSEMBLY |
- УКАЗАНИЕ:
- Perform the same procedure as for the No. 1 injection pipe.
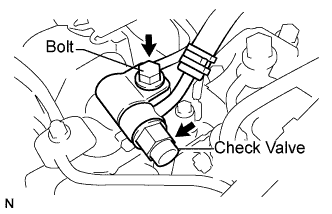
| 7. REMOVE NO. 1 NOZZLE LEAKAGE PIPE ASSEMBLY |
Remove the fuel check valve, bolt and gasket.
Remove the 4 union bolts, 4 gaskets and No. 1 nozzle leakage pipe.
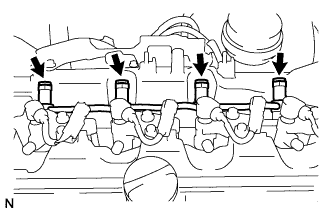
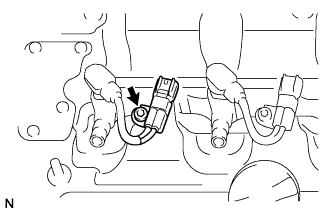
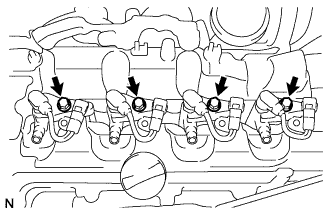
| 8. REMOVE NO. 1 NOZZLE HOLDER CLAMP |
Disconnect the 4 injector connectors.
Using a hexagon socket wrench, remove the 4 bolts.
Remove the 4 bolts, 4 washers, and 4 nozzle holder clamps.
| 9. REMOVE INJECTOR ASSEMBLY |
Remove the 4 injectors and 4 injection nozzle seats from the cylinder head.
Remove the O-rings from each injector.
- ПРИМЕЧАНИЕ:
- When removing the injector assembly, store them in correct order so that they can be returned to the original locations when reassembling.