Dtc P0045 Turbocharger / Supercharger Boost Control Solenoid Circuit / Open. Corolla Auris
Двигатель. COROLLA, AURIS. ZZE150 ZRE151,152 NDE150
DESCRIPTION
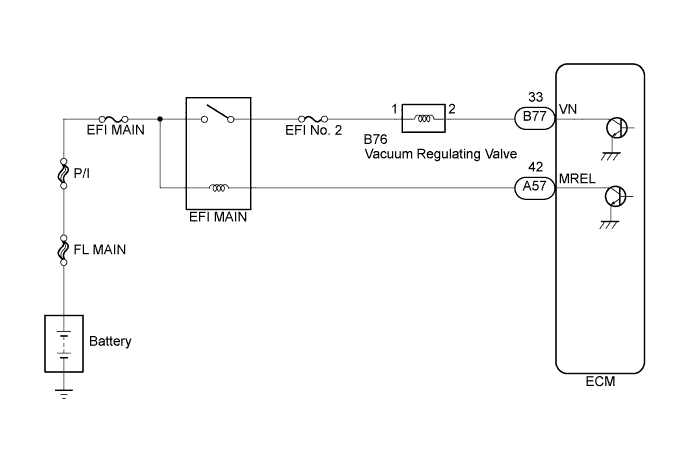
WIRING DIAGRAM
INSPECTION PROCEDURE
INSPECT VACUUM REGULATING VALVE ASSEMBLY (OPERATION)
INSPECT VACUUM REGULATING VALVE ASSEMBLY (RESISTANCE)
CHECK VACUUM REGULATING VALVE ASSEMBLY (VOLTAGE)
CHECK HARNESS AND CONNECTOR (ECM - VACUUM REGULATING VALVE)
INSPECT FUSE (EFI NO. 2)
DTC P0045 Turbocharger / Supercharger Boost Control Solenoid Circuit / Open |
DESCRIPTION
The ECM optimizes the balance between the back pressure and boost pressure so that the balance is most appropriate for the engine speed and load, by performing two functions. It signals the Vacuum Regulating Valve to open and close the variable nozzle vane that is built around the circumference of the turbine, and adjusts the flow rate and pressure of the exhaust gas that is input to the turbocharger.DTC No.
| DTC Detection Condition
| Trouble Area
|
P0045
| Open or short in VRV circuit for 3.0 seconds or more
(The MIL is illuminated and a DTC is immediately set when a malfunction is detected)
| - Vacuum regulating valve
- Open or short in vacuum regulating valve circuit
- EFI No. 2 fuse
- ECM
|
- УКАЗАНИЕ:
- DTC P0045 is set when the ignition switch is in the ON position.
WIRING DIAGRAM
INSPECTION PROCEDURE
- УКАЗАНИЕ:
- Read freeze frame data using an intelligent tester. The ECM records vehicle and driving condition information as freeze frame data the moment a DTC is stored. When troubleshooting, freeze frame data can be helpful in determining whether the vehicle was running or stopped, whether the engine was warmed up or not, whether the air fuel ratio was lean or rich, as well as other data recorded at the time of a malfunction.
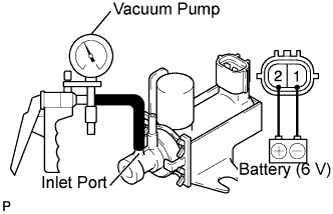
| 1.INSPECT VACUUM REGULATING VALVE ASSEMBLY (OPERATION) |
Remove the vacuum regulating valve (See page Нажмите здесь).
Apply 4 dry batteries of 1.5 V in series.
Check that the needle does not move when a vacuum is applied to the vacuum inlet port.
- OK:
- The vacuum regulating valve operates normally.
Reinstall the vacuum regulating valve (See page Нажмите здесь).
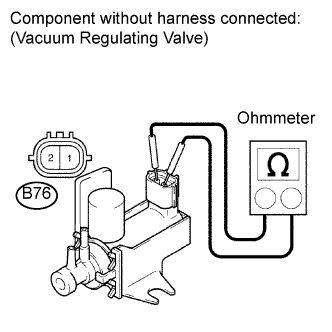
| 2.INSPECT VACUUM REGULATING VALVE ASSEMBLY (RESISTANCE) |
Remove the vacuum regulating valve (See page Нажмите здесь).
Measure the resistance according to the value(s) in the table below.
- Standard resistance:
Tester Connection
| Condition
| Specified Condition
|
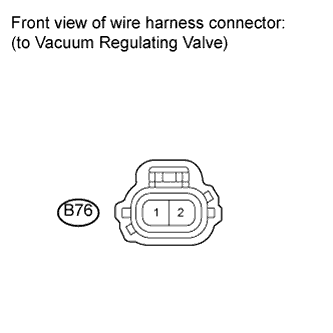
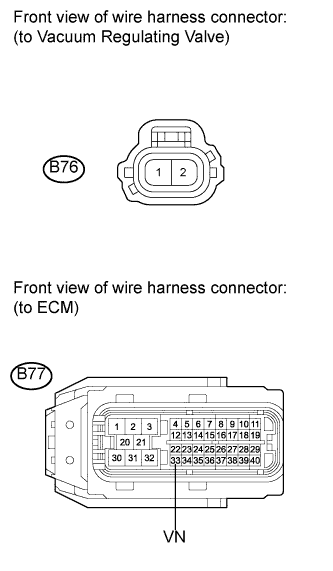
B76-1 - B76-2
| 20°C (68°F)
| 11 to 13 Ω
|
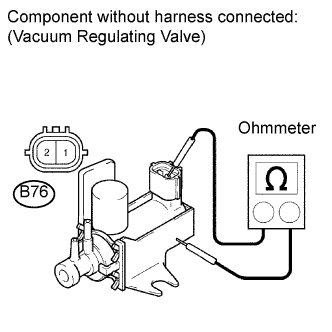
Measure the resistance according to the value(s) in the table below.
- Standard resistance:
Tester Connection
| Condition
| Specified Condition
|
B76-1 - Body
| Always
| 10 kΩ or higher
|
B76-2 - Body
| Always
| 10 kΩ or higher
|
Reinstall the vacuum regulating valve (See page Нажмите здесь).
| 3.CHECK VACUUM REGULATING VALVE ASSEMBLY (VOLTAGE) |
Disconnect the vacuum regulating valve connector.
Turn the ignition switch to the ON position.
Measure the voltage according to the value(s) in the table below.
- Standard voltage:
Tester Connection
| Switch Condition
| Specified Condition
|
B76-1 - Body ground
| Ignition switch ON
| 9 to 14 V
|
Turn the ignition switch off.
Reconnect the vacuum regulating valve connector.
| 4.CHECK HARNESS AND CONNECTOR (ECM - VACUUM REGULATING VALVE) |
Disconnect the ECM connector.
Disconnect the vacuum regulating valve connector.
Measure the resistance according to the value(s) in the table below.
- Standard resistance (check for open):
Tester Connection
| Condition
| Specified Condition
|
B77-33 (VN) - B76-2
| Always
| Below 1 Ω
|
- Standard resistance (check for short):
Tester Connection
| Condition
| Specified Condition
|
B77-33 (VN) or B76-2 - Body ground
| Always
| 10 kΩ or higher
|
Reconnect the vacuum regulating valve connector.
Reconnect the ECM connector.
| | REPAIR OR REPLACE HARNESS OR CONNECTOR (ECM - VACUUM REGULATING VALVE) |
|
|
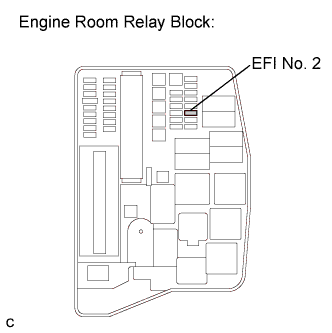
| 5.INSPECT FUSE (EFI NO. 2) |
Remove the EFI No. 2 fuse from the engine room relay block.
Measure the resistance according to the value(s) in the table below.
- Standard resistance:
Tester Connection
| Condition
| Specified Condition
|
EFI No. 2 fuse
| Always
| Below 1 Ω
|
Reinstall the EFI No. 2 fuse.
| | REPLACE FUSE (EFI NO. 2 FUSE) |
|
|
| OK |
|
|
|
| REPAIR OR REPLACE HARNESS OR CONNECTOR (VACUUM REGULATING VALVE - INTEGRATION RELAY (EFI MAIN RELAY)) |
|