Engine. Lexus Is250, Is220D. Gse20 Ale20
2Ad-Fhv Starting. Lexus Is250, Is220D. Gse20 Ale20
Glow Plug -- Installation |
| 1. INSTALL GLOW PLUG ASSEMBLY |
Install the 4 glow plugs.
- Torque:
- 12 N*m{125 kgf*cm, 9 ft.*lbf}
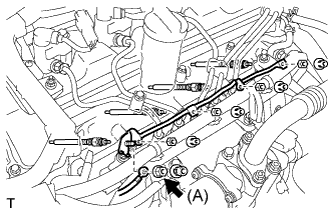 |
Install the glow plug connector with the 4 nuts.
- Torque:
- 2.2 N*m{22 kgf*cm, 19 in.*lbf}
Install the wire harness with the nut (A).
- Torque:
- 4.0 N*m{41 kgf*cm, 35 in.*lbf}
Install the 5 grommets.
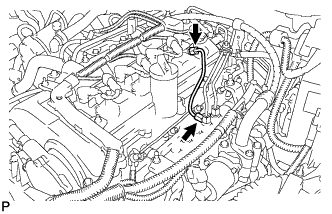
| 2. INSTALL NO. 4 INJECTION PIPE SUB-ASSEMBLY |
- NOTICE:
- In cases where an injector is replaced, the injection pipes must also be replaced.
Temporarily install the injection pipe.
 |
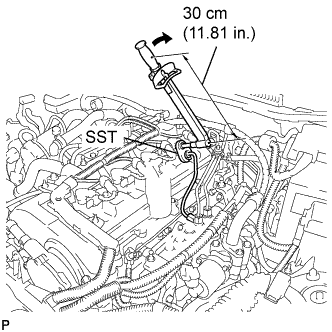
Using the SST, first tighten the nut at the common rail end of the injection pipe.
- SST
- 09023-38401
- Torque:
- 27 N*m{275 kgf*cm, 20 ft.*lbf}
- HINT:
- Use of the proper SST is necessary to ensure that the correct torque is applied to the injection pipe nut.
- Use a torque wrench with a fulcrum length of 30 cm (11.81 in.).
- Make sure that the pipe is not deformed or twisted during installation.
If the pipe is deformed or twisted, or if it cannot be installed properly, replace the pipe with a new one.
Using the SST, tighten the nut at the injector end of the injection pipe.
- SST
- 09023-38401
- Torque:
- 27 N*m{275 kgf*cm, 20 ft.*lbf}
- HINT:
- Use of the proper SST is necessary to ensure that the correct torque is applied to the injection pipe nut.
- Use a torque wrench with a fulcrum length of 30 cm (11.81 in.).
- Make sure that the pipe is not deformed or twisted during installation.
If the pipe is deformed or twisted, or if it cannot be installed properly, replace the pipe with a new one.
 |
| 3. CONNECT CABLE TO NEGATIVE BATTERY TERMINAL |
- Torque:
- 5.4 N*m{55 kgf*cm, 48 in.*lbf}
| 4. CHECK FOR FUEL LEAKS |
PERFORM ACTIVE TEST
Connect the intelligent tester to the DLC3.
Turn the engine switch ON (IG).
Turn the intelligent tester ON.
Enter the following menus: Powertrain / ENGINE / Active Test.
Perform the Active Test.
Intelligent Tester Display Test Details Control Range Diagnostic Notes Test the Fuel Leak Pressurize common rail internal fuel pressure, and check for fuel leaks Stop/Start - Fuel pressure inside common rail pressurized to specified value and engine speed increased to 2,000 rpm when "Start" is selected
- Above conditions to be maintained while "Start" is selected
- Fuel pressure inside common rail pressurized to specified value and engine speed increased to 2,000 rpm when "Start" is selected
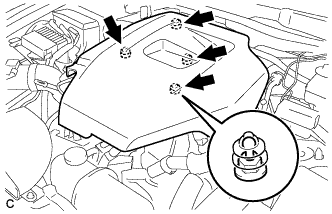
| 5. INSTALL NO. 1 ENGINE COVER |
Install the No. 1 engine cover.
 |
| 6. PERFORM INITIALIZATION |
Perform initialization procedure (Click here).
- HINT:
- Some vehicle systems require initialization after reconnecting the negative battery cable.