Amplifier Antenna -- Removal |
| 1. DISCONNECT CABLE FROM NEGATIVE BATTERY TERMINAL |
- CAUTION:
- Wait at least 90 seconds after disconnecting the cable from the negative (-) battery terminal to prevent airbag and seat belt pretensioner activation.
| 2. DISCONNECT FRONT SEAT OUTER BELT ASSEMBLY LH |
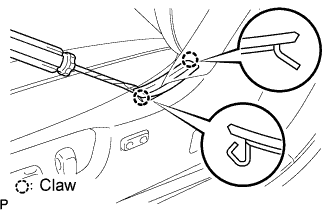 |
Using a screwdriver, detach the 2 claws and remove the front seat belt hole cover.
- HINT:
- Tape the screwdriver tip before use.
Apply protective tape around the seat belt anchor cover cap to the cushion shield.
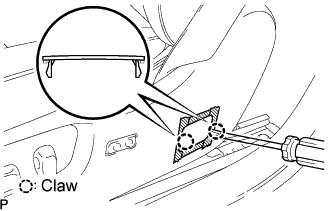 |
Using a screwdriver, detach the 2 claws and remove the seat belt anchor cover cap.
- HINT:
- Tape the screwdriver tip before use.
Move the seat using the power seat switch knob so that the seat belt anchor bolt is revealed.
Remove the bolt and front seat outer belt anchor.
 |
| 3. REMOVE FRONT SEAT ASSEMBLY |
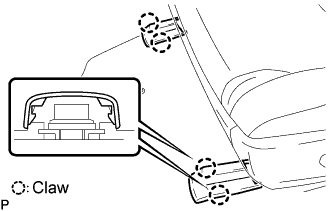 |
Operate the power seat switch knob and move the seat to the rearmost position.
Using a screwdriver, detach the 4 claws and remove the seat track bracket cover front inner and outer.
- HINT:
- Tape the screwdriver tip before use.
Remove the 2 bolts on the front side of the seat.
Operate the power seat switch knob and move the seat to the foremost position.
Using a screwdriver, detach the 4 claws and remove the seat track bracket cover rear inner and outer.
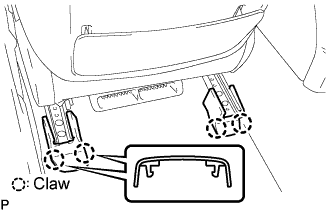 |
Remove the 2 bolts on the rear side of the seat.
Disconnect the cable from the negative (-) battery terminal.
- CAUTION:
- Wait at least 90 seconds after disconnecting the cable from the negative (-) battery terminal to prevent airbag and seat belt pretensioner activation.
Disconnect the connectors under the seat. Then remove the seat.
| 4. REMOVE REAR SEAT CUSHION ASSEMBLY |
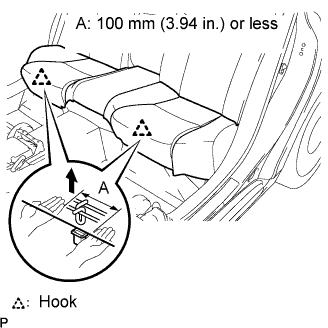 |
Detach the seat cushion's 2 front hooks from the vehicle body.
- NOTICE:
- Follow the instructions below carefully as the cushion frame deforms easily.
Choose a hook to detach first. Place your hands near the hook as shown in the illustration. Then lift the seat cushion to detach the hook.
Repeat for the other hook.
Detach the seat cushion's 2 rear hooks from the seatback.
Remove the seat cushion.
| 5. REMOVE REAR SEAT HEADREST ASSEMBLY LH AND RH |
| 6. REMOVE REAR SEAT HEADREST ASSEMBLY CENTER |
| 7. REMOVE REAR SEATBACK ASSEMBLY |

Using a screwdriver, detach the claws and remove the 2 rear seat covers.
- HINT:
- Tape the screwdriver tip before use.
Using a screwdriver, detach the claw to open the cap of the 3 rear seat shoulder belt guides.
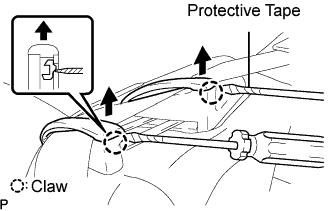 |
Remove the bolt and floor anchor part.
Remove the 4 bolts and 2 nuts.
 |
Remove the seatback.
| 8. REMOVE FRONT CONSOLE UPPER PANEL GARNISH |
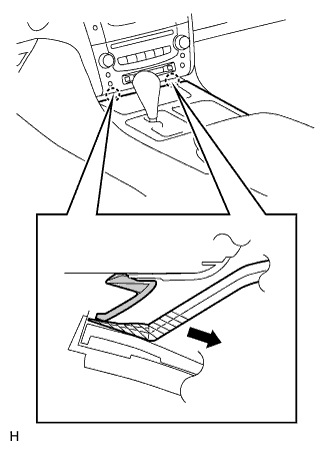 |
Using a clip remover, detach the claws and remove the garnish.
- HINT:
- Tape the clip remover tip before use.
| 9. REMOVE CONSOLE UPPER PANEL ASSEMBLY |
 |
Twist the shift lever knob in the direction indicated by the arrow and remove it.
Using a screwdriver, detach the 9 clips.
- HINT:
- Tape the screwdriver tip before use.
 |
Remove the ash receptacle and then disconnect the connector.
| 10. REMOVE INSTRUMENT PANEL FINISH PANEL END LH |
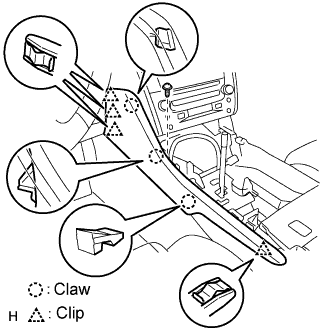 |
Remove the screw.
Using a screwdriver, detach the 4 clips and 3 claws.
- HINT:
- Tape the screwdriver tip before use.
Remove the finish panel end.
| 11. REMOVE INSTRUMENT PANEL FINISH PANEL END RH |
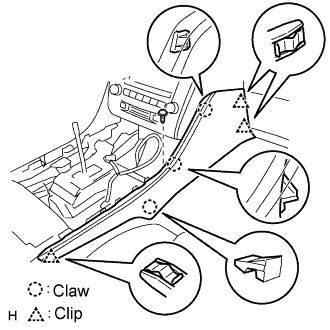 |
Remove the screw.
Using a screwdriver, detach the 3 clips and 3 claws.
- HINT:
- Tape the screwdriver tip before use.
Remove the finish panel end.
| 12. REMOVE CONSOLE BOX PLATE |
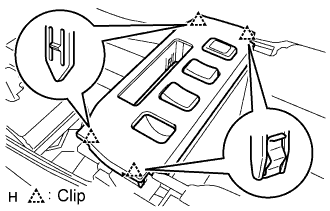 |
Using a screwdriver, detach the 4 clips.
- HINT:
- Tape the screwdriver tip before use.
Remove the console box plate and then disconnect the connector.
| 13. REMOVE CONSOLE BOX REGISTER ASSEMBLY |
 |
Using a screwdriver, detach the 4 clips and remove the register.
- HINT:
- Tape the screwdriver tip before use.
| 14. REMOVE CONSOLE BOX |
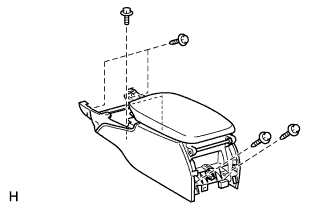 |
Remove the 4 bolts and 2 screws.
Remove the console box and then disconnect the connector.
| 15. REMOVE FRONT DOOR SCUFF PLATE LH |
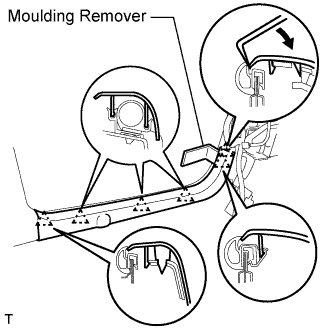 |
Using a moulding remover, detach the 5 claws and remove the scuff plate.
| 16. REMOVE FRONT DOOR SCUFF PLATE RH |
- HINT:
- Use the same procedures described for the LH side.
| 17. REMOVE FRONT DOOR OPENING TRIM COVER LH |
Using a moulding remover, detach the 3 claws and remove the trim cover.
| 18. REMOVE FRONT DOOR OPENING TRIM COVER RH |
- HINT:
- Use the same procedures described for the LH side.
| 19. REMOVE FRONT PILLAR GARNISH LH |
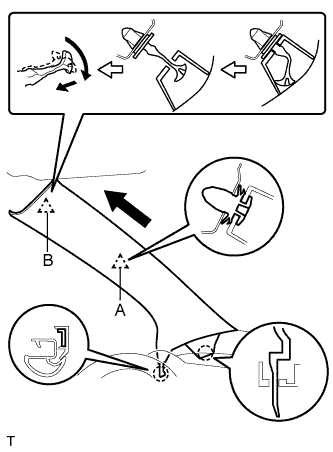 |
Detach the clip labeled A from the vehicle body. Pull the pillar garnish so that the tip of clip B locks in the pillar garnish's hole.
Using needle-nose pliers, rotate clip B 90° and remove the pillar garnish.
- HINT:
- If clip B is removed from the vehicle body or is damaged, replace it with a new one.
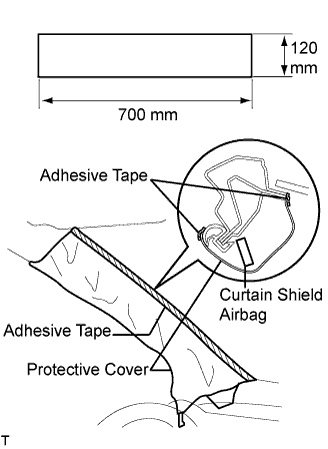
Protect the curtain shield airbag.
Thoroughly cover the airbag with a cloth or nylon sheet that is 700 mm (27.56 in.) x 120 mm (4.72 in.) and fix the ends of the cover with adhesive tape, as shown in the illustration.
- NOTICE:
- Cover the curtain shield airbag with a protective cover as soon as the front pillar garnish is removed.
 |
| 20. REMOVE FRONT PILLAR GARNISH RH |
- HINT:
- Use the same procedures described for the LH side.
| 21. REMOVE REAR DOOR SCUFF PLATE LH |
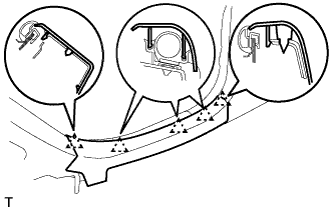 |
Detach the 5 claws and remove the scuff plate.
| 22. REMOVE REAR DOOR SCUFF PLATE RH |
- HINT:
- Use the same procedures described for the LH side.
| 23. REMOVE CENTER PILLAR GARNISH LOWER LH |
 |
Detach the 2 claws and 5 clips, and remove the garnish.
| 24. REMOVE CENTER PILLAR GARNISH LOWER RH |
- HINT:
- Use the same procedures described for the LH side.
| 25. REMOVE CENTER PILLAR GARNISH LH |
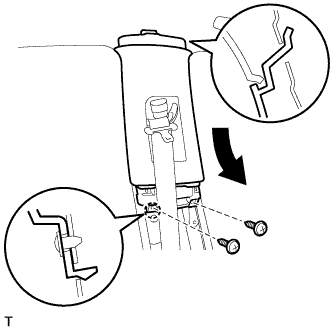 |
Remove the 2 screws.
Pull the garnish in the direction indicated by the arrow in the illustration to detach the claw. Then remove the garnish.
| 26. REMOVE CENTER PILLAR GARNISH RH |
- HINT:
- Use the same procedures described for the LH side.
| 27. REMOVE REAR SEAT SIDE GARNISH LH |
 |
Using a moulding remover, pull the garnish in the direction indicated by the arrow in the illustration to detach the 5 claws. Then remove the garnish.
| 28. REMOVE REAR SEAT SIDE GARNISH RH |
- HINT:
- Use the same procedures described for the LH side.
| 29. REMOVE ROOF SIDE GARNISH INNER LH |
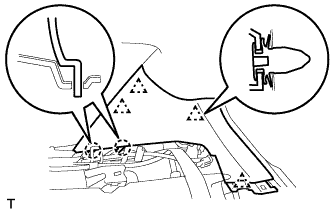 |
Detach the 4 clips.
Pull the garnish in the direction indicated by the arrow in the illustration to detach the 2 claws. Then remove the garnish.
| 30. REMOVE ROOF SIDE GARNISH INNER RH |
- HINT:
- Use the same procedures described for the LH side.
| 31. REMOVE INNER REAR VIEW MIRROR COVER |
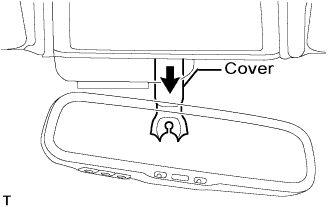 |
Pull the cover in the direction indicated by the arrow in the illustration. Then remove the cover.
| 32. REMOVE FRONT ROOFTOP GARNISH |
 |
w/ Rain sensor:
Remove the top garnish.Using a screwdriver, detach the 3 claws and 2 clips, and remove the top garnish.
- HINT:
- Tape the screwdriver tip before use.
w/o Rain sensor:
Remove the top garnish.Using a screwdriver, detach the 3 claws and 2 clips, and remove the top garnish.
- HINT:
- Tape the screwdriver tip before use.
| 33. REMOVE PERSONAL LIGHT ASSEMBLY |
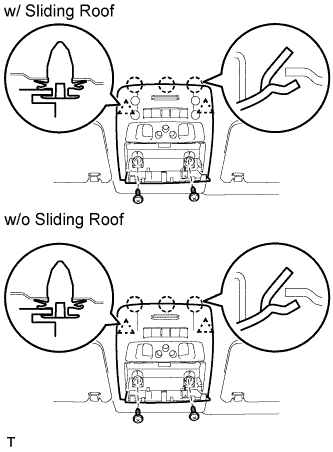 |
Using a screwdriver, remove the 2 covers and 2 screws.
Using a moulding remover, detach the 2 clips and 3 claws.
Disconnect the connector and remove the personal light.
| 34. REMOVE INNER REAR VIEW MIRROR ASSEMBLY |
Remove the screw.
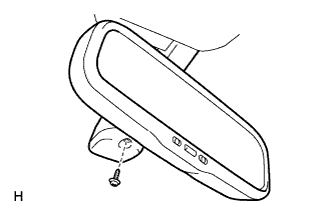 |
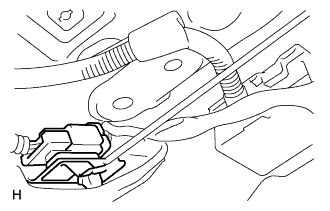
Disconnect the connector and remove the mirror.
 |
| 35. REMOVE REAR ROOM LIGHT ASSEMBLY |
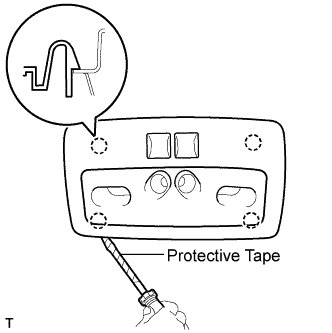 |
Using a screwdriver, detach the 4 claws and remove the rear room light from the vehicle body.
- HINT:
- Tape the screwdriver tip before use.
Disconnect the connector from the room light.
| 36. REMOVE ASSIST GRIP ASSEMBLY |
w/o Sliding roof:
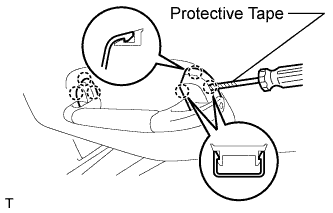
Remove the assist grip.Using a screwdriver, detach the 6 claws and remove the 2 assist grip covers.
- HINT:
- Tape the screwdriver tip before use.
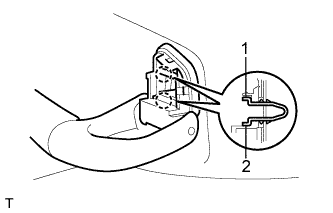
Detach the 2 claws in the order shown in the illustration.
- HINT:
- Repeat this for the other side and remove the assist grip.
 |
w/ Sliding roof:
Remove the assist grip.Using a screwdriver, detach the 6 claws and remove the 2 assist grip covers.
- HINT:
- Tape the screwdriver tip before use.
Detach the 2 claws in the order shown in the illustration.
- HINT:
- Repeat this for the other side and remove the assist grip.
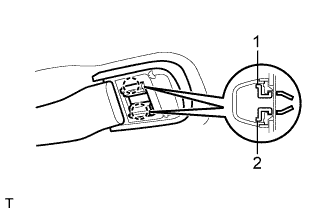
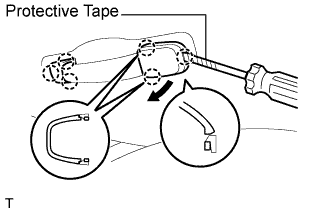 |
| 37. REMOVE STEERING SPOT LIGHT ASSEMBLY |
Using a moulding remover, detach the 2 claws and remove the spot light.
Disconnect the connector.
| 38. REMOVE VISOR BRACKET COVER |
Using a moulding remover, detach the 4 claws and remove the cover.
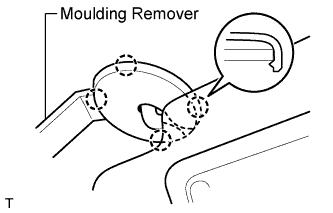 |
| 39. REMOVE LH VISOR ASSEMBLY |
Remove the 2 screws and visor.
| 40. REMOVE RH VISOR ASSEMBLY |
Remove the 2 screws and visor.
| 41. REMOVE VISOR HOLDER |
Remove the visor holder by turning it counterclockwise.
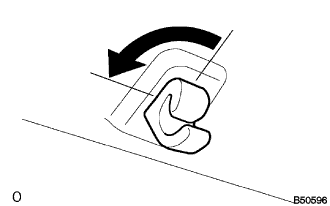 |
| 42. REMOVE ROOF HEADLINING ASSEMBLY |
Disconnect the roof wire and connector from the front pillar.
Detach the 4 clips labeled A and 12 clips labeled B.
w/o Sliding roof:
Detach the 2 hooks and fastener from the vehicle body side.
w/ Sliding roof:
Detach the hook and claw from the vehicle body side.
Disconnect the connector from the drive gear.
Detach the 4 clips labeled A and 12 clips labeled B, and 11 fasteners.
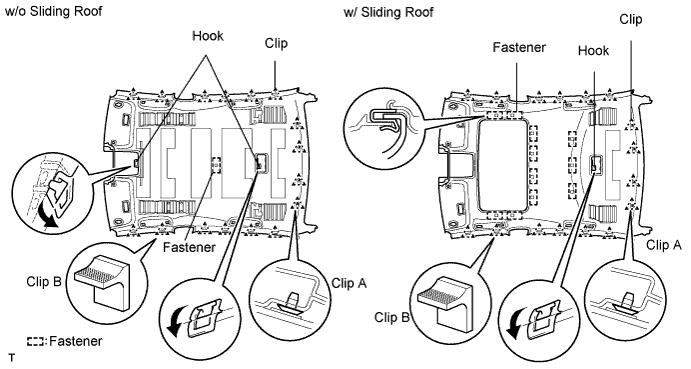
Remove the roof headlining from the vehicle through the rear door, as shown in the illustration.
 |
Only when replacing the roof headlining:
Remove the 11 fasteners from the roof headlining.
| 43. REMOVE AMPLIFIER ANTENNA ASSEMBLY |
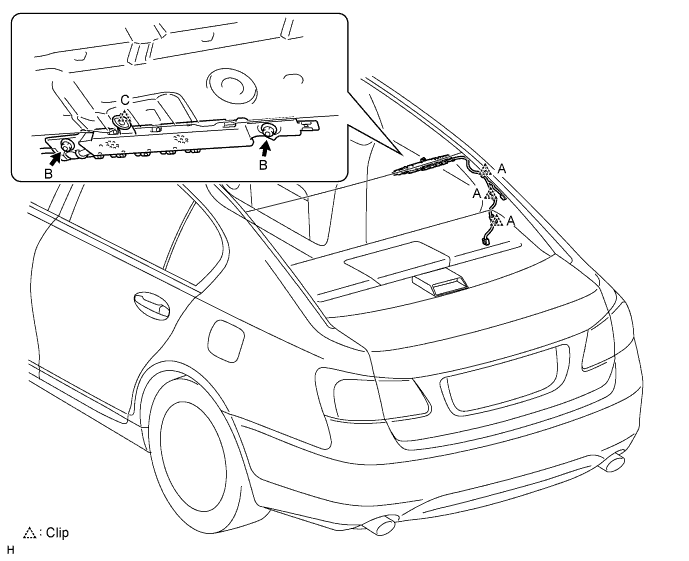
Disconnect the connectors.
Detach the 3 clips labeled A and remove the 2 nuts labeled B.
Detach the clip labeled C and remove the amplifier antenna.