Room Temperature Sensor Removal
DISCONNECT CABLE FROM NEGATIVE BATTERY TERMINAL
REMOVE FRONT CONSOLE UPPER PANEL GARNISH
REMOVE CONSOLE UPPER PANEL ASSEMBLY
REMOVE INSTRUMENT PANEL FINISH PANEL END LH
REMOVE FRONT DOOR SCUFF PLATE LH
REMOVE FRONT DOOR OPENING TRIM COVER LH
REMOVE INSTRUMENT SIDE PANEL LH
REMOVE NO. 1 INSTRUMENT PANEL SAFETY PAD SUB-ASSEMBLY
REMOVE DRIVER SIDE KNEE AIRBAG ASSEMBLY
REMOVE NO. 1 INSTRUMENT PANEL UNDER COVER SUB-ASSEMBLY
REMOVE ROOM TEMPERATURE SENSOR
Room Temperature Sensor -- Removal |
| 1. DISCONNECT CABLE FROM NEGATIVE BATTERY TERMINAL |
- CAUTION:
- Wait at least 90 seconds after disconnecting the cable from the negative (-) battery terminal to prevent airbag and seat belt pretensioner activation.
| 2. REMOVE FRONT CONSOLE UPPER PANEL GARNISH |
Using a clip remover, detach the claws and remove the garnish.
- HINT:
- Tape the clip remover tip before use.
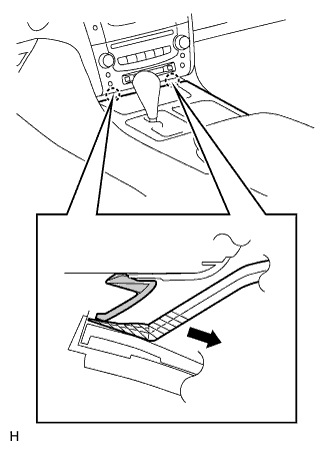
| 3. REMOVE CONSOLE UPPER PANEL ASSEMBLY |
Twist the shift lever knob in the direction indicated by the arrow and remove it.
Using a screwdriver, detach the 9 clips.
- HINT:
- Tape the screwdriver tip before use.
Remove the ash receptacle and then disconnect the connector.
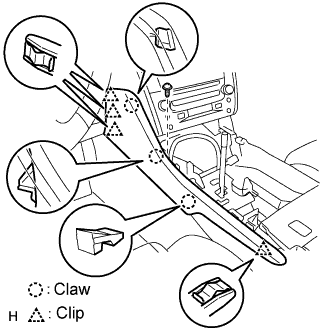
| 4. REMOVE INSTRUMENT PANEL FINISH PANEL END LH |
Remove the screw.
Using a screwdriver, detach the 4 clips and 3 claws.
- HINT:
- Tape the screwdriver tip before use.
Remove the finish panel end.
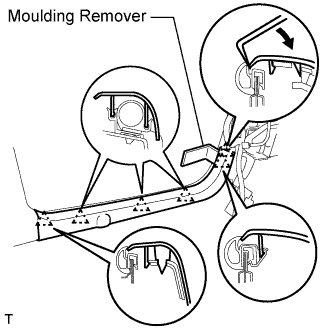
| 5. REMOVE FRONT DOOR SCUFF PLATE LH |
Using a moulding remover, detach the 5 claws and remove the scuff plate.
| 6. REMOVE FRONT DOOR OPENING TRIM COVER LH |
Using a moulding remover, detach the 3 claws and remove the trim cover.
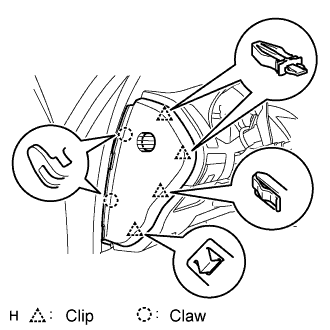
| 7. REMOVE INSTRUMENT SIDE PANEL LH |
Using a screwdriver, detach the 2 claws and 4 clips, and remove the side panel.
- HINT:
- Tape the screwdriver tip before use.
| 8. REMOVE NO. 1 INSTRUMENT PANEL SAFETY PAD SUB-ASSEMBLY |
Using a screwdriver, detach the 8 clips and claw.
- HINT:
- Tape the screwdriver tip before use.
Remove the hood lock control cable from the safety pad.
Remove the safety pad.
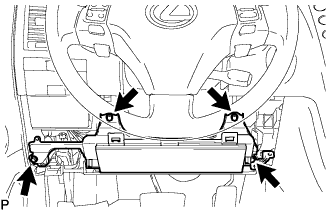
| 9. REMOVE DRIVER SIDE KNEE AIRBAG ASSEMBLY |
Remove the 4 bolts and driver side knee airbag assembly.
Disconnect the connector.
- NOTICE:
- When handling the airbag connector, take care not to damage the airbag wire harness.
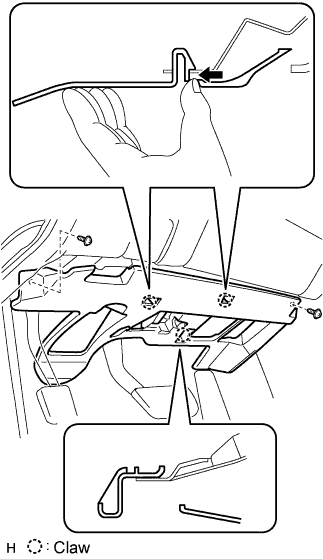
| 10. REMOVE NO. 1 INSTRUMENT PANEL UNDER COVER SUB-ASSEMBLY |
Remove the 2 screws.
Detach the 2 claws.
Remove the under cover and then disconnect the connector.
| 11. REMOVE ROOM TEMPERATURE SENSOR |
Disconnect the connector and air hose.
Detach the claw and remove the sensor.