Transmission Wire Removal
DISCONNECT CABLE FROM NEGATIVE BATTERY TERMINAL
REMOVE ENGINE UNDER COVER NO.2
DRAIN AUTOMATIC TRANSMISSION FLUID
REMOVE ENGINE UNDER COVER AIR GUIDE BRACKET
REMOVE EXHAUST PIPE NO.1 SUPPORT BRACKET SUB-ASSEMBLY
REMOVE AUTOMATIC TRANSMISSION OIL PAN SUB-ASSEMBLY
REMOVE VALVE BODY OIL STRAINER ASSEMBLY
DISCONNECT TRANSMISSION WIRE
REMOVE TRANSMISSION WIRE
Transmission Wire -- Removal |
- CAUTION:
- When working with FIPG material, perform the following:
- Using a razor blade and gasket scraper, remove all the old FIPG material from the gasket surfaces.
- Thoroughly clean all components to remove any loose material.
- Clean both sealing surfaces with a non-residue solvent.
- Apply FIPG in a continuous line (width approximately 1 mm (0.04 in.)) along the sealing surface.
- Parts must be assembled within 10 minutes of application. Otherwise, the FIPG material must be removed and reapplied.
| 1. DISCONNECT CABLE FROM NEGATIVE BATTERY TERMINAL |
| 2. REMOVE ENGINE UNDER COVER NO.2 |
Remove the 4 screws, 2 grommets, 2 spacers and under cover.
| 3. DRAIN AUTOMATIC TRANSMISSION FLUID |
Remove the drain plug and gasket, drain the ATF.
Install a new gasket and the drain plug.
- Torque:
- 20 N*m{204 kgf*cm, 15 ft.*lbf}
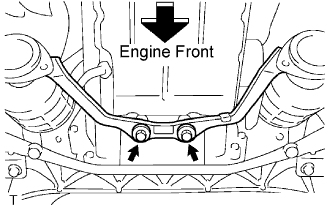
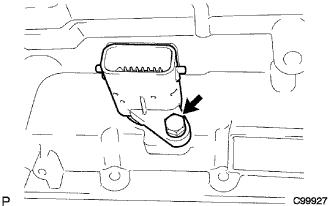
| 4. REMOVE ENGINE UNDER COVER AIR GUIDE BRACKET |
Remove the 2 bolts and engine under cover air guide bracket.
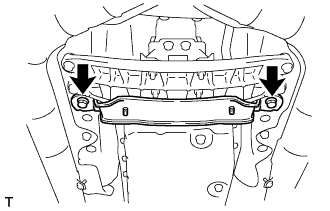
| 5. REMOVE EXHAUST PIPE NO.1 SUPPORT BRACKET SUB-ASSEMBLY |
Remove the 2 bolts and exhaust pipe No.1 support bracket sub-assembly from the automatic transmission assembly.
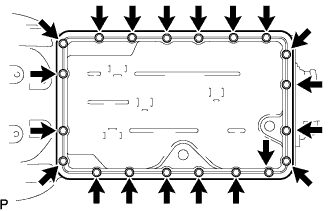
| 6. REMOVE AUTOMATIC TRANSMISSION OIL PAN SUB-ASSEMBLY |
- NOTICE:
- Some fluid will remain in the oil pan.
Remove the 20 bolts, oil pan and gasket.
Remove the 3 magnets from the oil pan.
Examine particles in the pan.
Collect any steel chips with the removed magnets.
Carefully look at the foreign objects and particles in the pan and on the magnets to guess at the type of wear which might be found in the transmission.
Steel (magnetic)... bearing, gear and clutch plate wear
Brass (non-magnetic)... bushing wear
| 7. REMOVE VALVE BODY OIL STRAINER ASSEMBLY |
Remove the 4 bolts and oil strainer.
- NOTICE:
- Be careful as some fluid will come out of the oil strainer.
Remove the O-ring from the oil strainer.
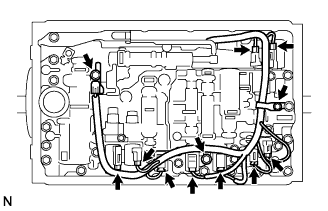
| 8. DISCONNECT TRANSMISSION WIRE |
Remove the bolt and lock plate, and separate the ATF temperature sensor.
Remove the 2 bolts and disconnect the 2 clamps.
Disconnect the 9 connectors from the solenoid valves.
| 9. REMOVE TRANSMISSION WIRE |
Disconnect the transmission wire connector.
Remove the bolt and pull out the transmission wire.
Remove the O-ring from the transmission wire.