INSTALL DOOR OPENING SWITCH SUB-ASSEMBLY (for Face to Face Seat Type)
INSTALL NO. 2 BACK DOOR SERVICE HOLE COVER (for Face to Face Seat Type)
Rear Wiper Motor -- Installation |
| 1. INSTALL REAR WIPER MOTOR ASSEMBLY |
Temporarily install the rear wiper motor assembly with the 3 bolts.
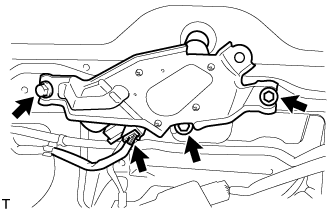 |
Tighten the 3 bolts.
- Torque:
- 5.5 N*m{56 kgf*cm, 49 in.*lbf}
Connect the connector.
| 2. INSTALL REAR WIPER MOTOR GROMMET |
Apply MP grease to the entire inner surface of the rear wiper motor grommet.
Text in Illustration *1 MP Grease - HINT:
- Make sure that the hole does not get clogged with grease and the grooves in the grommet are filled with grease.
 |
Install the rear wiper motor grommet with the position mark facing upward as shown in the illustration.
Text in Illustration *1 Position Mark
 |
| 3. INSTALL REAR WIPER ARM |
Operate the rear wiper, and stop the rear wiper motor at the automatic stop position.
Text in Illustration *1 Wiper Arm Serration *2 Wiper Pivot Serration *3 Wire Brush
 |
Clean the wiper arm serration and wiper pivot serration with a wire brush.
Set the head of the blade on the defogger line.
Text in Illustration *1 Defogger Line
 |
Install the nut and rear wiper arm.
- Torque:
- 5.5 N*m{56 kgf*cm, 49 in.*lbf}
Close the cover.
| 4. INSTALL BACK DOOR GARNISH |
Attach the 14 clips to install the back door garnish.
| 5. INSTALL DOOR OPENING SWITCH SUB-ASSEMBLY (for Face to Face Seat Type) |
Attach the 2 claws to install the door opening switch sub-assembly.
| 6. INSTALL NO. 2 BACK DOOR SERVICE HOLE COVER (for Face to Face Seat Type) |
Connect the connector.
Attach the 4 claws to install the No. 2 back door service hole cover.
| 7. INSTALL ASSIST GRIP (for Face to Face Seat Type) |
Install the assist grip with the 2 screws.
| 8. INSTALL BACK DOOR SIDE GARNISH LH |
Attach the 3 clips and 2 claws to install the back door side garnish LH.
| 9. INSTALL BACK DOOR SIDE GARNISH RH |
w/o Power Back Door:
- HINT:
- Use the same procedure described for the LH side.
w/ Power Back Door:
Attach the clip and 4 claws to install the back door side garnish RH.
| 10. INSTALL CENTER BACK DOOR GARNISH |
Attach the 5 clips and 4 claws to install the center back door garnish.