REMOVE REAR NO. 2 SEAT HEADREST ASSEMBLY LH (w/ Rear Center Seat Headrest)
REMOVE REAR SEAT CUSHION HINGE COVER LH (except Face to Face Seat Type)
REMOVE REAR NO. 2 SEAT HINGE COVER LH (except Face to Face Seat Type)
REMOVE REAR NO. 2 SEAT ASSEMBLY (except Face to Face Seat Type)
REMOVE REAR SIDE SEAT LEG PROTECTOR LH (for Face to Face Seat Type)
REMOVE REAR NO. 2 SEAT ASSEMBLY (for Face to Face Seat Type)
Rear Power Outlet Socket -- Removal |
| 1. REMOVE TONNEAU COVER ASSEMBLY (w/ Tonneau Cover) |
Remove the tonneau cover.
| 2. REMOVE REAR NO. 2 SEAT HEADREST ASSEMBLY LH (w/ Rear Center Seat Headrest) |
| 3. REMOVE REAR SEAT CUSHION HINGE COVER LH (except Face to Face Seat Type) |
Operate the rear seat headrest handle and lower the headrest.
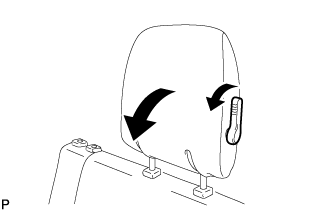 |
Operate the reclining adjuster release handle and fold down the seat.
 |
Operate the seat cushion lock release lever and move the seat to the storage position.
 |
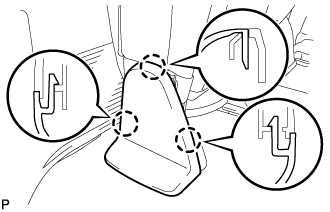
Using a screwdriver, detach the 3 claws and remove the cover.
- HINT:
- Tape the screwdriver tip before use.
 |
| 4. REMOVE REAR NO. 2 SEAT HINGE COVER LH (except Face to Face Seat Type) |
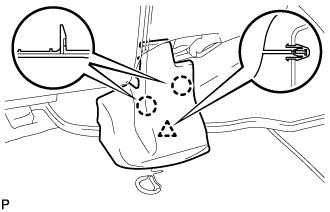 |
Detach the 2 claws and clip, and then remove the cover.
| 5. REMOVE REAR NO. 2 SEAT ASSEMBLY (except Face to Face Seat Type) |
 |
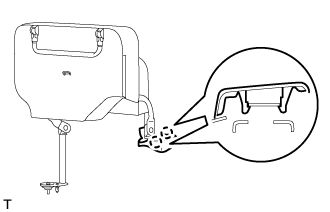
Remove the 4 bolts and seat assembly.
- NOTICE:
- Be careful not to damage the vehicle body.
| 6. REMOVE REAR SIDE SEAT LEG PROTECTOR LH (for Face to Face Seat Type) |
 |
Using a screwdriver, detach the 2 claws and remove the protector.
- HINT:
- Tape the screwdriver tip before use.
| 7. REMOVE REAR NO. 2 SEAT ASSEMBLY (for Face to Face Seat Type) |
 |
Remove the 4 bolts and rear No. 2 seat.
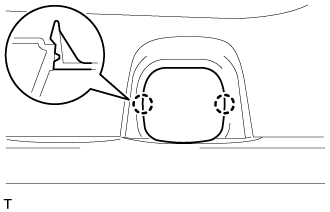
| 8. REMOVE REAR STEP COVER |
 |
- HINT:
- Use the same procedure to remove the step cover on the other side.
Detach the 2 claws and remove the step cover.
| 9. REMOVE REAR DOOR SCUFF PLATE LH |
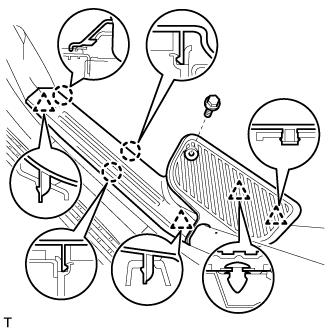 |
Remove the screw.
Detach the 3 claws and 4 clips, and remove the scuff plate.
| 10. REMOVE REAR FLOOR MAT REAR SUPPORT PLATE |
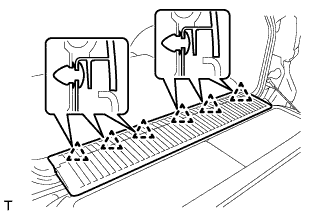 |
Detach the 6 clips and remove the support plate.
| 11. REMOVE NO. 1 TONNEAU COVER HOLDER CAP (w/ Tonneau Cover) |
 |
- HINT:
- Use the same procedure to remove the tonneau cover holder cap on the other side.
Detach the 2 claws and remove the tonneau cover holder cap.
| 12. REMOVE REAR SEAT COVER CAP (except Face to Face Seat Type) |
 |
- HINT:
- Use the same procedure to remove the rear seat cover cap on the other side.
Using a screwdriver, detach the 3 claws and remove the rear seat cover cap.
- HINT:
- Tape the screwdriver tip before use.
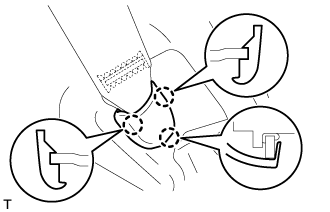
| 13. REMOVE FRONT QUARTER TRIM PANEL ASSEMBLY LH |
 |
- HINT:
- When removing the front quarter trim panel, operate the reclining adjuster release handle and move the No. 1 rear seat to the position shown in the illustration.
Detach the 3 claws and remove the cover.
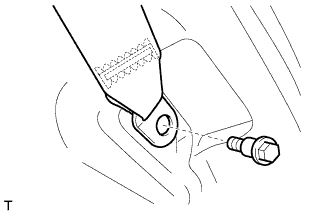
 |
Remove the bolt and rear No. 1 seat belt anchor.
 |
w/ Rear No. 2 Seat, except Face to Face Seat Type:
Remove the bolt and rear No. 2 seat belt anchor.
 |
w/ Rear No. 2 Seat, except Face to Face Seat Type:
Remove the clip and bolt.
Detach the 18 clips and 2 claws.
w/o Rear Air Conditioning System:
Disconnect the rear seat lock control lever cable and then remove the quarter trim panel.w/ Rear Air Conditioning System:
Disconnect the thermistor connector and rear seat lock control lever cable, and then remove the quarter trim panel.
w/o Rear No. 2 Seat or w/ Rear No. 2 Seat, for Face to Face Seat Type:
Remove the clip.
Detach the 18 clips and 2 claws, and remove the quarter trim panel.

w/ Tonneau Cover:
Remove the screw and clip.
Detach the 18 clips and 2 claws, and remove the quarter trim panel.

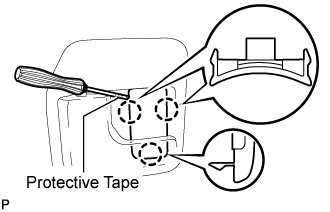
| 14. REMOVE POWER OUTLET SOCKET ASSEMBLY |
Disengage the 4 claws and remove the power outlet socket bezel.
 |
Using a screwdriver with its tip wrapped in protective tape, disengage the claw and remove the power outlet socket assembly.
Text in Illustration *1 Protective Tape
 |
| 15. REMOVE POWER OUTLET SOCKET COVER NO.2 |
Disengage the 2 claws and remove the power outlet socket cover.
 |