Rear Brake -- Removal |
- HINT:
- Use the same procedures for the LH side and RH side.
- The procedures listed below are for the LH side.
| 1. REMOVE REAR WHEEL |
| 2. DRAIN BRAKE FLUID |
- NOTICE:
- Wash brake fluid off immediately if it is spilled on any painted surface.
| 3. DISCONNECT REAR FLEXIBLE HOSE LH |
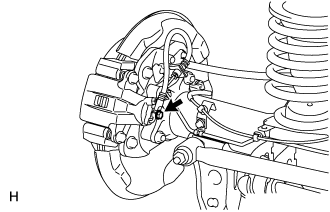 |
Remove the union bolt and gasket, and then disconnect the flexible hose from the rear disc brake cylinder. Use a container to catch brake fluid as it drains out.
| 4. REMOVE REAR DISC BRAKE CYLINDER ASSEMBLY LH |
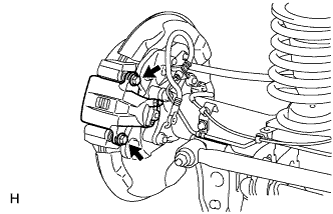 |
Remove the 2 slide pins.
Remove the cylinder from the rear disc brake cylinder mounting.
| 5. REMOVE REAR DISC BRAKE PAD |
Remove the 2 brake pads from the rear disc brake cylinder mounting.
- NOTICE:
- When removing the pads, make sure that the No. 1 and No. 2 disc brake pad support plates remain securely attached to the cylinder mounting. The pad support plates are attached to the cylinder mounting with double-sided tape.
- If a pad support plate is not securely attached to the cylinder mounting, replace it with a new one.
| 6. REMOVE REAR DISC BRAKE ANTI-SQUEAL SHIM KIT |
Remove the anti-squeal shims from each disc brake pad.
| 7. REMOVE REAR DISC BRAKE PAD WEAR INDICATOR PLATE |
Remove the pad wear indicator plate from the inner side disc brake pad.
| 8. REMOVE REAR NO. 1 DISC BRAKE PAD SUPPORT PLATE |
- NOTICE:
- The pad support plates can be reused if they are securely attached to the cylinder mounting. Therefore, do not remove the pad support plates from the cylinder mounting. The pad support plates are attached to the cylinder mounting with double-sided tape.
- If it is necessary to remove the pad support plates, replace them with new ones.
Remove the 2 pad support plates from the rear disc brake cylinder mounting.
| 9. REMOVE REAR NO. 2 DISC BRAKE PAD SUPPORT PLATE |
- NOTICE:
- The pad support plates can be reused if they are securely attached to the cylinder mounting. Therefore, do not remove the pad support plates from the cylinder mounting. The pad support plates are attached to the cylinder mounting with double-sided tape.
- If it is necessary to remove the pad support plates, replace them with new ones.
Remove the 2 pad support plates from the rear disc brake cylinder mounting.
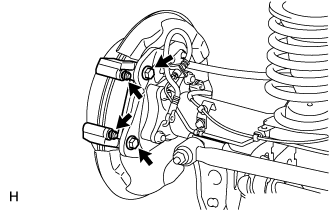
| 10. REMOVE REAR DISC BRAKE CYLINDER MOUNTING LH |
Remove the 2 bolts and rear disc brake cylinder mounting.
- NOTICE:
- If the pad supports are removed during maintenance of parts, replace them with new ones.
 |
Remove the cylinder slide bush and boot from the rear disc brake cylinder mounting.
| 11. REMOVE PARKING BRAKE SHOE ADJUSTING HOLE PLUG |
| 12. REMOVE REAR DISC |
Put matchmarks on the rear disc and axle hub if planning to reuse the disc.
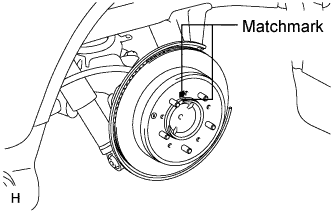 |
Turn the shoe adjuster as shown in the illustration until the disc turns freely, and then remove the disc.
 |