OPEN STABILIZER CONTROL WITH ACCUMULATOR HOUSING SHUTTER VALVE (w/ KDSS)
REMOVE REAR NO. 1 FLOOR HEAT INSULATOR (w/ Active Height Control)
DISCHARGE SUSPENSION FLUID PRESSURE (w/ Active Height Control)
DISCONNECT NO. 4 SUSPENSION CONTROL PRESSURE HOSE (w/ Active Height Control)
REMOVE REAR SHOCK ABSORBER ASSEMBLY LH (w/ Active Height Control)
REMOVE REAR SHOCK ABSORBER ASSEMBLY LH (w/o Active Height Control)
Rear Shock Absorber -- Removal |
- HINT:
- Use the same procedures for the RH side and LH side.
- The procedures listed below are for the LH side.
| 1. REMOVE STABILIZER CONTROL VALVE PROTECTOR (w/ KDSS) |
Detach the clamp, and disconnect the connector from the protector.
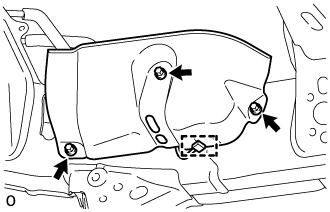 |
Remove the 3 bolts and protector.
| 2. OPEN STABILIZER CONTROL WITH ACCUMULATOR HOUSING SHUTTER VALVE (w/ KDSS) |
Using a 5 mm hexagon socket wrench, loosen the lower and upper chamber shutter valves of the stabilizer control with accumulator housing 2.0 to 3.5 turns.

- NOTICE:
- When loosening a shutter valve, make sure that the end protrudes 2 to 3.5 mm (0.0787 to 0.137 in.) from the surface of the block, and do not turn the shutter valve any further.
- Do not remove the shutter valves.
| 3. REMOVE REAR WHEEL |
| 4. REMOVE EXHAUST PIPE ASSEMBLY (w/ Active Height Control) |
for 1UR-FE: Click here
for 1VD-FTV: Click here
for 3UR-FE: Click here
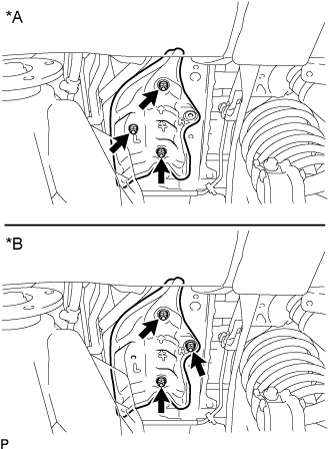
| 5. REMOVE REAR NO. 1 FLOOR HEAT INSULATOR (w/ Active Height Control) |
Remove the 3 bolts and rear No. 1 floor heat insulator.
Text in Illustration *A for LHD *B for RHD
 |
| 6. REMOVE FUEL TANK (w/ Active Height Control) |
- HINT:
- When removing the rear shock absorber assembly RH, also remove the fuel tank.
for 1VD-FTV: Click here
for 3UR-FE: Click here
for 1UR-FE: Click here
| 7. DISCONNECT NO. 3 PARKING BRAKE CABLE ASSEMBLY |
Remove the bolt and disconnect the No. 3 parking brake cable.
| 8. DISCONNECT NO. 2 PARKING BRAKE CABLE ASSEMBLY |
Remove the bolt and disconnect the No. 2 parking brake cable.
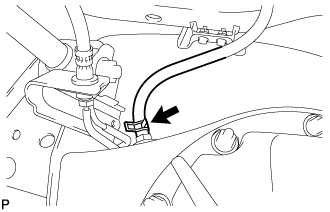
| 9. DISCONNECT REAR AXLE BREATHER HOSE SUB-ASSEMBLY |
Disconnect the rear axle breather hose from the rear axle housing assembly.
 |
| 10. DISCHARGE SUSPENSION FLUID PRESSURE (w/ Active Height Control) |
Connect a hose to the bleeder plug for the height control accumulator and loosen the bleeder plug.
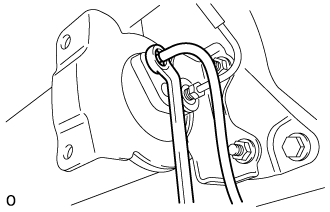 |
Discharge the suspension fluid pressure.
After the fluid pressure has dropped and oil has drained out, tighten the bleeder plug and remove the hose.
- Torque:
- 6.9 N*m{70 kgf*cm, 61 in.*lbf}
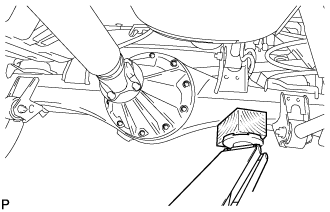
| 11. SUPPORT REAR AXLE HOUSING ASSEMBLY |
Support the rear axle housing with a jack using a wooden block to avoid damage.
 |
| 12. DISCONNECT REAR LATERAL CONTROL ROD ASSEMBLY |
Remove the bolt and nut, and disconnect the rear lateral control rod from the frame.
 |
| 13. DISCONNECT REAR SHOCK ABSORBER ASSEMBLY RH |
Remove the bolt on the lower side of the shock absorber.
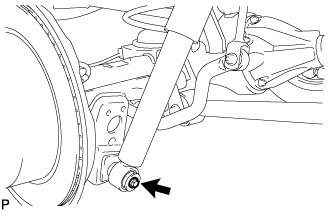 |
Disconnect the shock absorber from the axle housing.
| 14. DISCONNECT NO. 4 SUSPENSION CONTROL PRESSURE HOSE (w/ Active Height Control) |
Remove the 2 bolts and disconnect the pressure hose from the shock absorber.
 |
| 15. REMOVE REAR SHOCK ABSORBER ASSEMBLY LH (w/ Active Height Control) |
Remove the bolt on the lower side of the shock absorber.
 |
Using SST, hold the rear shock absorber in place.
- SST
- 09224-00011
09961-01270
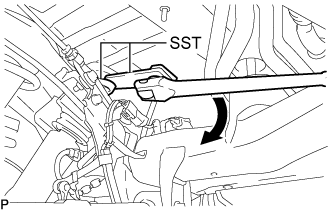 |
Remove the nut, upper bracket and shock absorber assembly.
Remove the lower bracket from the shock absorber.
| 16. REMOVE REAR SHOCK ABSORBER ASSEMBLY LH (w/o Active Height Control) |
Remove the bolt on the lower side of the shock absorber.
 |
Using SST, hold the rear shock absorber in place.
- SST
- 09922-10010
 |
Remove the nut, upper bracket and shock absorber assembly.
Remove the lower bracket from the shock absorber.