Fuel Lid Lock Control Cable Assembly (For Single Cab) -- Removal |
| 1. REMOVE FRONT SEAT ASSEMBLY LH |
| 2. REMOVE FRONT SEAT ASSEMBLY RH |
for Manual Seat:
- HINT:
- Use the same procedure described for the LH side.
for Bench Seat Type:
(HILUX_TGN26 RM000000Z9000EX.html)
| 3. REMOVE CONSOLE BOX ASSEMBLY (w/ Console Box Lid) |
| 4. REMOVE UPPER BACK PANEL GARNISH |
 |
Detach the 4 claws, 4 guides and 5 clips and remove the upper back panel garnish.
| 5. REMOVE FRONT DOOR SCUFF PLATE LH |
 |
Put protective tape around the front door scuff plate.
Text in Illustration *1 Protective Tape
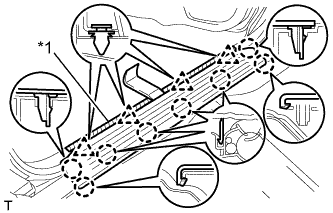
Using a moulding remover, detach the 4 clips and 8 claws and remove the front door scuff plate.
| 6. REMOVE COWL SIDE TRIM BOARD LH |
 |
Remove the part of the front door opening trim attached to the cowl side trim board.
Remove the clip.
Detach the 2 clips and remove the cowl side trim board.
| 7. REMOVE LOWER QUARTER TRIM PANEL LH |
 |
Remove the bolt and disconnect the front seat outer belt floor anchor.
Remove the part of the front door opening trim attached to the lower quarter trim panel.
 |
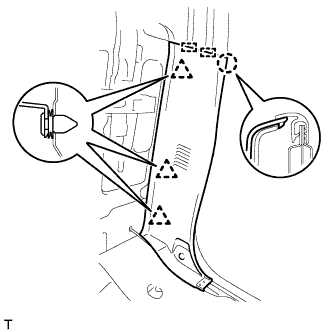
Detach the claw, 3 clips and 2 guides and remove the lower quarter trim panel.
| 8. REMOVE FRONT FLOOR CARPET ASSEMBLY |
Partially remove the floor carpet.
- HINT:
- It is not necessary to fully remove the floor carpet. Partially remove it so that the lock control cable can be removed in a later step.
| 9. REMOVE REAR NO. 1 WHEEL OPENING EXTENSION SUB-ASSEMBLY LH (w/ Over Fender) |
Put protective tape around the rear No. 1 wheel opening extension.
Text in Illustration *1 Protective Tape
 |
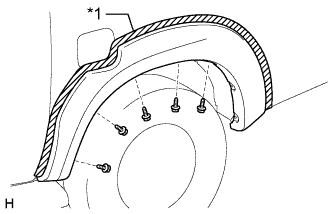
Remove the 5 screws.
Detach the 11 clips and remove the No. 1 rear wheel opening extension.
 |
Remove the 11 clips from the vehicle body.
| 10. REMOVE REAR WHEEL HOUSE LINER LH |
Partially remove the rear wheel house liner.
- HINT:
- It is not necessary to fully remove the liner. Partially remove it so that the lock control cable can be removed in a later step.
| 11. REMOVE FUEL LID LOCK CONTROL CABLE SUB-ASSEMBLY |
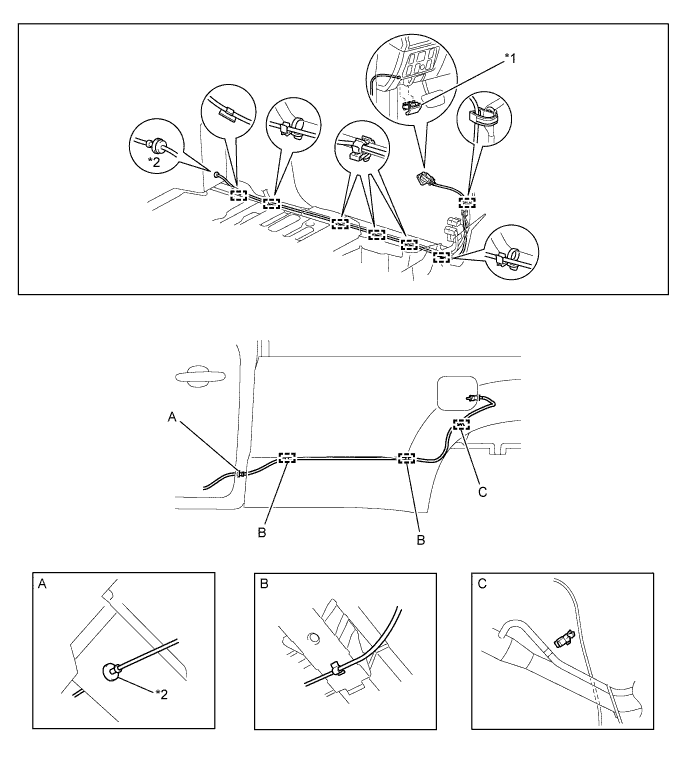
Remove the fuel lid lock open lever.
Remove the grommet from the vehicle body.
Detach the cable from the clamps shown in the illustration.

Text in Illustration *1 Fuel Lid Lock Open Lever *2 Grommet
Turn the fuel filler opening lid lock retainer counterclockwise and remove the cable from the fuel filler opening lid lock retainer.
 |
| 12. REMOVE FUEL FILLER OPENING LID LOCK RETAINER |
 |
Turn the fuel filler opening lid lock retainer clockwise and remove the fuel filler opening lid lock retainer as shown in the illustration.